


Contents
- 1 Campaign Recipients [CSV file]
- 2 Follow-up Conditions
- 3 Sending Methods
- 4 Send follow-up in same thread with the previous emails
- 5 Link Tracking in Mail Merge campaign
- 6 Time Interval Between Two Emails
- 7 Schedule Campaign
- 8 Mark CC & BCC
- 9 Add Unsubscribe Link
- 10 Domain Block
- 11 Know the status of your campaign
Here, we are going to show you how one can schedule 9 back to back automated follow-up emails using Saleshandy’s feature also one of the email drip campaign best practices.
Setting-up automated follow-ups to your mail merge campaigns will drastically increase your chances to get a response. SalesHandy can help send personalized mail merge campaign with automated follow-up from Gmail, Outlook, or any other email service provider.
This blog post contains the detailed explanation & importance of each functionality provided by SalesHandy’s Auto follow-up Feature.
We are pretty sure that you are gonna love what we have built.
Campaign Recipients [CSV file]
You can have up to 20 columns in the CSV file to craft a personalized email. Having one column is necessary in order to send a mail merge with auto followup. This column is not case-sensitive so it will accept word “email” written in both upper & lower case letters.
- SalesHandy supports three separators- comma, semicolon, and tab in the CSV file.
- See the preview recipients’ details after selecting a CSV file.
- SalesHandy supports UTF-8 character encoding so that you write a message in any language you want to send.
- Auto Error Handlings:
- If recipient list exceeds the limit of 200 and the user is not in Enterprise plan, it will be removed automatically after 200th row from the CSV file.
- If your CSV contains invalid rows & columns, it will be removed automatically from the CSV file.
- After uploading the CSV, you’ll get an option to verify your email list. Click Ok and cleanse your list by deleting all the invalid, inactive and fake email addresses. This will increase your sender reputation by decreasing your bounce rate.
Follow-up Conditions
After writing your first email, schedule a series of auto follow-up emails up to 9 stages. Set up any of three conditions, “Not replied to,” “Not opened” and “been sent.”
- Not replied: Select this condition if you want to send follow-up emails to the recipients who have not replied to your previous stage email.
- Not opened: Select this condition if you want to send follow-up emails to the recipients who have not opened your previous email.
- Been sent: Select this condition if you want to send follow-up emails to all the recipients in your CSV file.
Sending Methods
You can send email campaign from any email address you want.i.e., Gmail, Outlook or any other emails client.

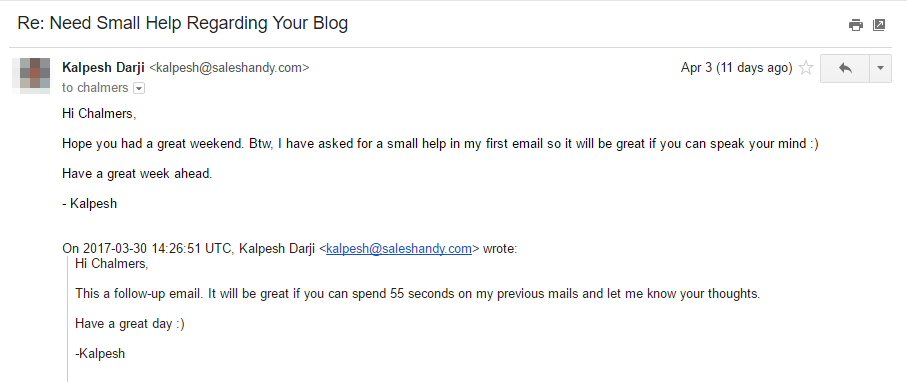
Send follow-up in same thread with the previous emails
You can check the toggle button as shown as below image to send follow-up emails in the same thread with previous emails. Your message will be seen as a reply to the recipients.
Your recipient can know that previously, you already sent emails on the same matter.

Link Tracking in Mail Merge campaign
Link tracking in Mail Merge helps you analyze how subscribers interact with your email campaigns. When you enable link tracking in a Mail Merge campaign, this feature tracks how many recipients have clicked links in your email messages.

Track all your links in your Mail Merge Campaign and know how many times recipients open the particular link.
Time Interval Between Two Emails
You can set “interval” in seconds between two emails while sending mass emails. It helps your email landing in recipient’s inbox instead of “spam” folder.
- How does Time Interval help increasing email deliverability?Usually, a person can send maximum 2-3 emails in one minute so if you send mass emails from your Gmail or any other email account your Email service provider may find this activity suspicious, and your emails may go to spam folder. So when you send mass emails by setting up time interval, Email service providers consider that you are sending a one-one email and all of your emails will go to Inbox.
- For example, if you set a sending interval of 40 seconds between two emails for 200 recipients, your campaign will take 132 minutes ~ 2.20 hours(199*200 recipients) to complete. If you don’t set any time interval then by default SalesHandy applies min 60 seconds to 90 seconds interval.
- However, you can set sending interval as low as 0 sec and max 180 sec. With these limits, you can control how fast you want to shoot the auto follow-up campaign.

Schedule Campaign
- Schedule an email campaign to be sent later. It is mandatory to schedule campaign at least 15 minutes in future time from the current time.
- You can schedule email campaign using Date, Time and Time zone.
- Please note that you can not change the time for auto follow-up emails. Your follow-up emails will be sent on the other day(as per your selection) at the same time when the first email was sent.

Mark CC & BCC
- Add an email address in “CC” or “BCC” if you want to notify your manager about your email campaign. The person you have Cc’ed will get all the emails.
- You can mark BCC to your CRM software to log the campaign emails.
- Please note that Gmail counts CC’ed emails/recipients in your daily Gmail sending limit.
For example, if you are sending a campaign to 200 recipients from Gmail with CC’ed email, Gmail counts total 400 emails (Know Gmail/G suite’s daily sending limits).

Add Unsubscribe Link
SalesHandy allows the recipient to opt-out from the email list with the help of Unsubscribe tag. You can add an Unsubscribe tag to email at any stage of the campaign, so that recipient can have an option to opt-out from the email list.
Unsubscribe links are a very important part of any campaign:
- It builds trust with your subscribers.
- It decreases the likelihood of your campaign being marked as spam.
Domain Block
You can block sending emails to a given domain with SalesHandy’s “Domain Block” feature. Go to Email campaign and click on “Domain Block” button. After that, click on “Create Blocklist”. Upload a CSV file containing a list of Domains to be blocked. You can then choose an option to “Append the Existing List” or “Replace the Existing List” with the current list that you have uploaded as shown in the screenshot. Along with the option to upload domain blocklist CSV file to SalesHandy, you can also add/edit a single domain to domain blocklist.

Read more : 10 Mail Merge Software to Boost your Response
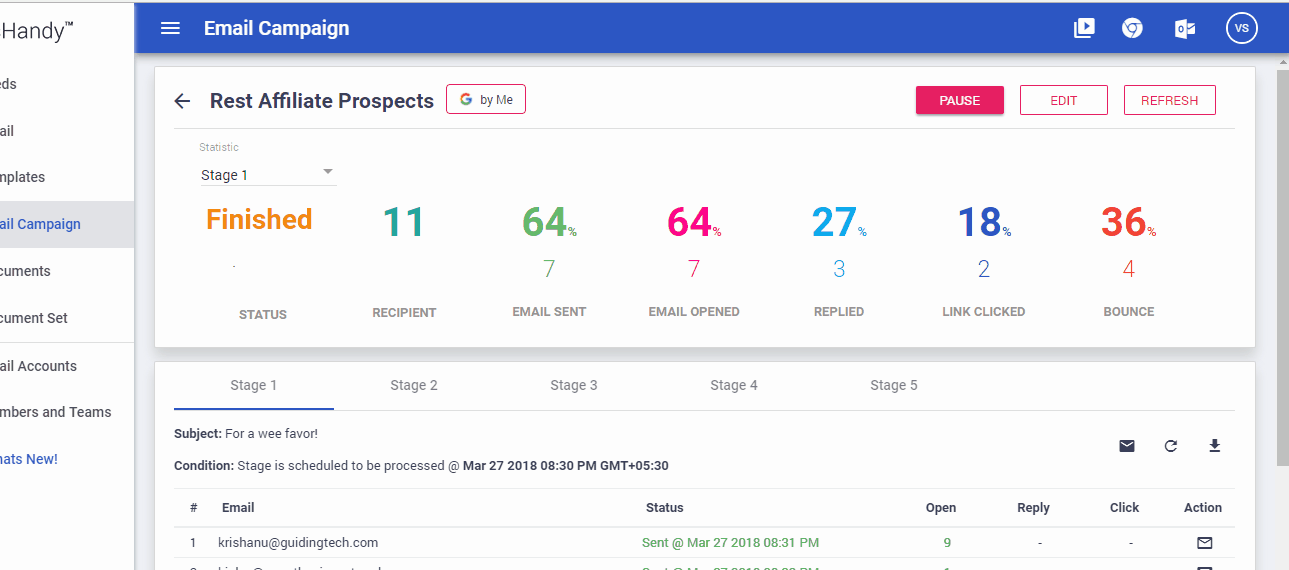
Know the status of your campaign
- Draft: It shows you haven’t scheduled your campaign. You have saved your campaign to edit it later.
- Scheduled: Campaign is scheduled and waiting to be triggered.
- Queued: Queue shows that saleshandy is preparing your campaign. Status changes to Queue before 15 minutes of the scheduled time.
- In Progress: SalesHandy is sending emails to the recipients.
- Paused: Pause implies that you have deliberately suspended your campaign. The campaign will also being paused if:-
- Change in SMTP credentials i.e. you have changed your password and have not updated the same on SalesHandy.
- Connection with Gmail might have revoked
- Waiting: Waiting implies that your outgoing email quota is exhausted.
- Finished: It indicates that your campaign has completed all stages successfully.
Hope this helps you to follow-up like pro!