
Sending personalized emails to a large list of recipients using Outlook can be extremely time-consuming (and frustrating!).
You either have to manually customize your email message for each recipient or send an impersonal email to all recipients at once.
Neither is ideal.
Fortunately, there is a third option! – Outlook’s mail merge feature lets you send personalized emails to a large contact list with minimal effort.
In this post, we’ll walk you through how to do mail merge in Outlook step-by-step.
How to Do Mail Merge in Outlook – Table of Contents
- What is mail merge in Outlook?
- How to do a mail merge in Outlook? – Step-by-step process
- Why mail merge in Outlook is not best for email personalization?
- How to send personalized emails from Outlook at scale?
- Conclusion
- FAQs
What is mail merge in Outlook?
Mail merge is a feature of Outlook that allows you to create and send personalized emails to a large list of recipients.
It works by linking an Excel spreadsheet containing contact details to an Outlook email message. In the email message, you just have to insert customizable fields like name, company, address, etc., to personalize your email for each recipient.
Based on the merge fields you add, Outlook will pull the info from your Excel spreadsheet and automatically generate individual emails for each contact.
As a result, the messages appear personalized with each recipient’s data merged into the email body and subject line.
For businesses, mail merge is the best way to add a personal touch when emailing customers, employees, subscribers, or other large lists.
Now that you know the basics, let’s look at how to set up a mail merge in Outlook.
Also Read: How to Schedule an Email in Outlook?
How to do a mail merge in Outlook? – Step-by-step process
Step 1 – Prepare your email document
Step 2 – Setup your Mailing list in MS Word
Step 3 – Link the mailing list with your email document
Step 4 – Insert mail merge fields to personalize email message
Step 5 – Finish & preview your mail merge
Step 6 – Send your mail merge message
Step 1 – Prepare your email document
The first step to performing a mail merge in Outlook is to write your email message.
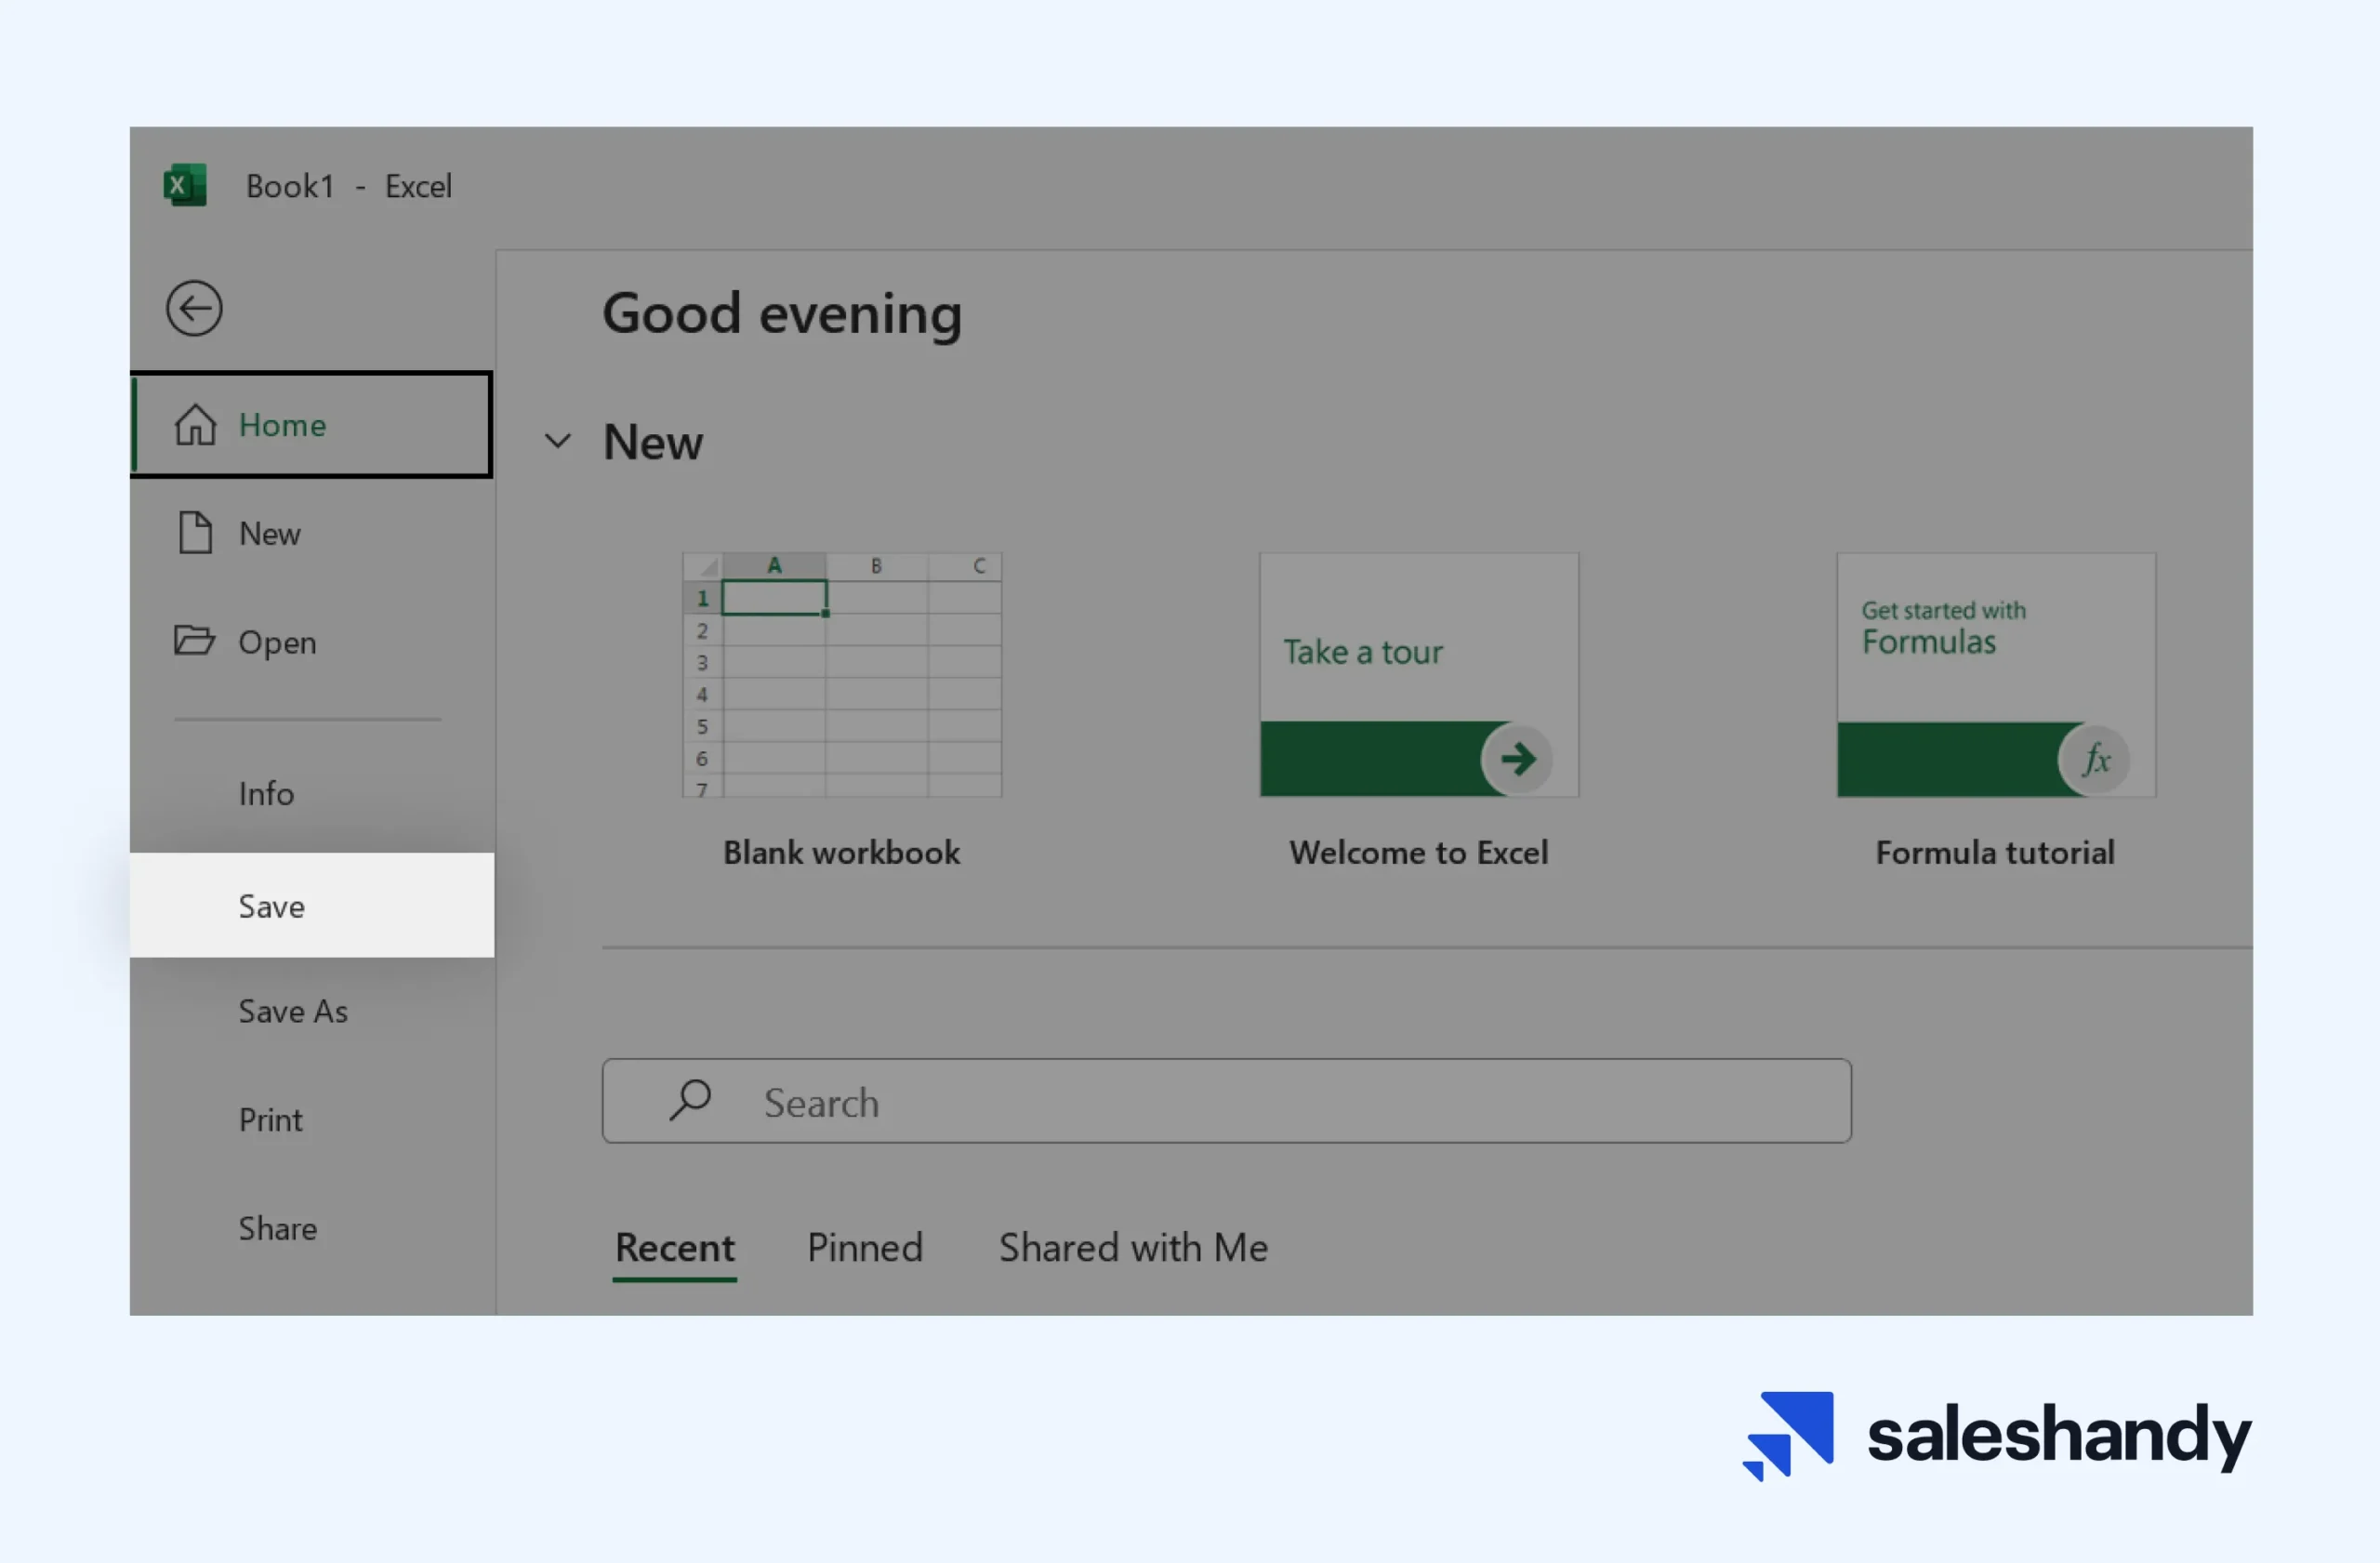
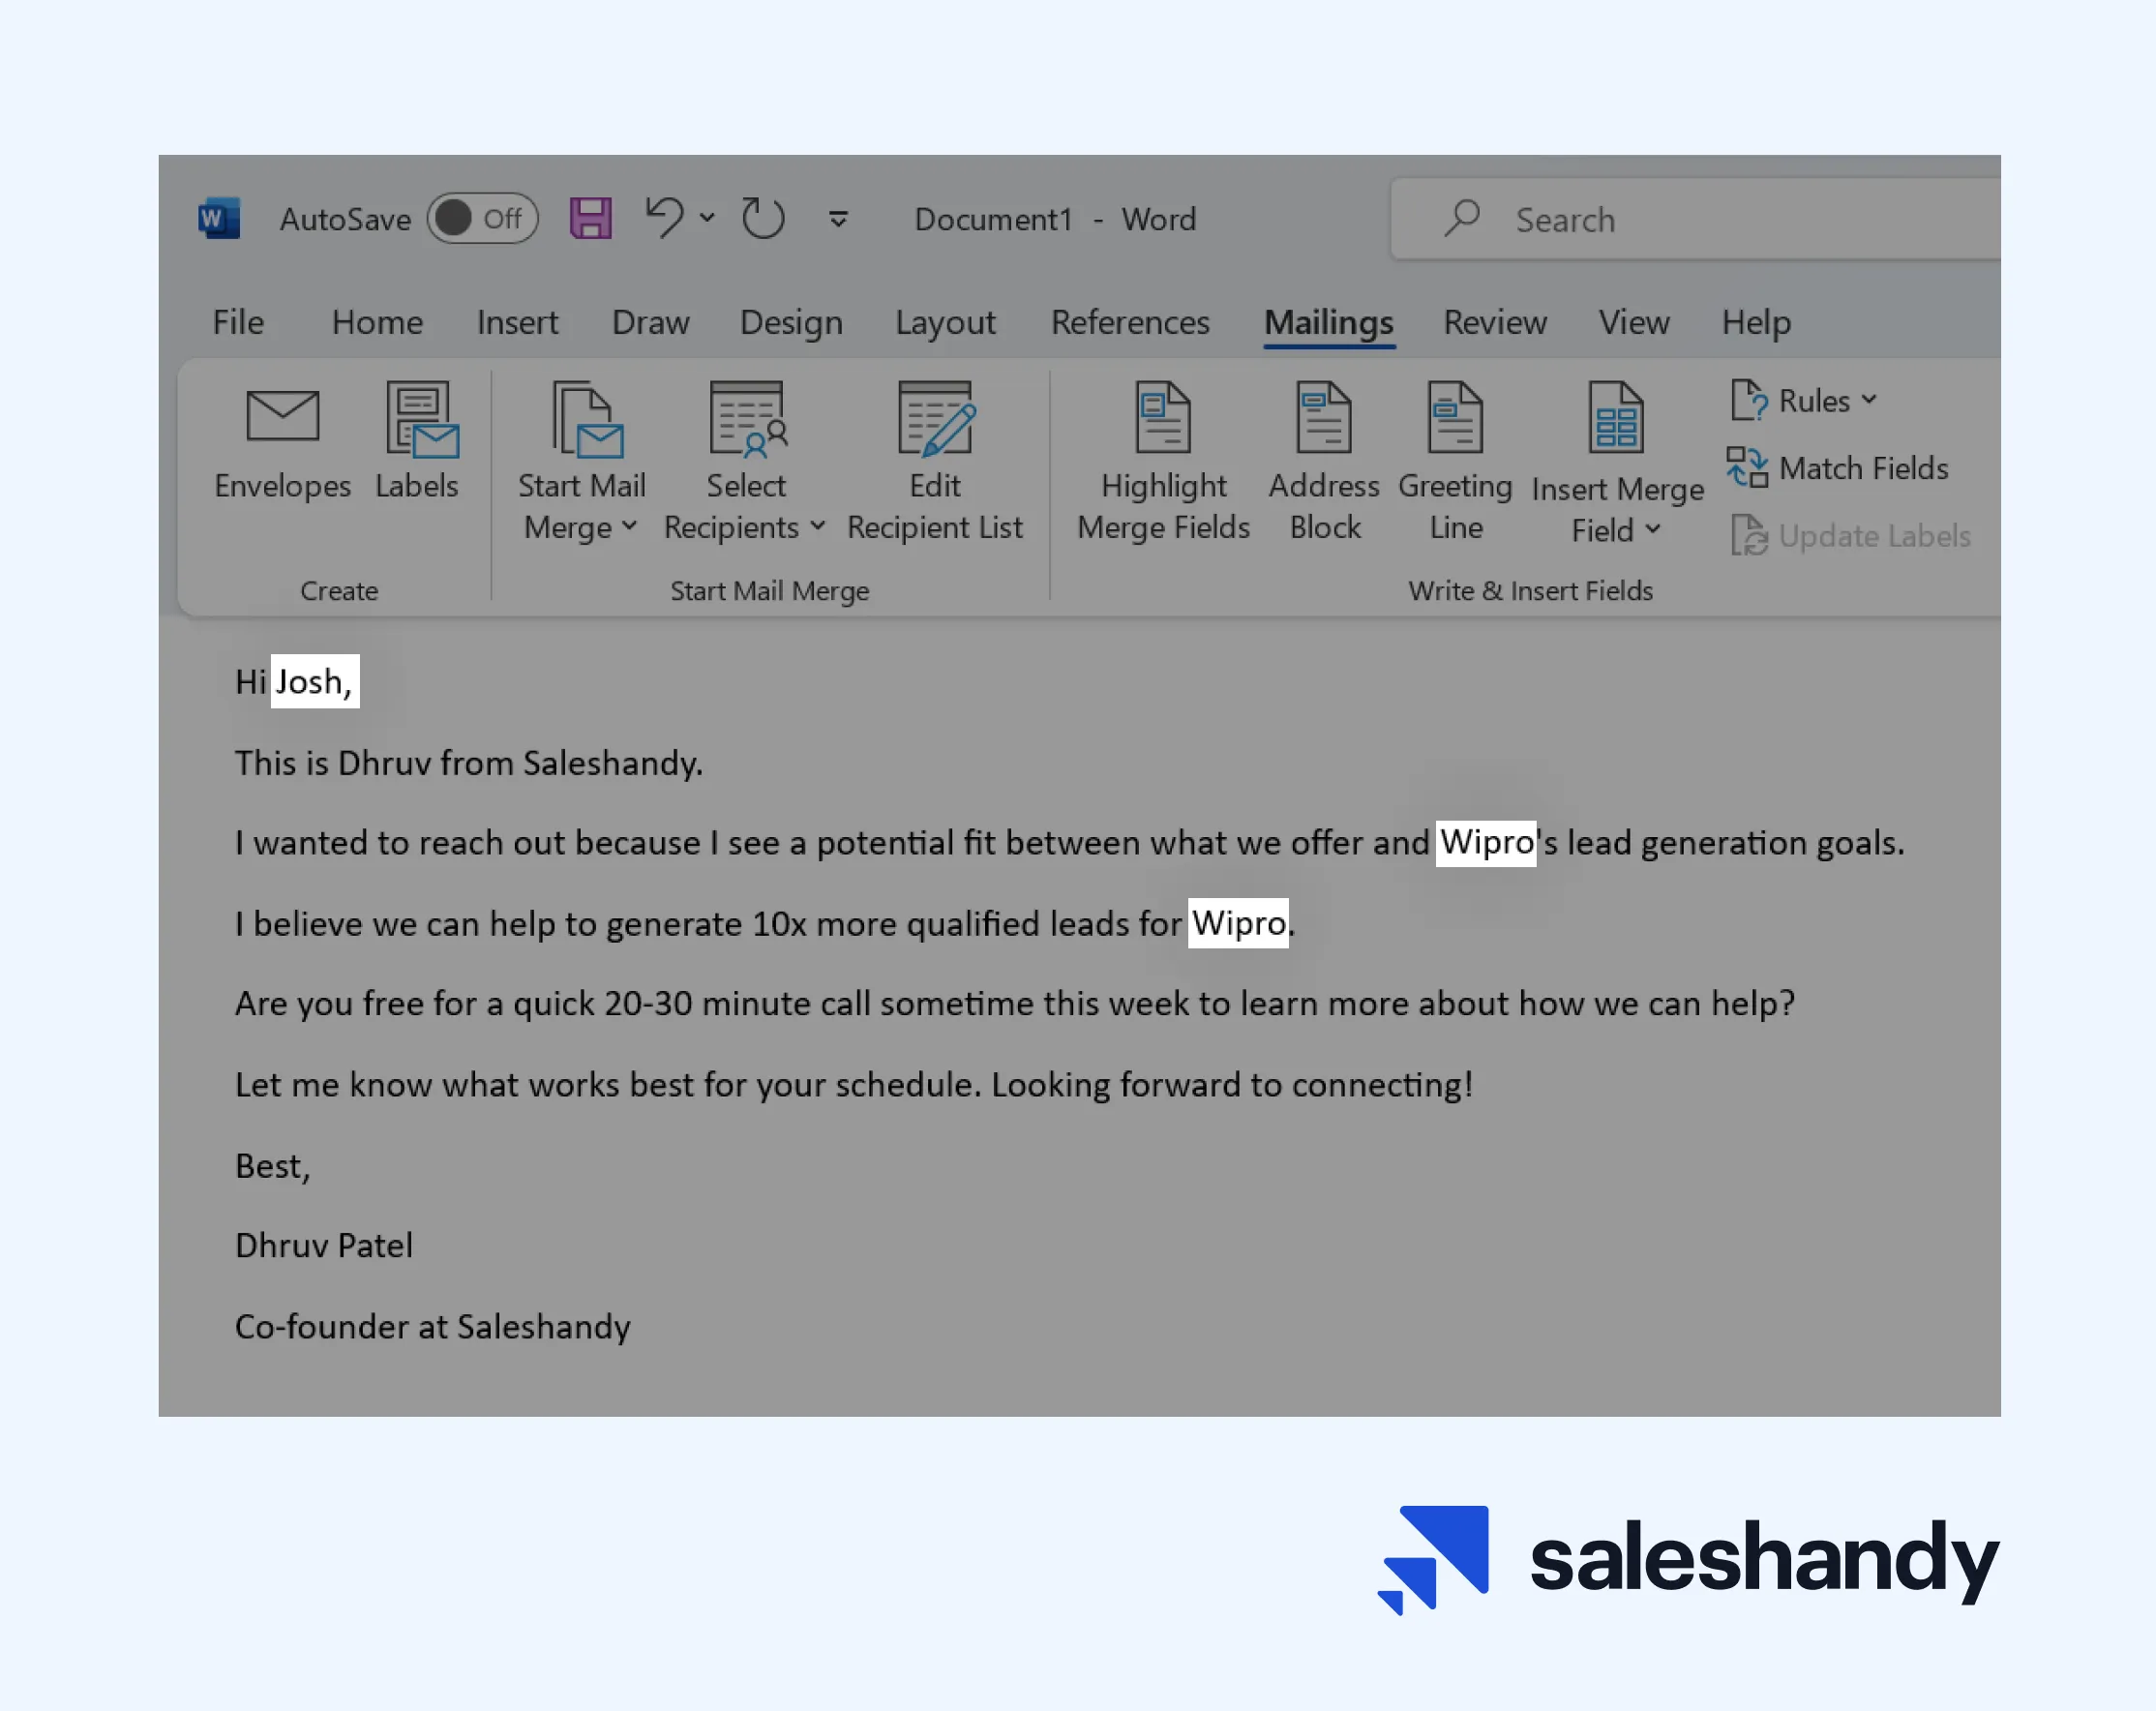
For this, you’ll need to open ‘Microsoft Word’ and select ‘Blank Document’ to create your mail merge email document.

Now, go to the Mailing tab>>Start Mail Merge >> E-mail messages.
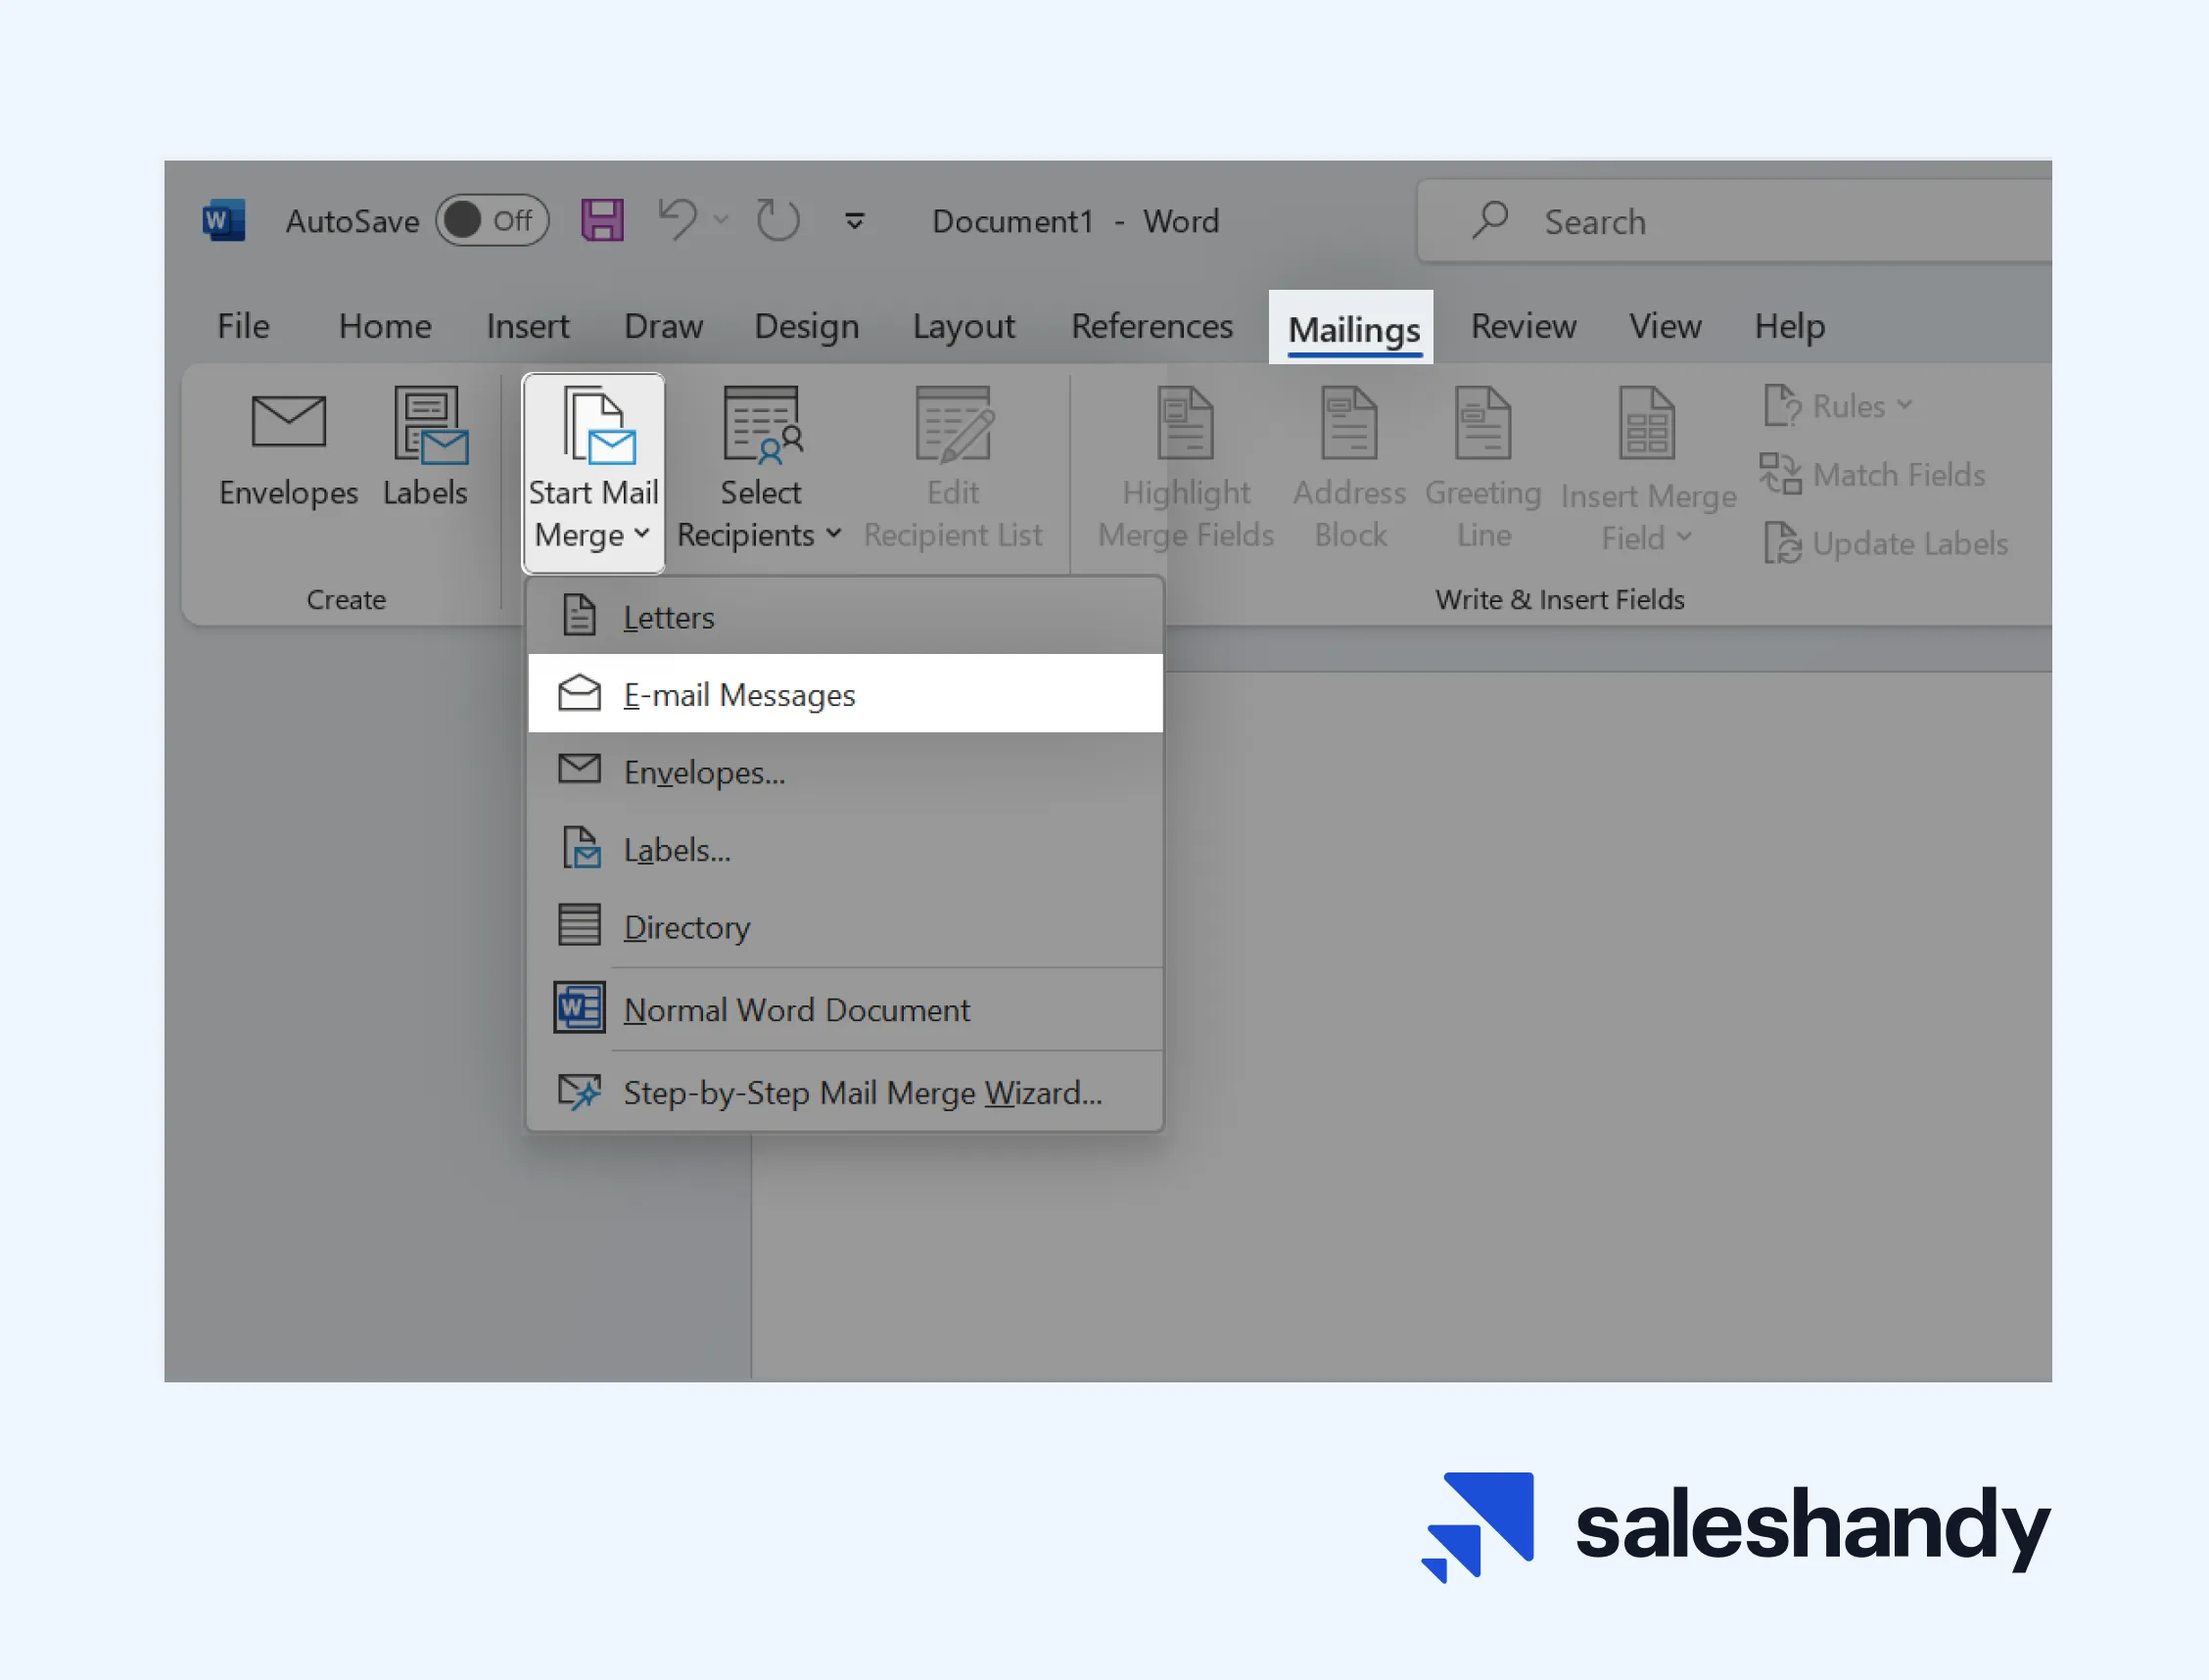
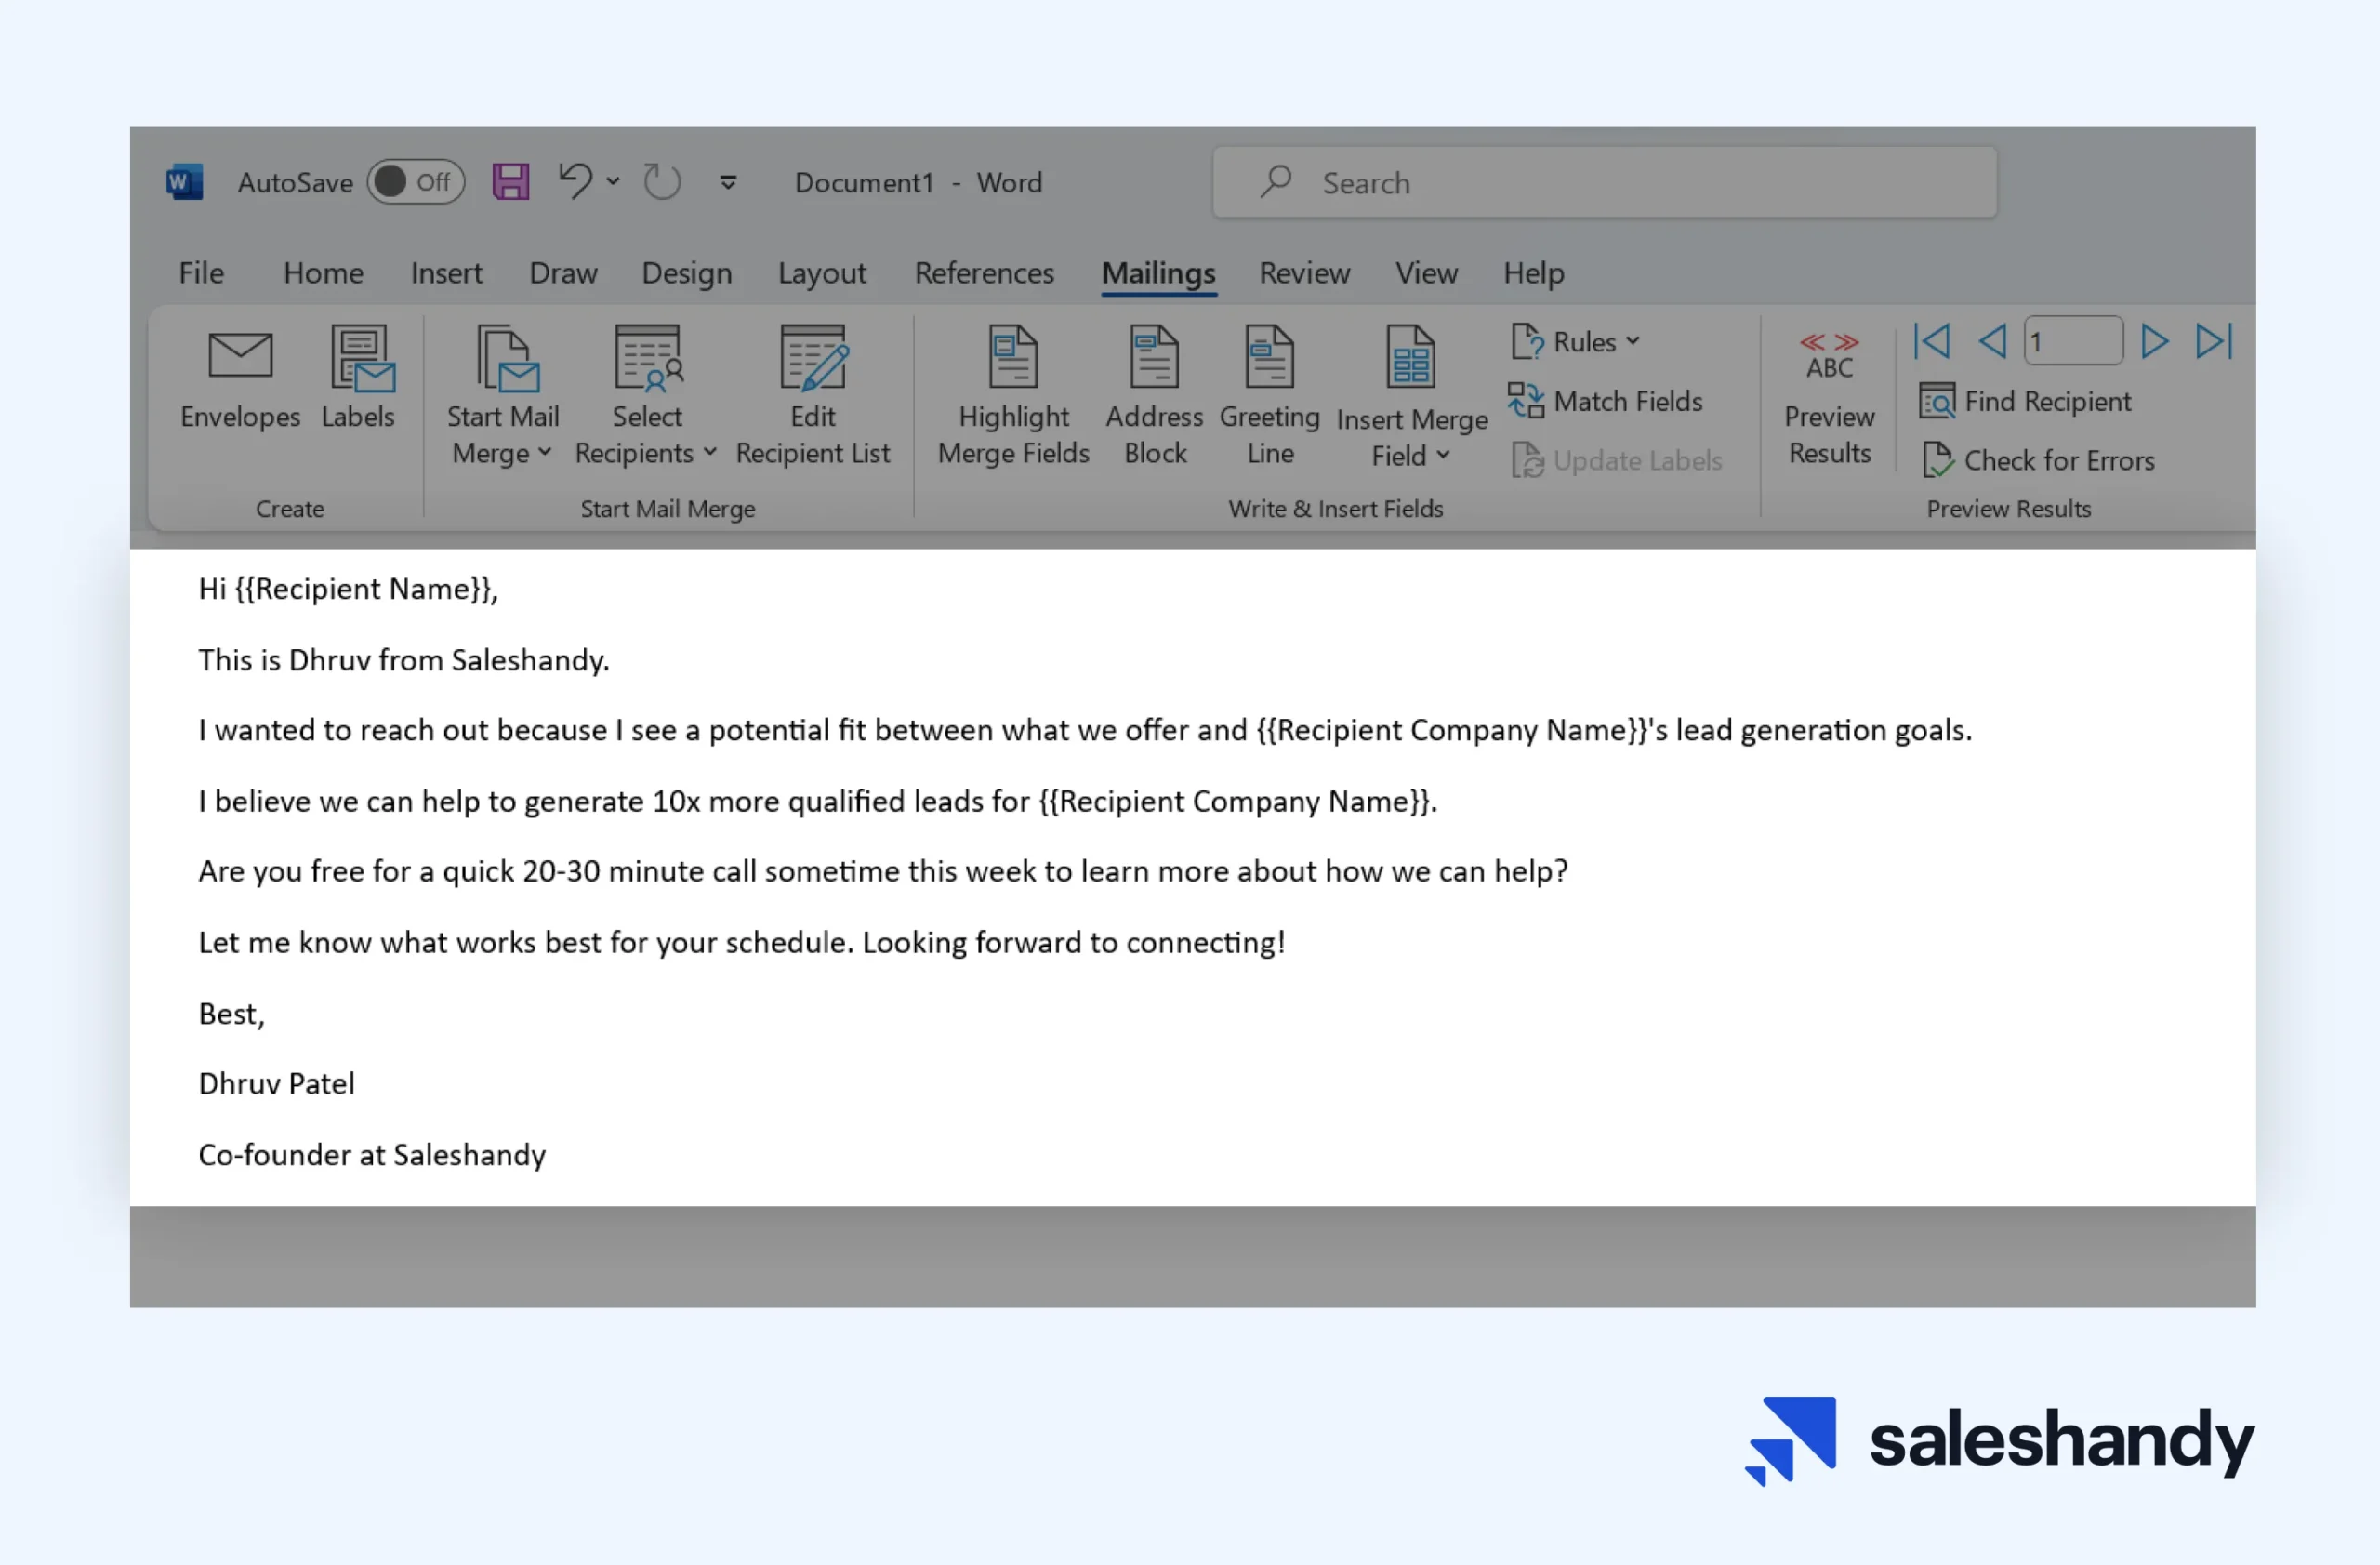
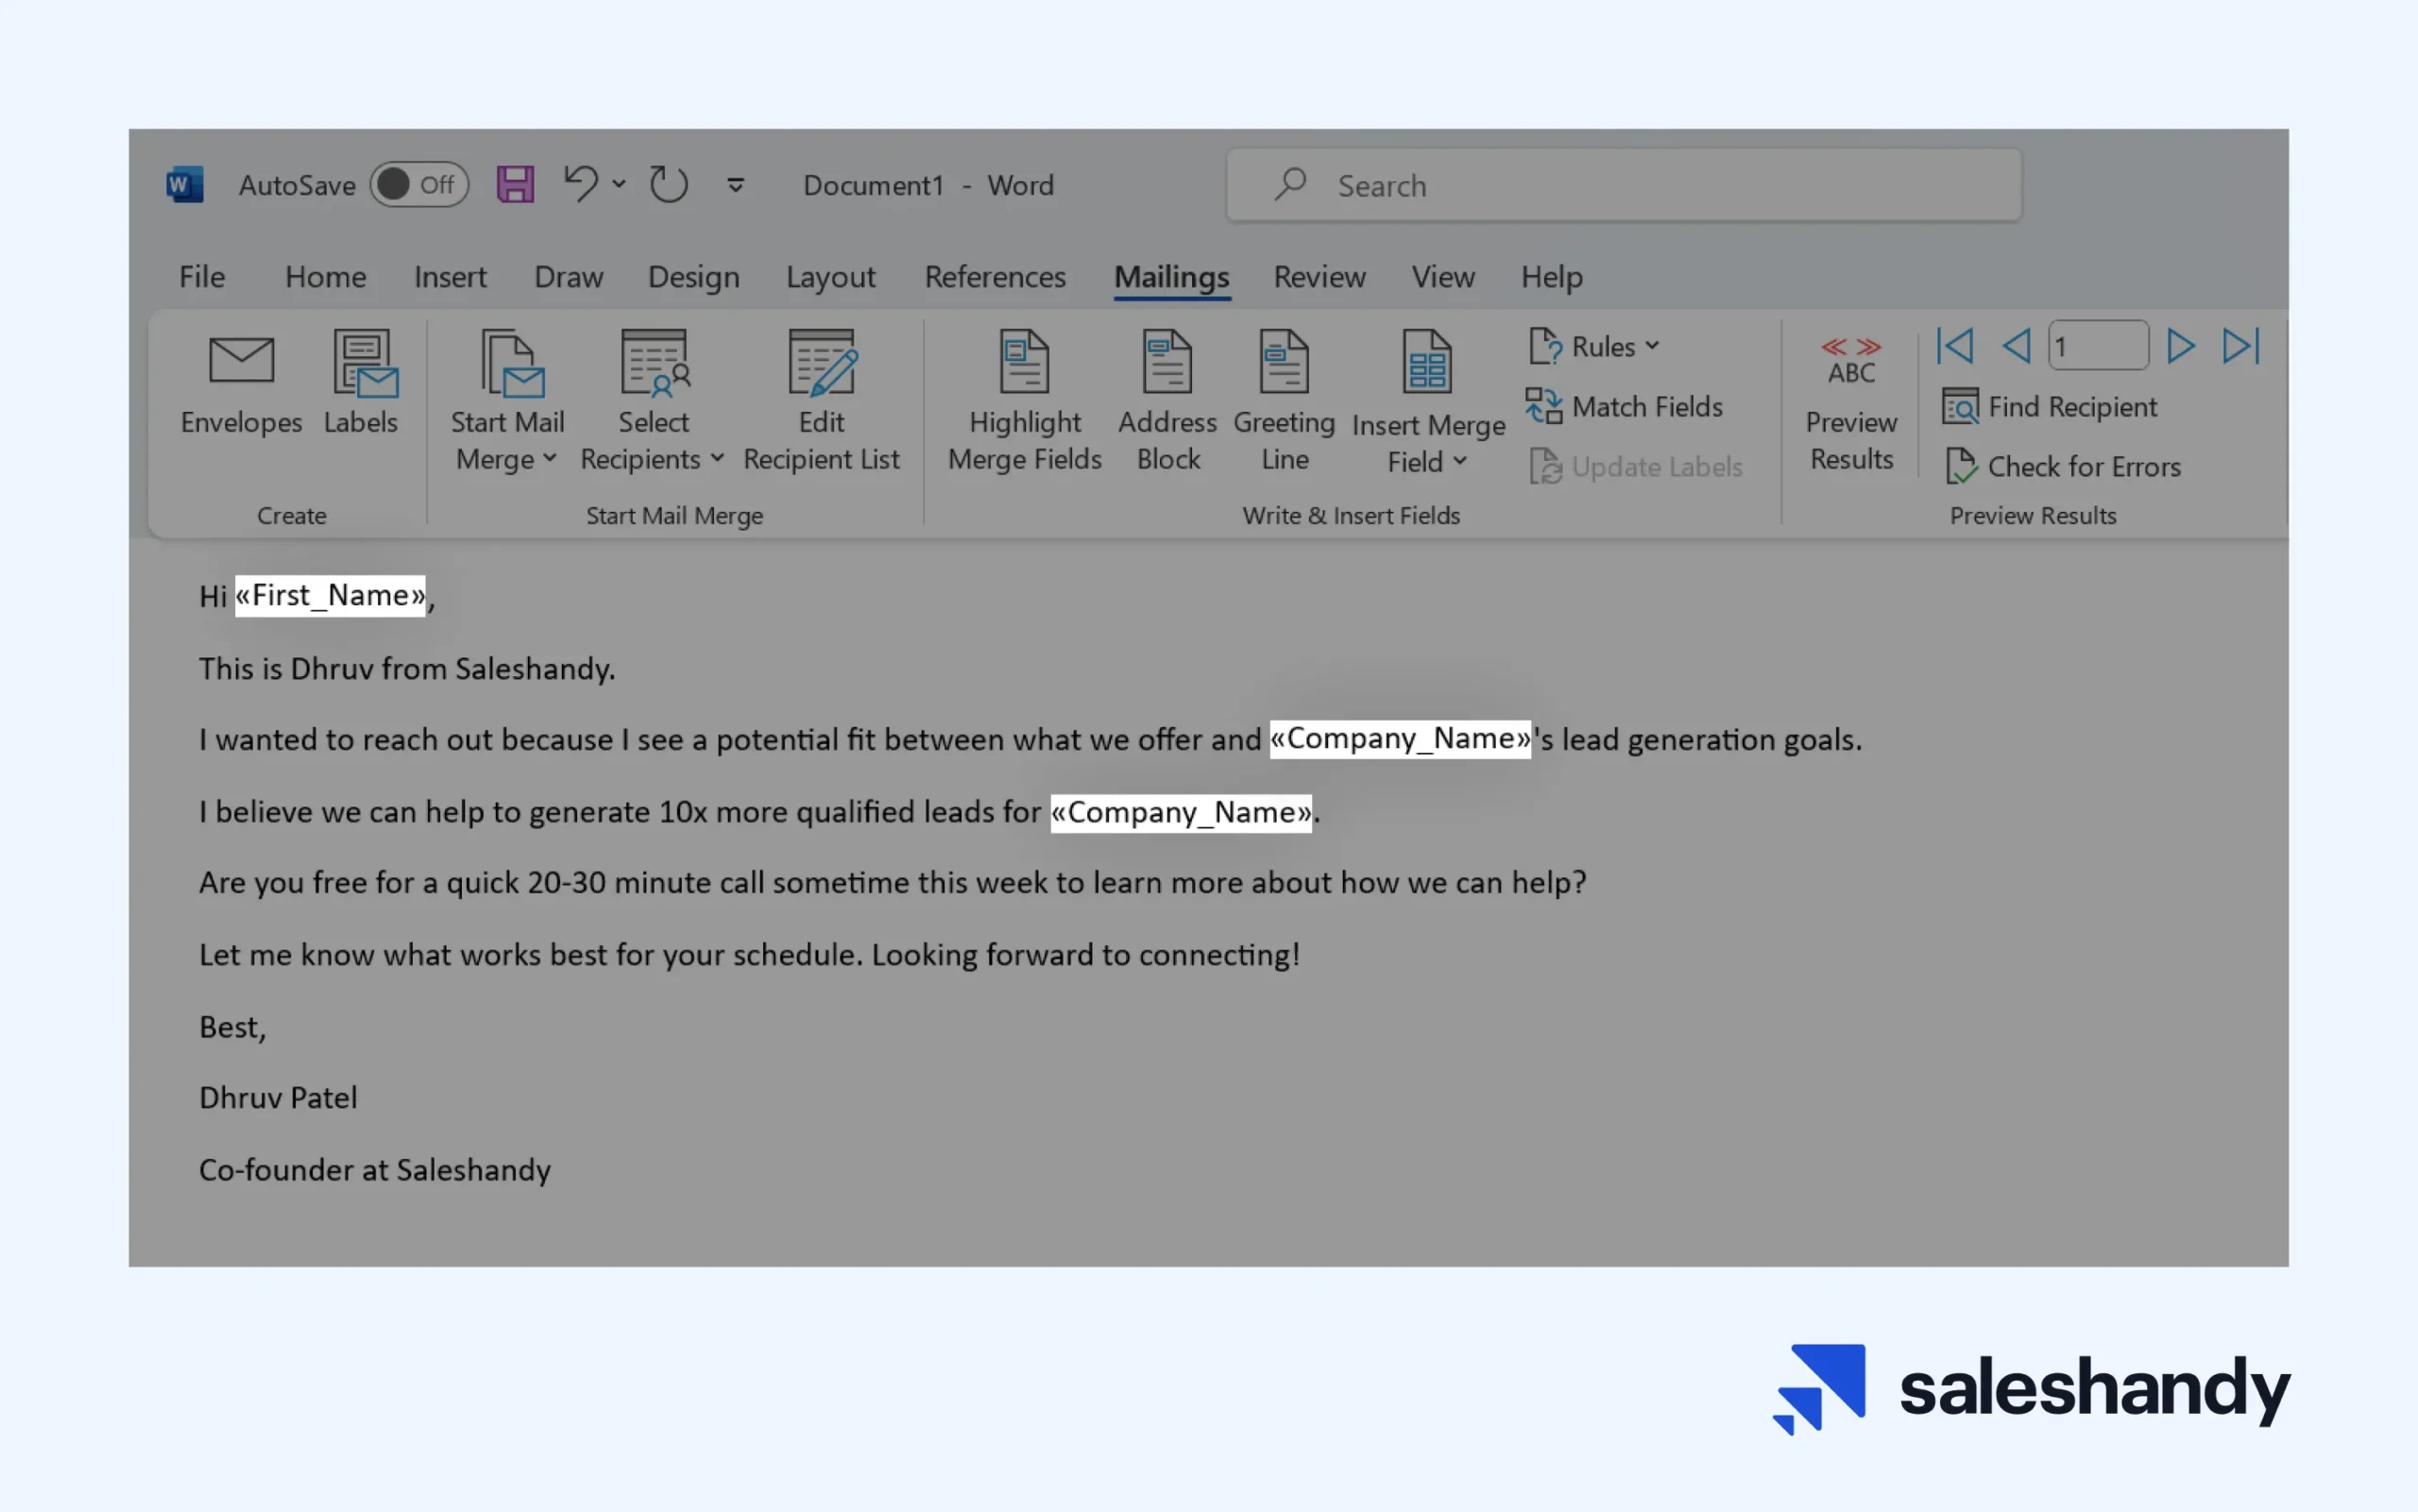
Now, type your email message with appropriate placeholders where you want to insert merge fields in the Word document.
After writing your email message, we will need to set up the mailing list in an Excel spreadsheet file.
Step 2 – Set up your mailing list in MS Excel
In order to send personalized emails using mail merge in Outlook, you’ll need to create an Excel spreadsheet with your recipient data.
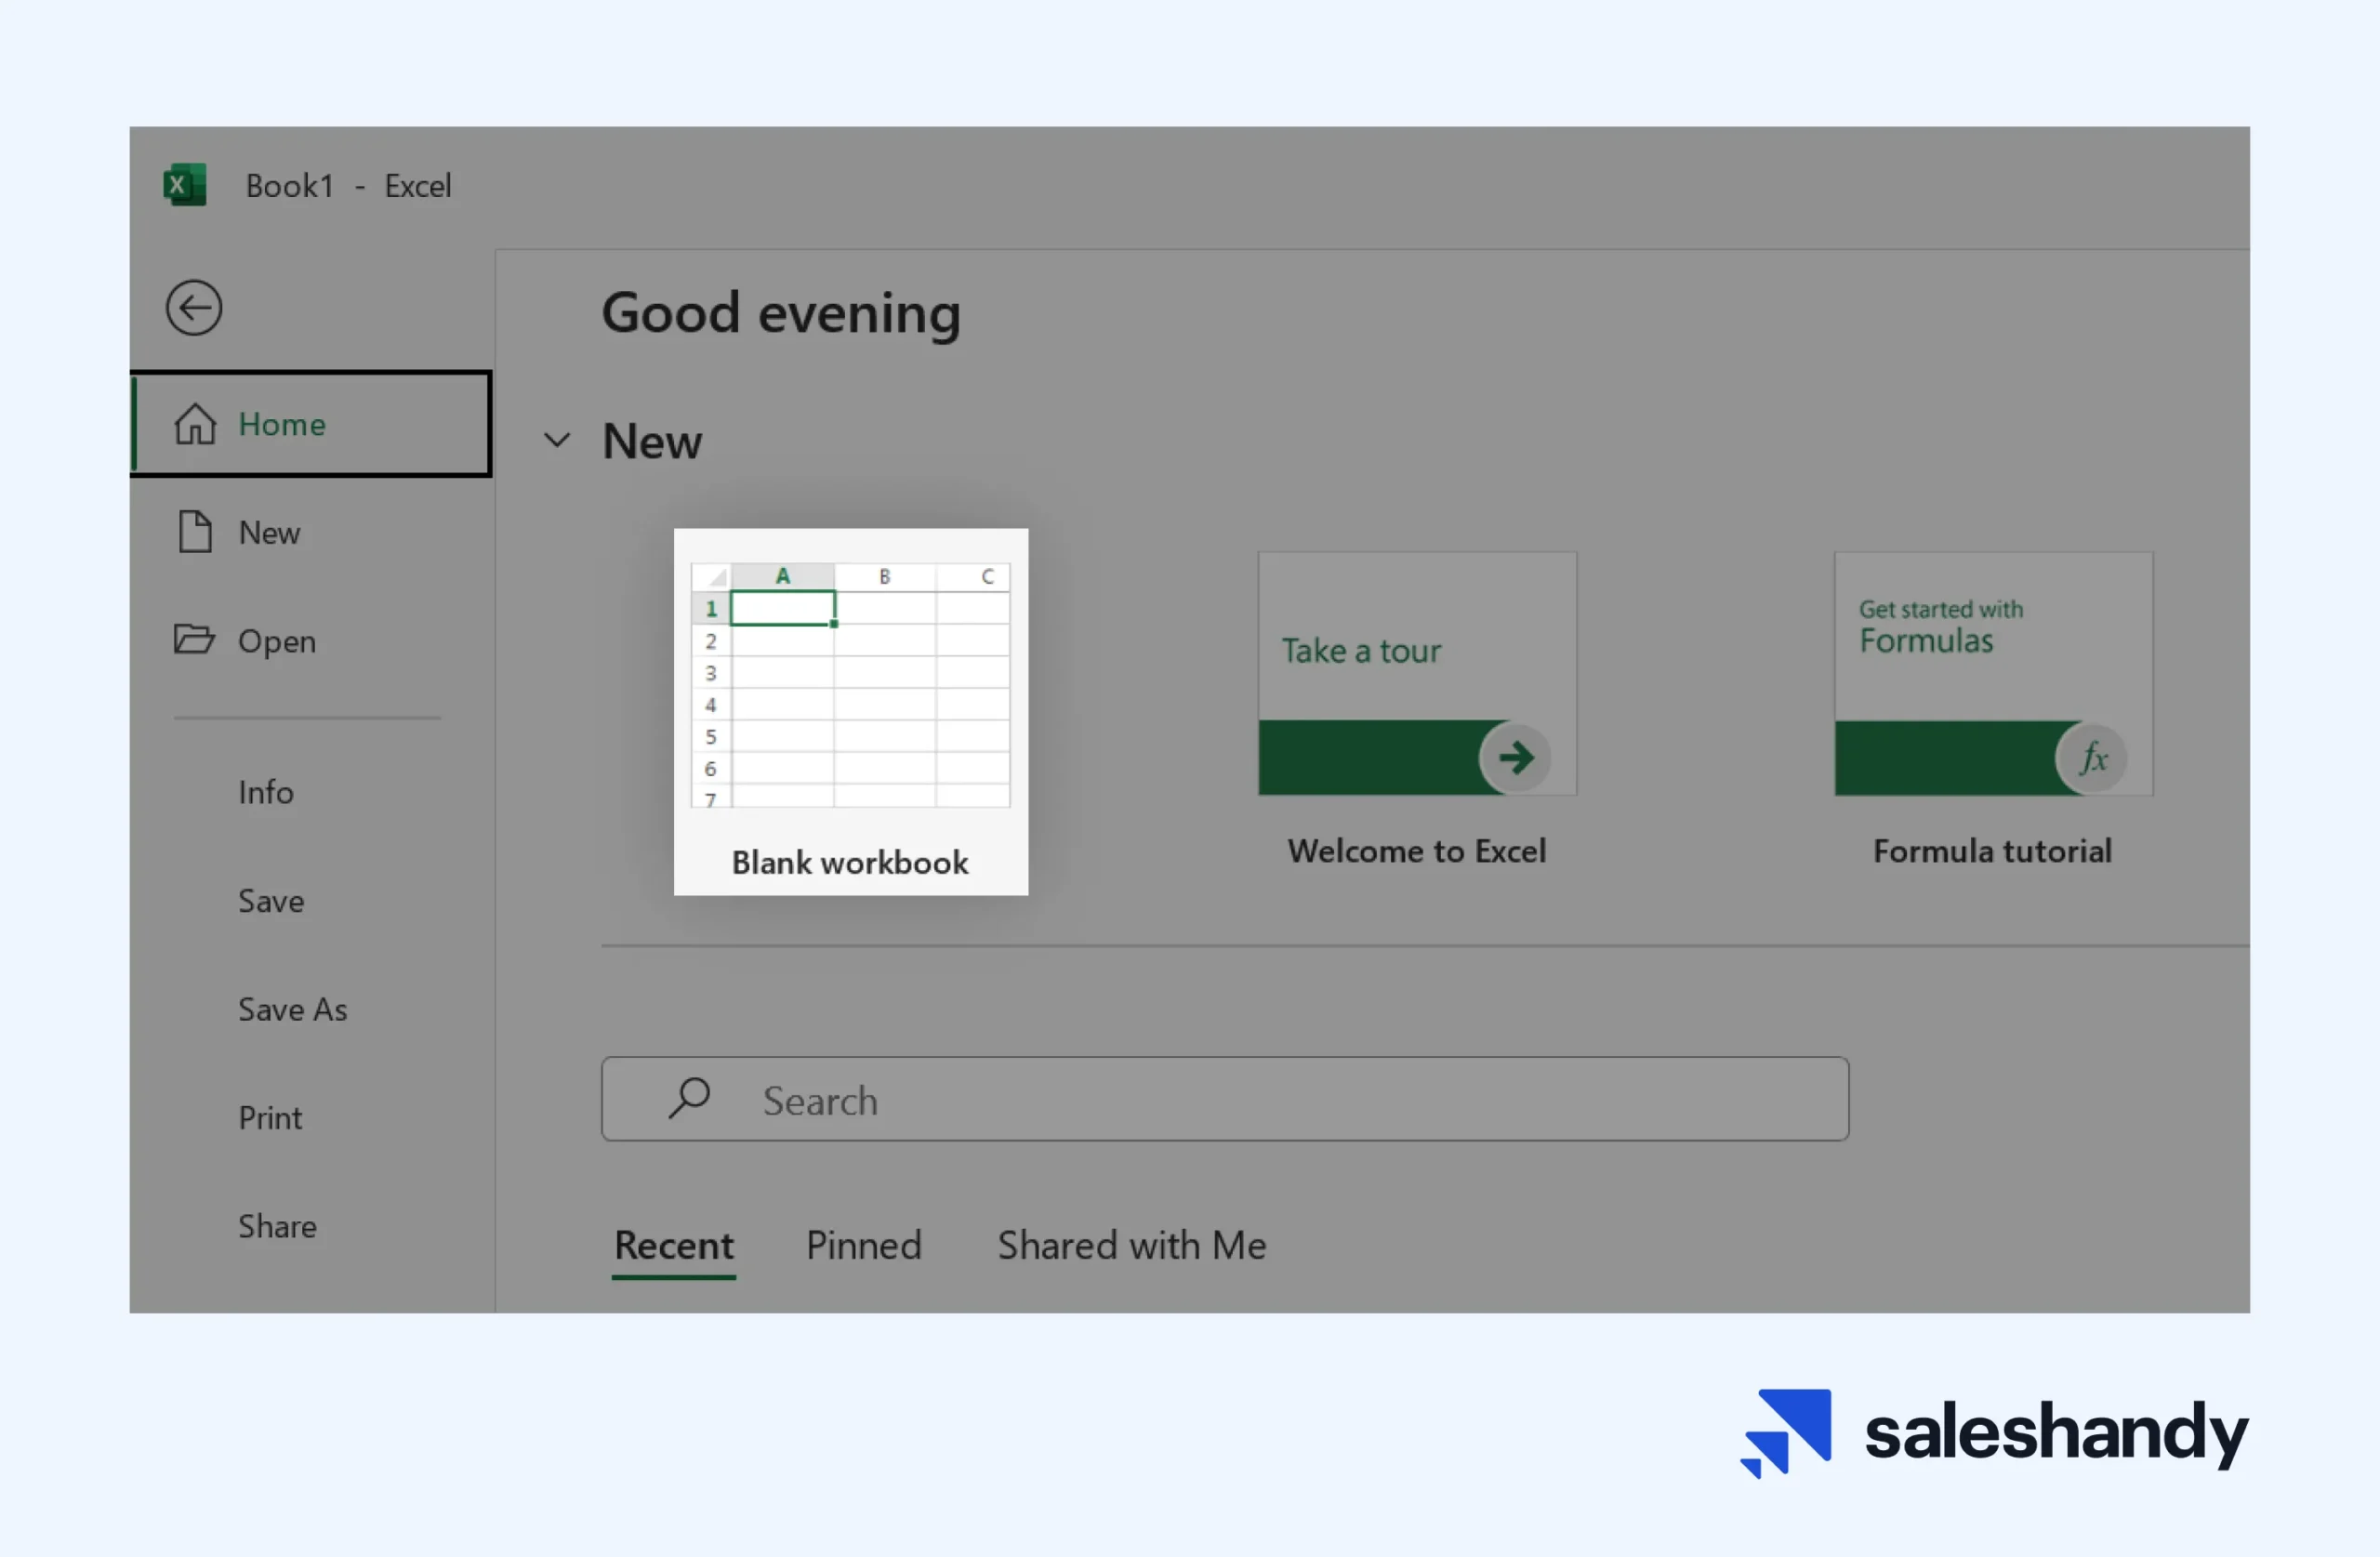
So, open Microsoft Excel and select ‘Blank Workbook’.
After that, enter the headers for your recipients like their First name, Last name, Company name, the industry they work in, etc., and add your data under respective headers.
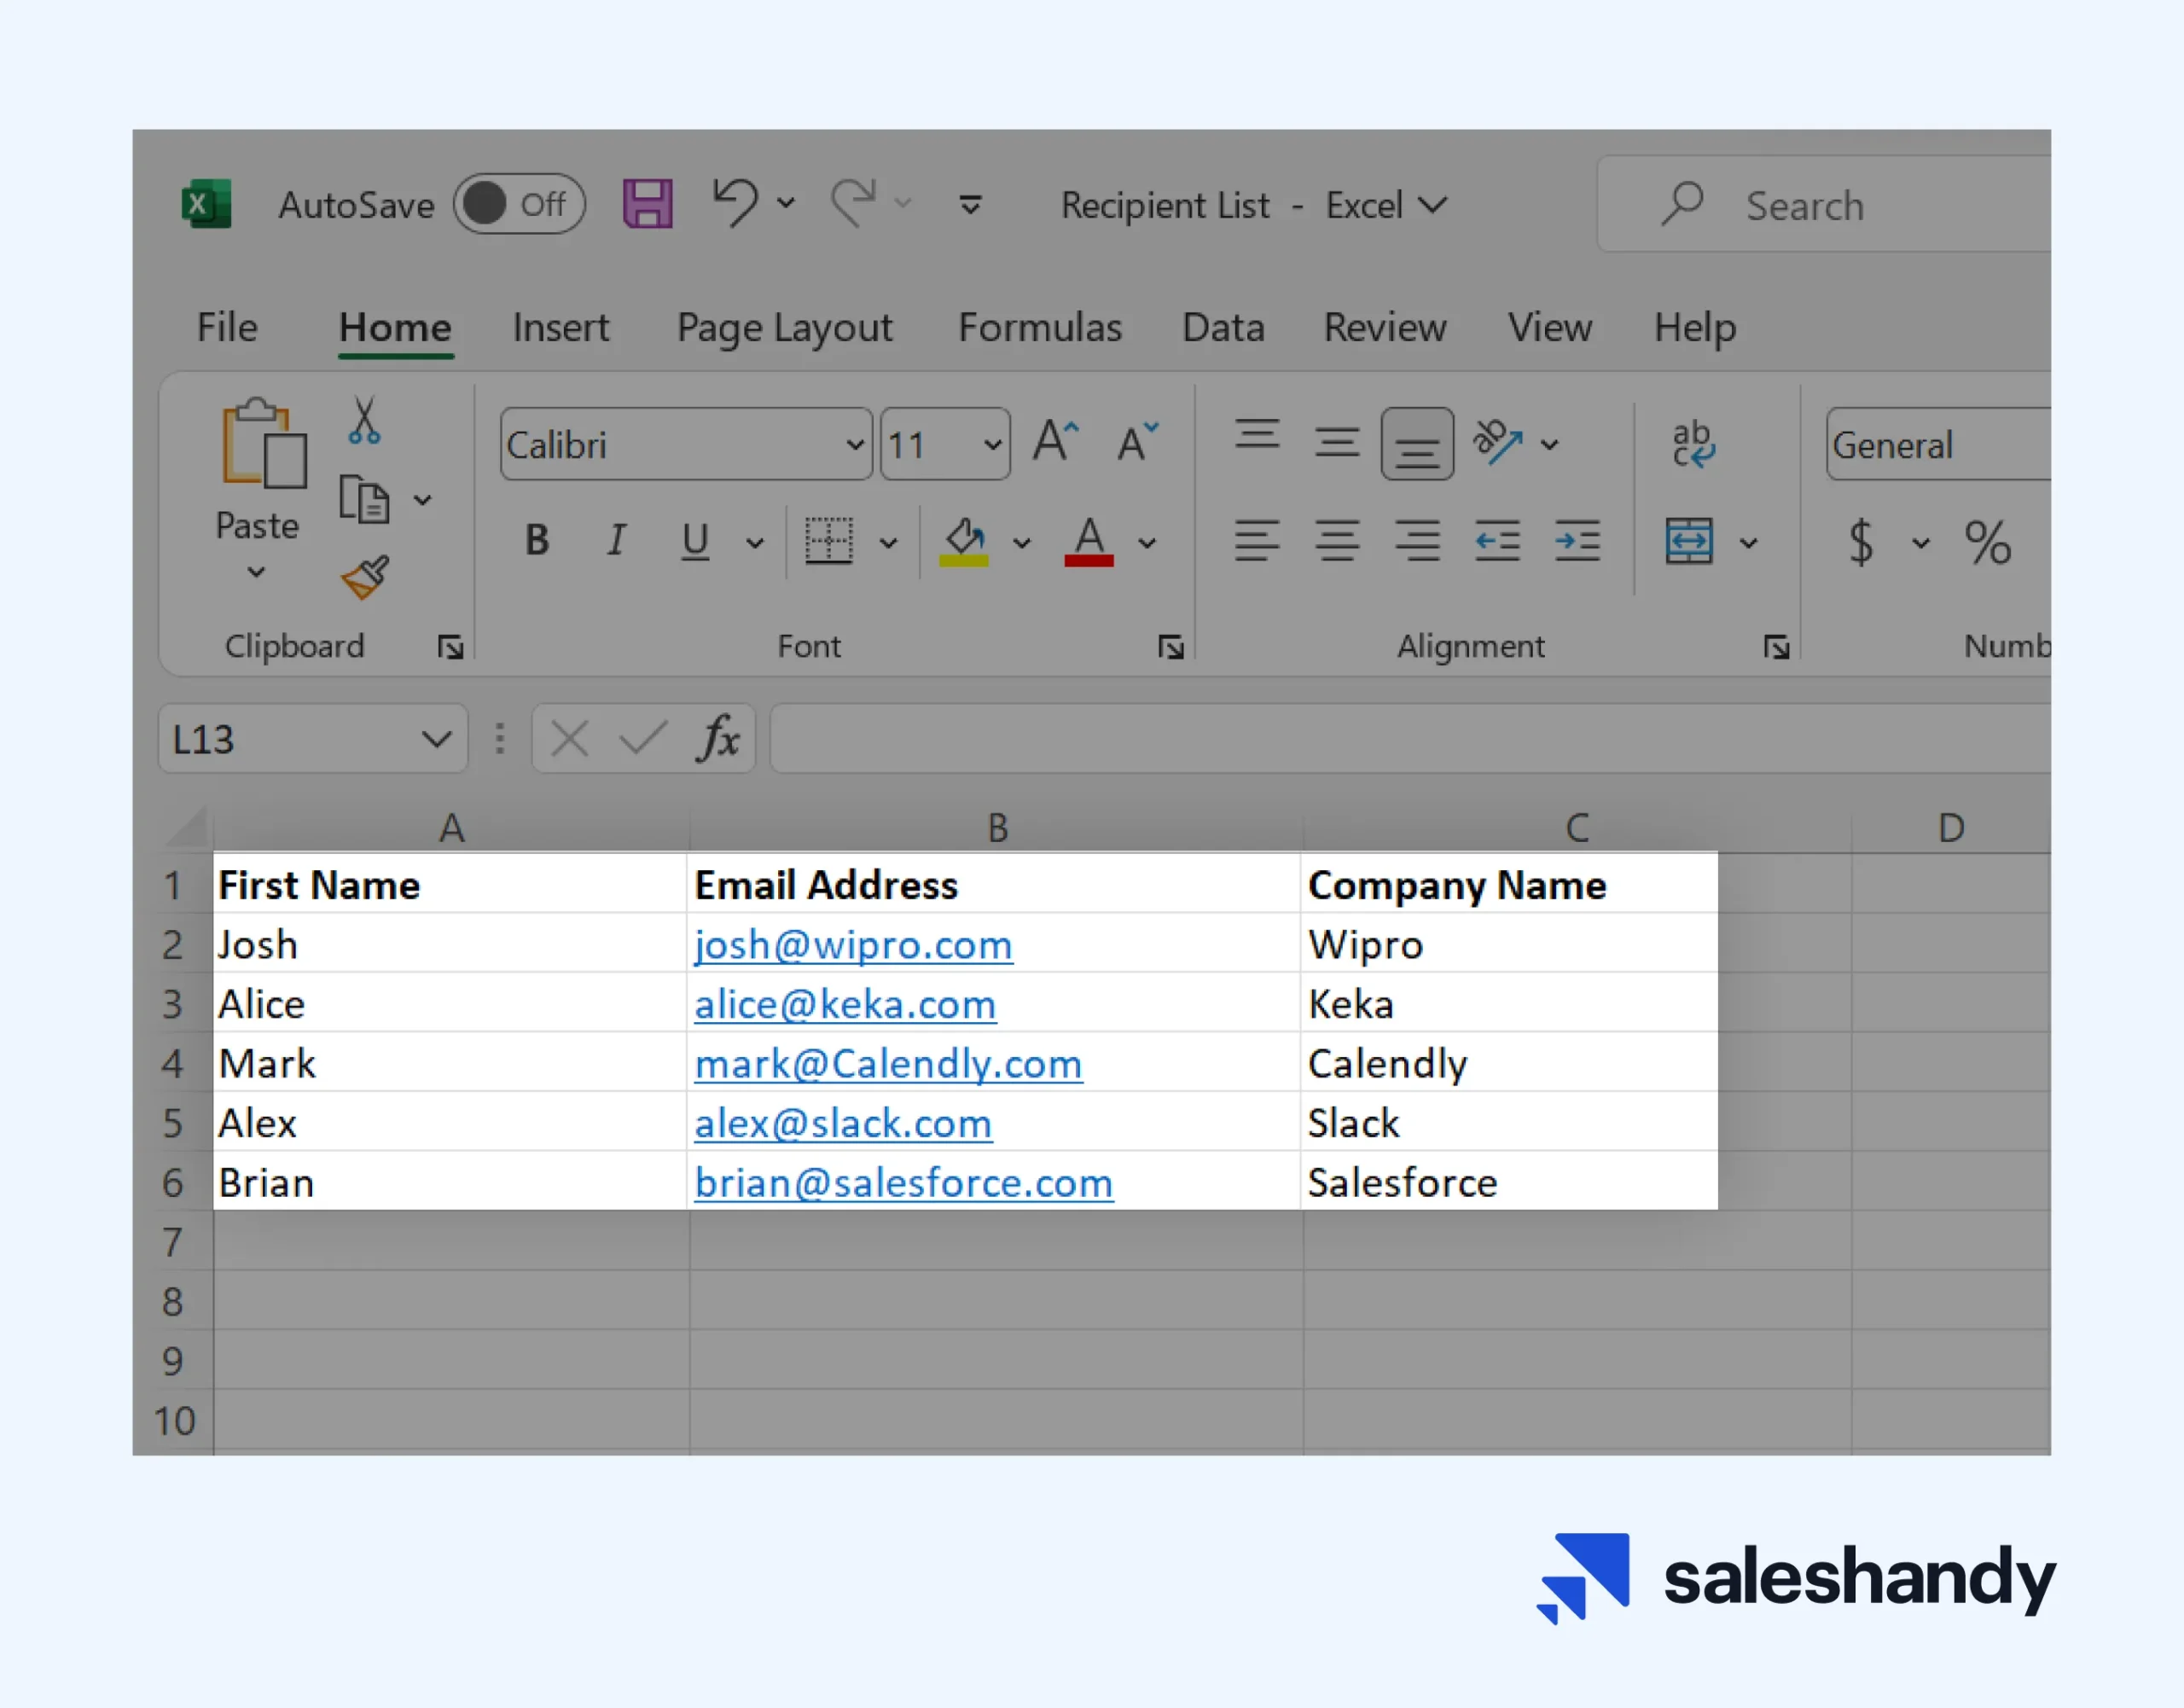
Next, go to the ‘File’ menu and click on the ‘Save As’ button to save your recipient list spreadsheet.
Once you’ve created your mailing list in MS Excel, it’s time to link this spreadsheet with your Microsoft Word email message document.
Step 3 – Link the mailing list with your email document
To perform mail merge in Outlook, you’ll have to link your mailing list and email document.
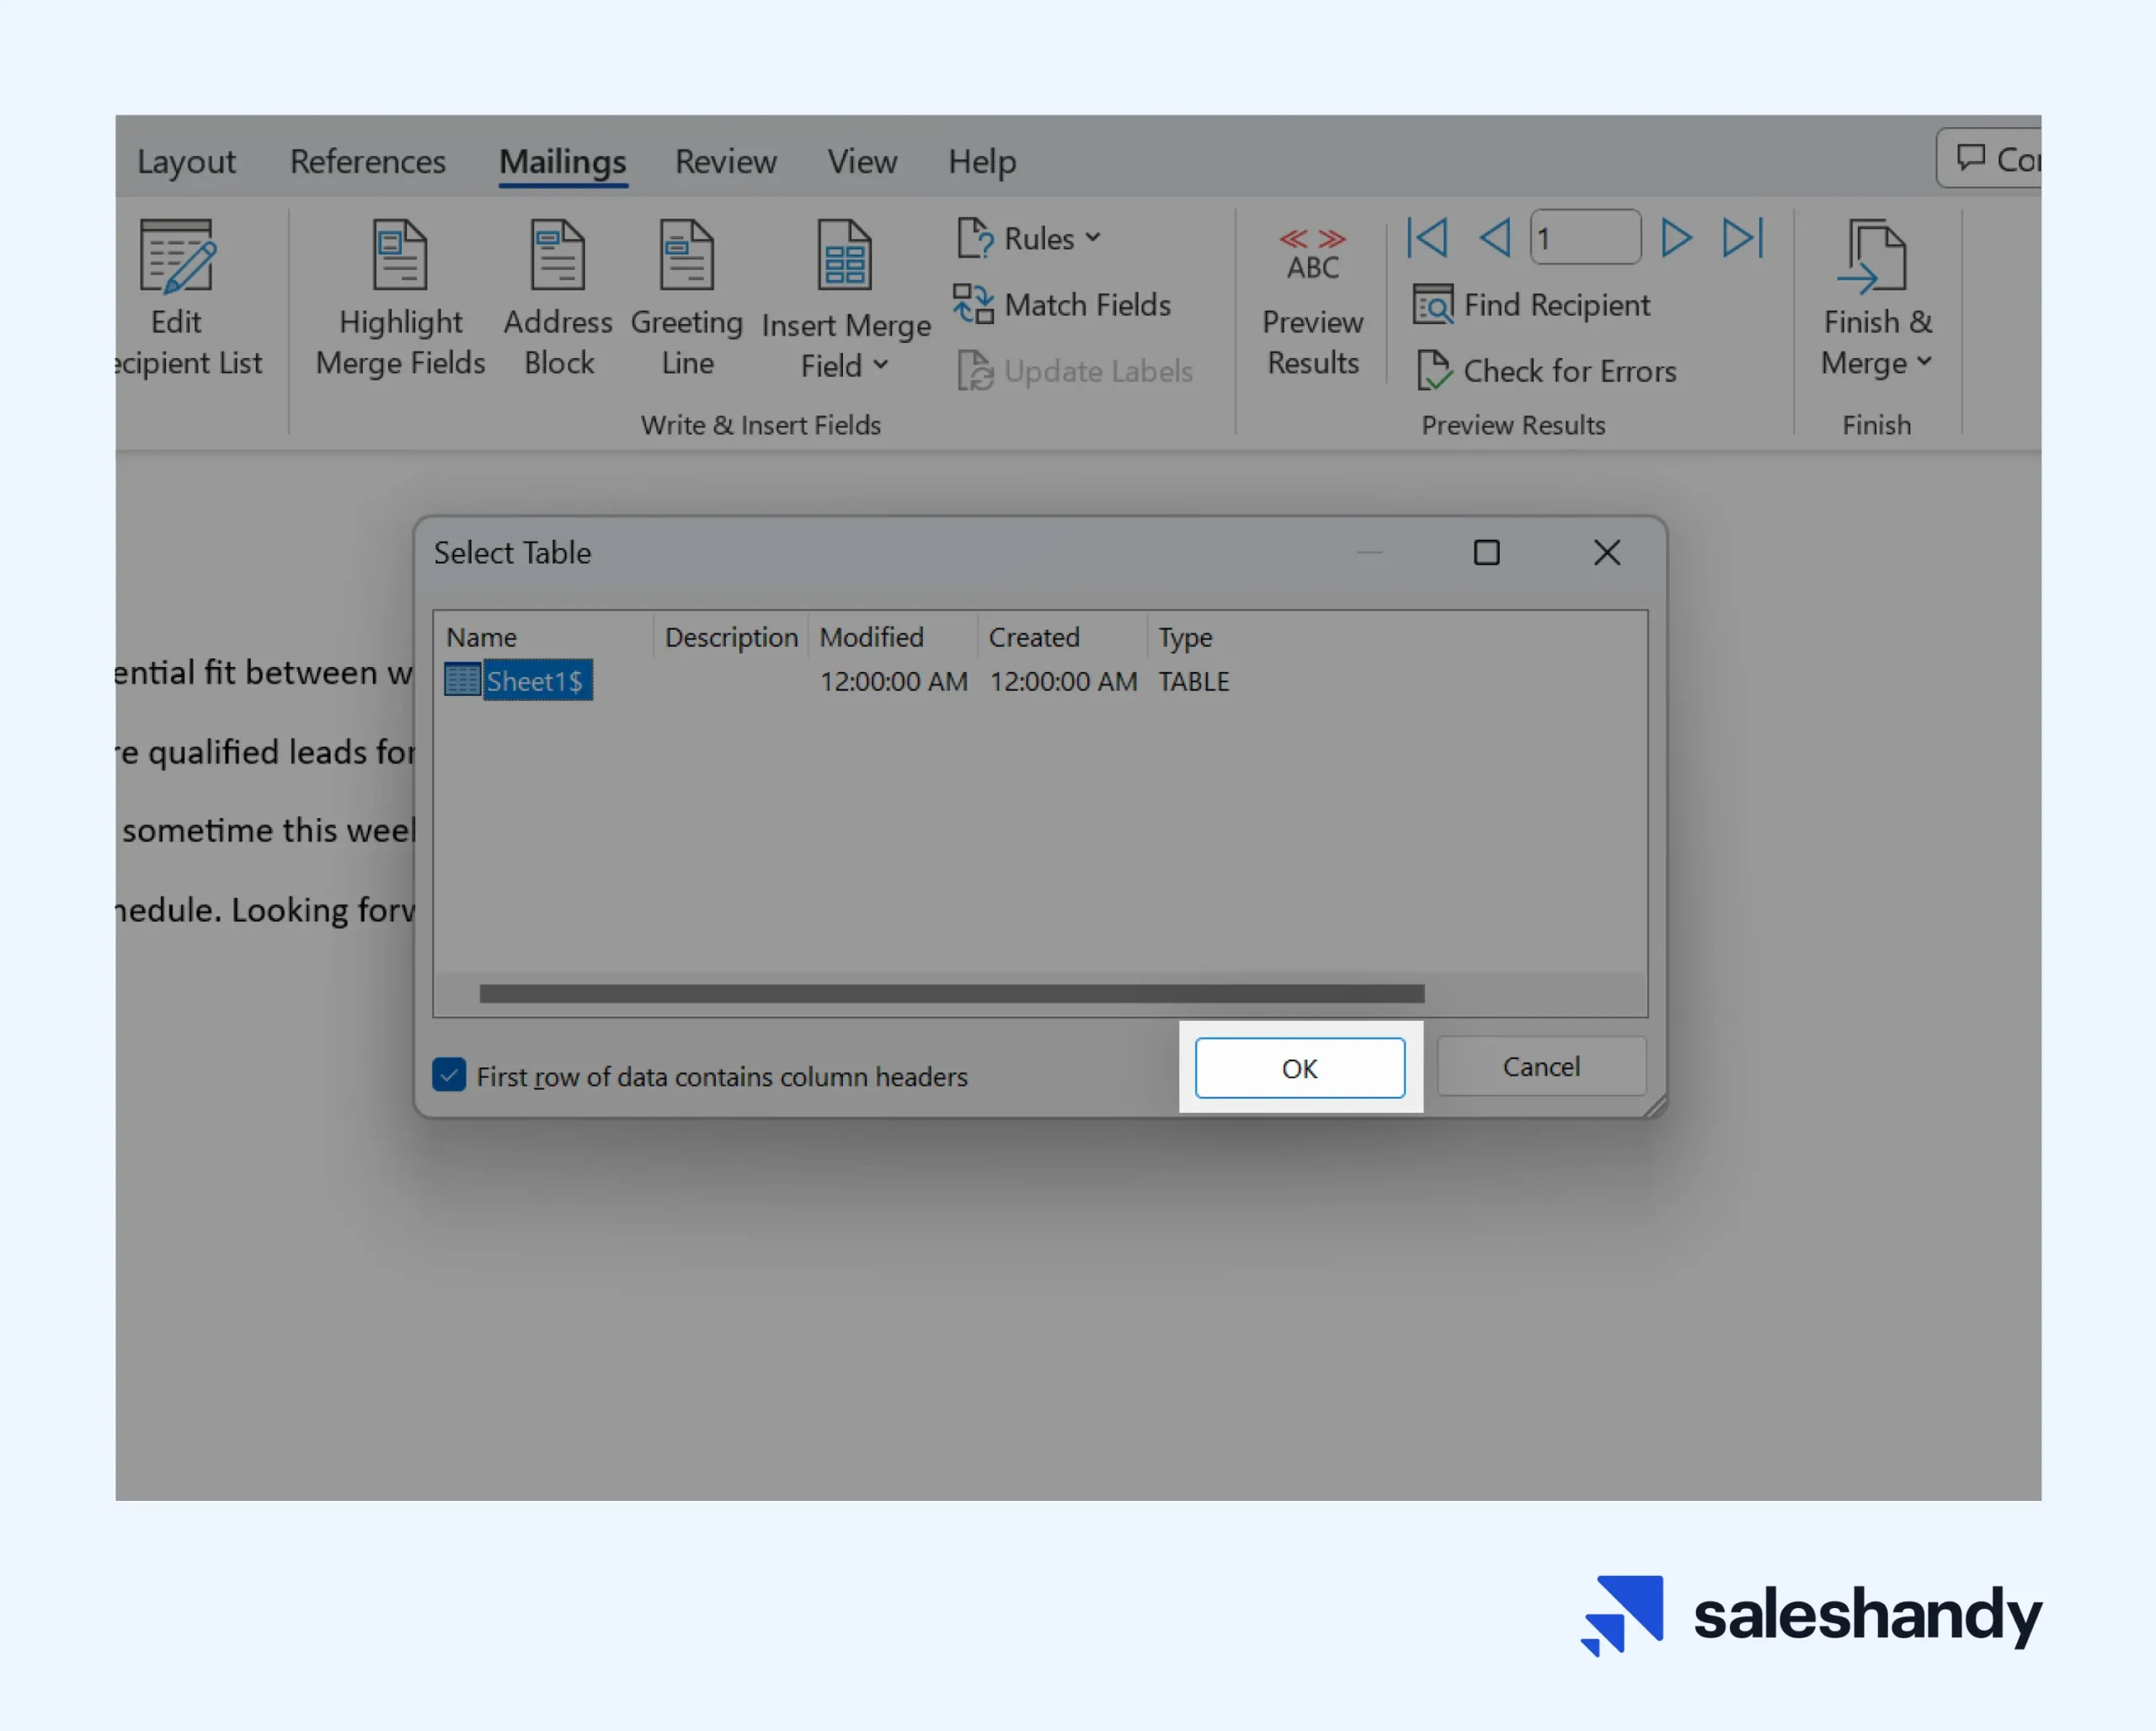
To do this, click on the ‘Select Recipients’ from the ‘Mailings’ tab, and click on the ‘Use an Existing List’ option.

Select the mailing list file we created during step #2 and click ‘OK’.
Step 4 – Insert mail merge fields to personalize the email message
Now, insert merge fields into the email template by clicking ‘Insert Merge Field’ and selecting the matching Excel column headers.
For example, replace {Name} with your “First Name” column, {Email} with “Email Address” and so on.

This will map the data fields between your Outlook message and Excel spreadsheet.
Step 5 – Finish & preview your mail merge
Finally, it’s almost time to send your email to all recipients using mail merge in Outlook.
First, we need to finish the mail merge and preview the results before actually sending emails to your recipients.
Go to Microsoft Word and click on the ‘Preview Results’ under the ‘Mailings’ tab.
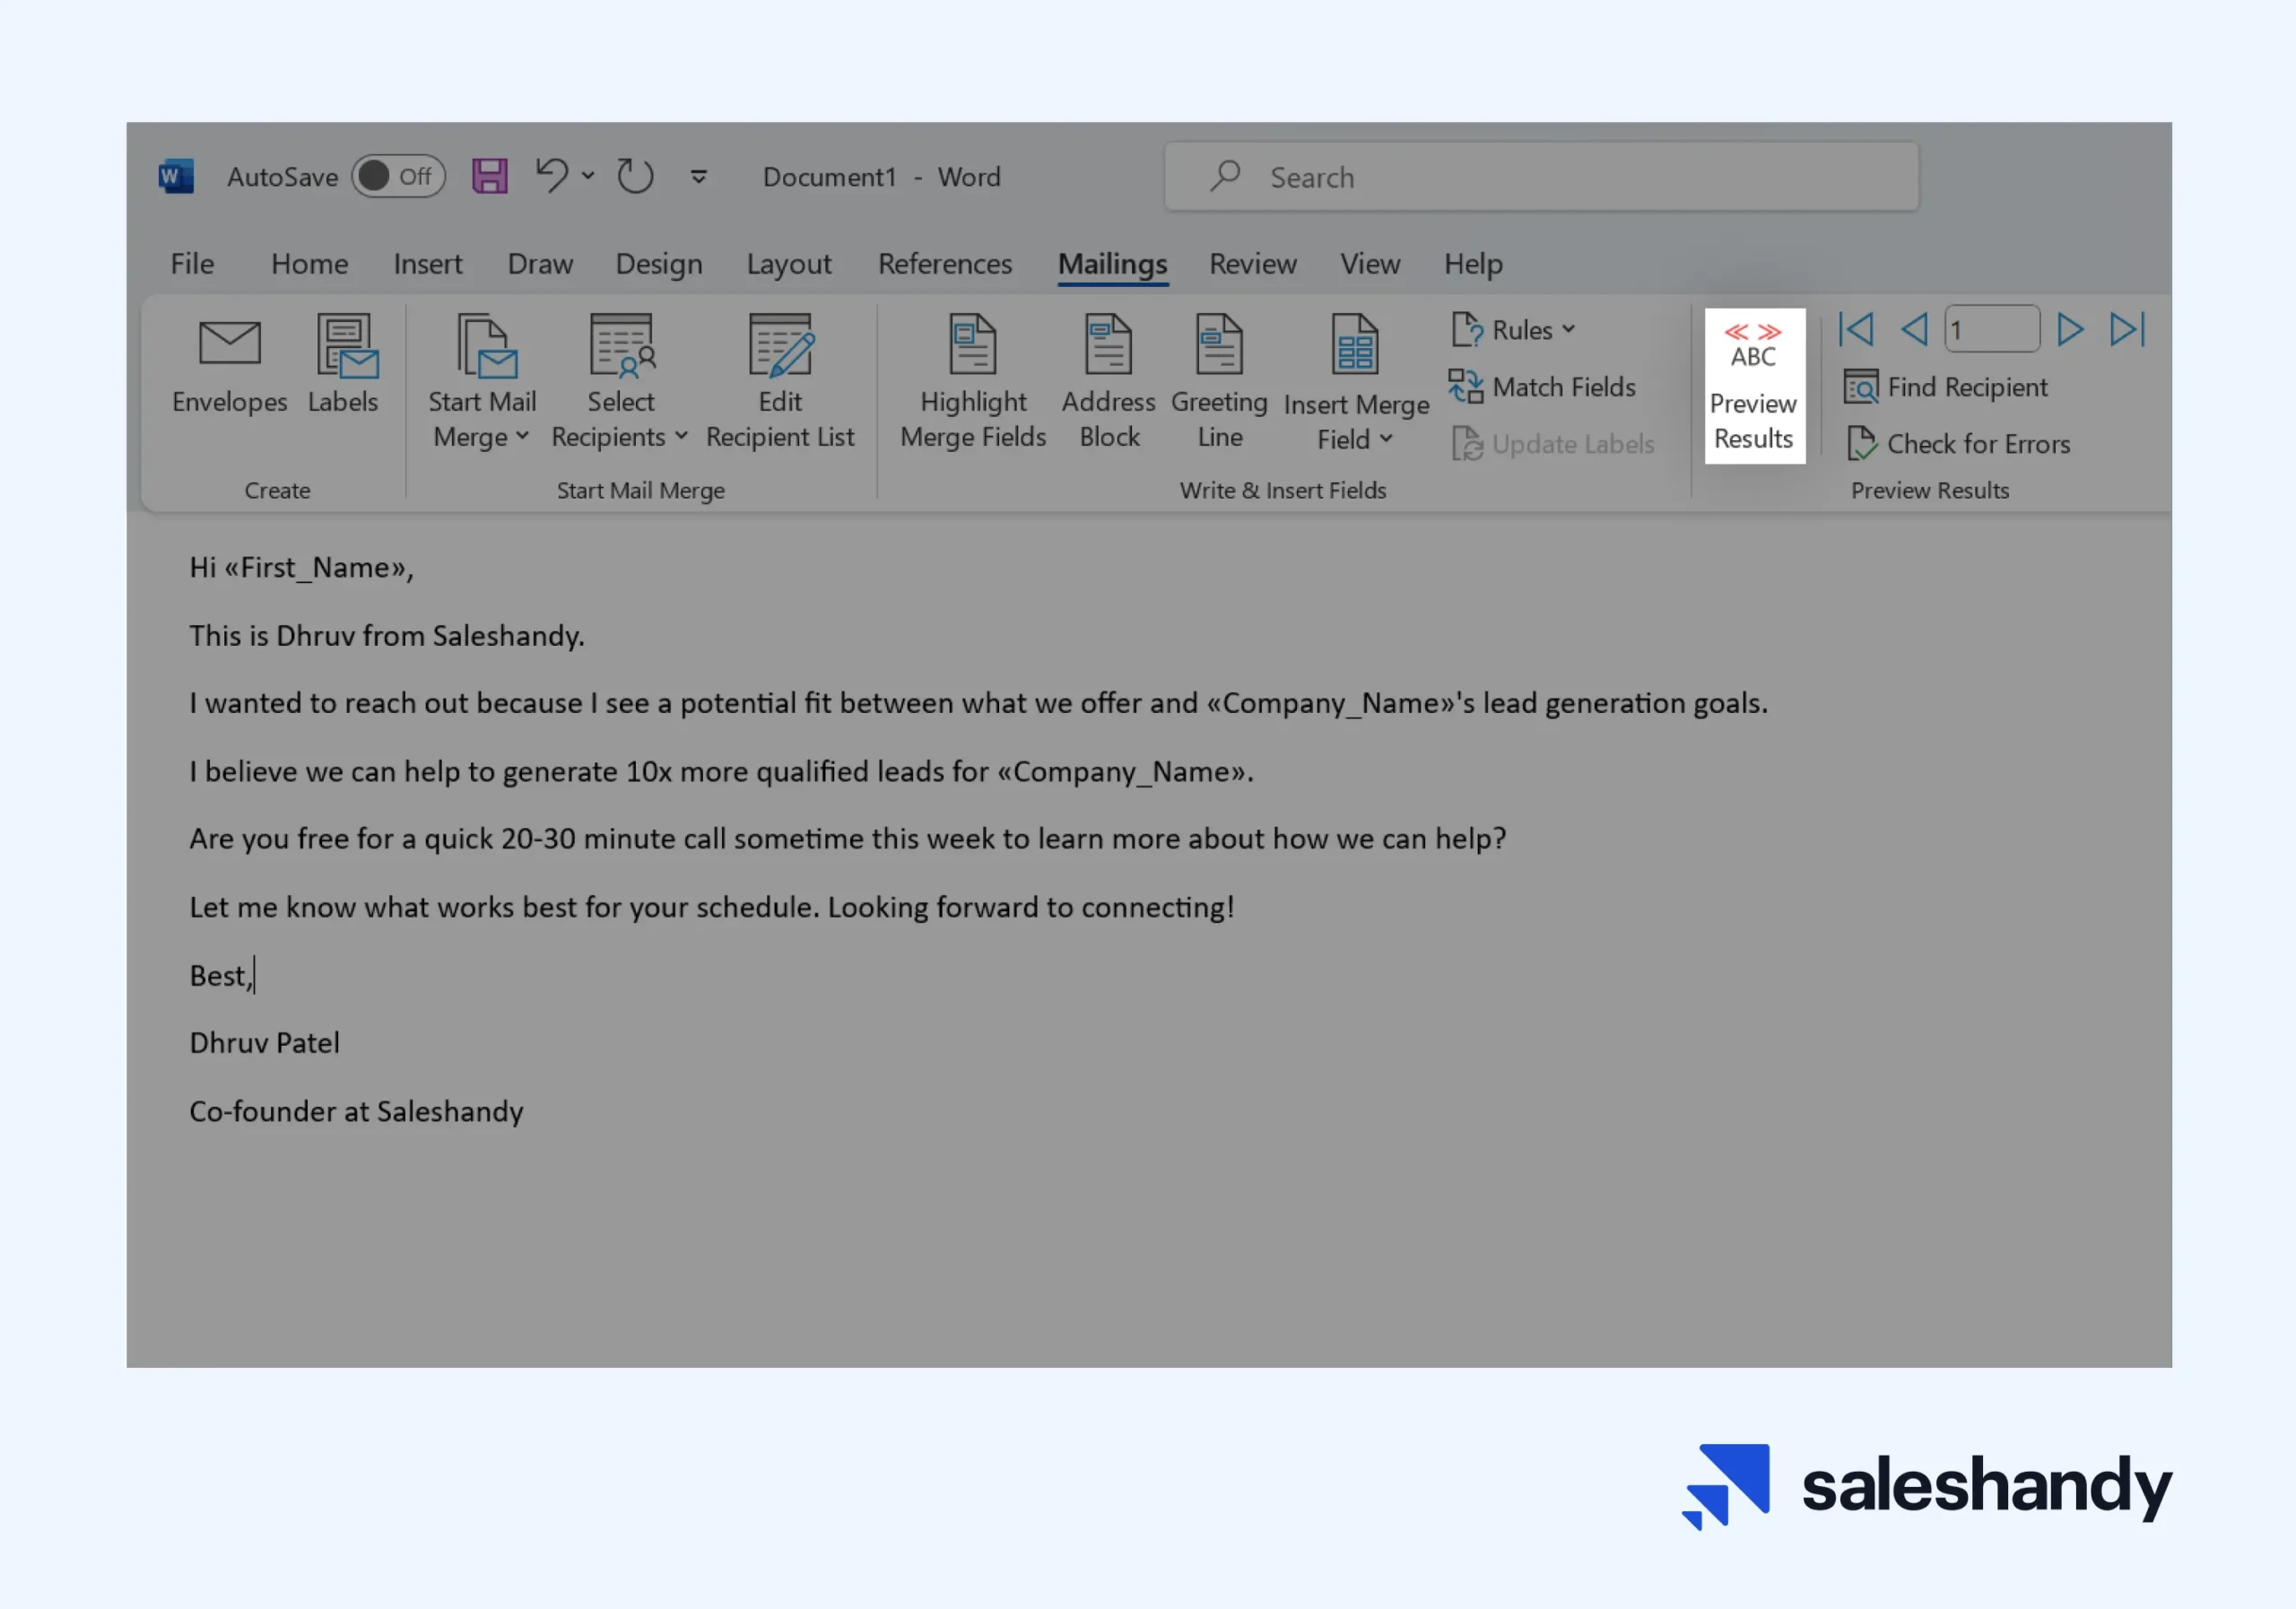
After that, choose the Next or Previous record button to make sure the names and addresses in the body of your letter look right.
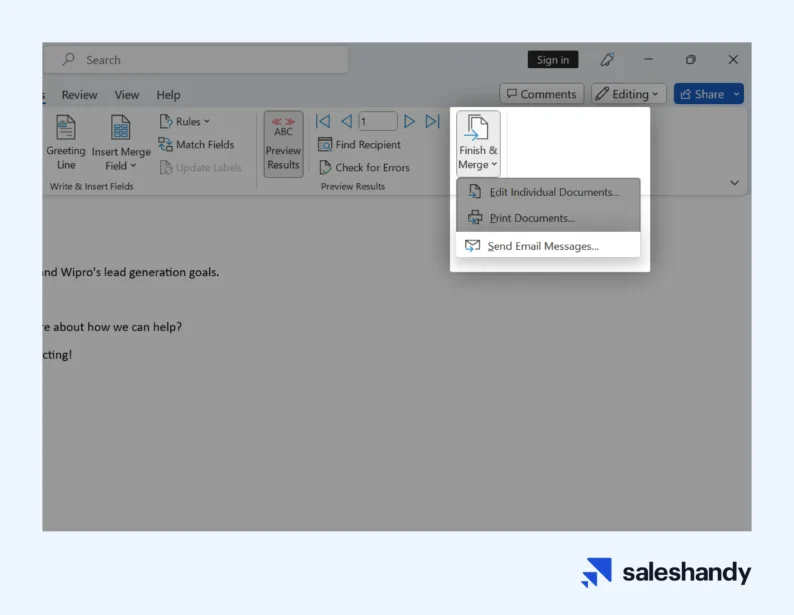
If you’re satisfied with the results, finish your mail merge and start sending your emails to the recipient list.
For this, click on the ‘Finish & Merge’ and select ‘Send E-mail Messages’ option.
Now, you’ll see a dialog box where you need to select the column header containing the email addresses of your recipients in the ‘To’ field.

Next, add a subject line in the ‘Subject line’ box.
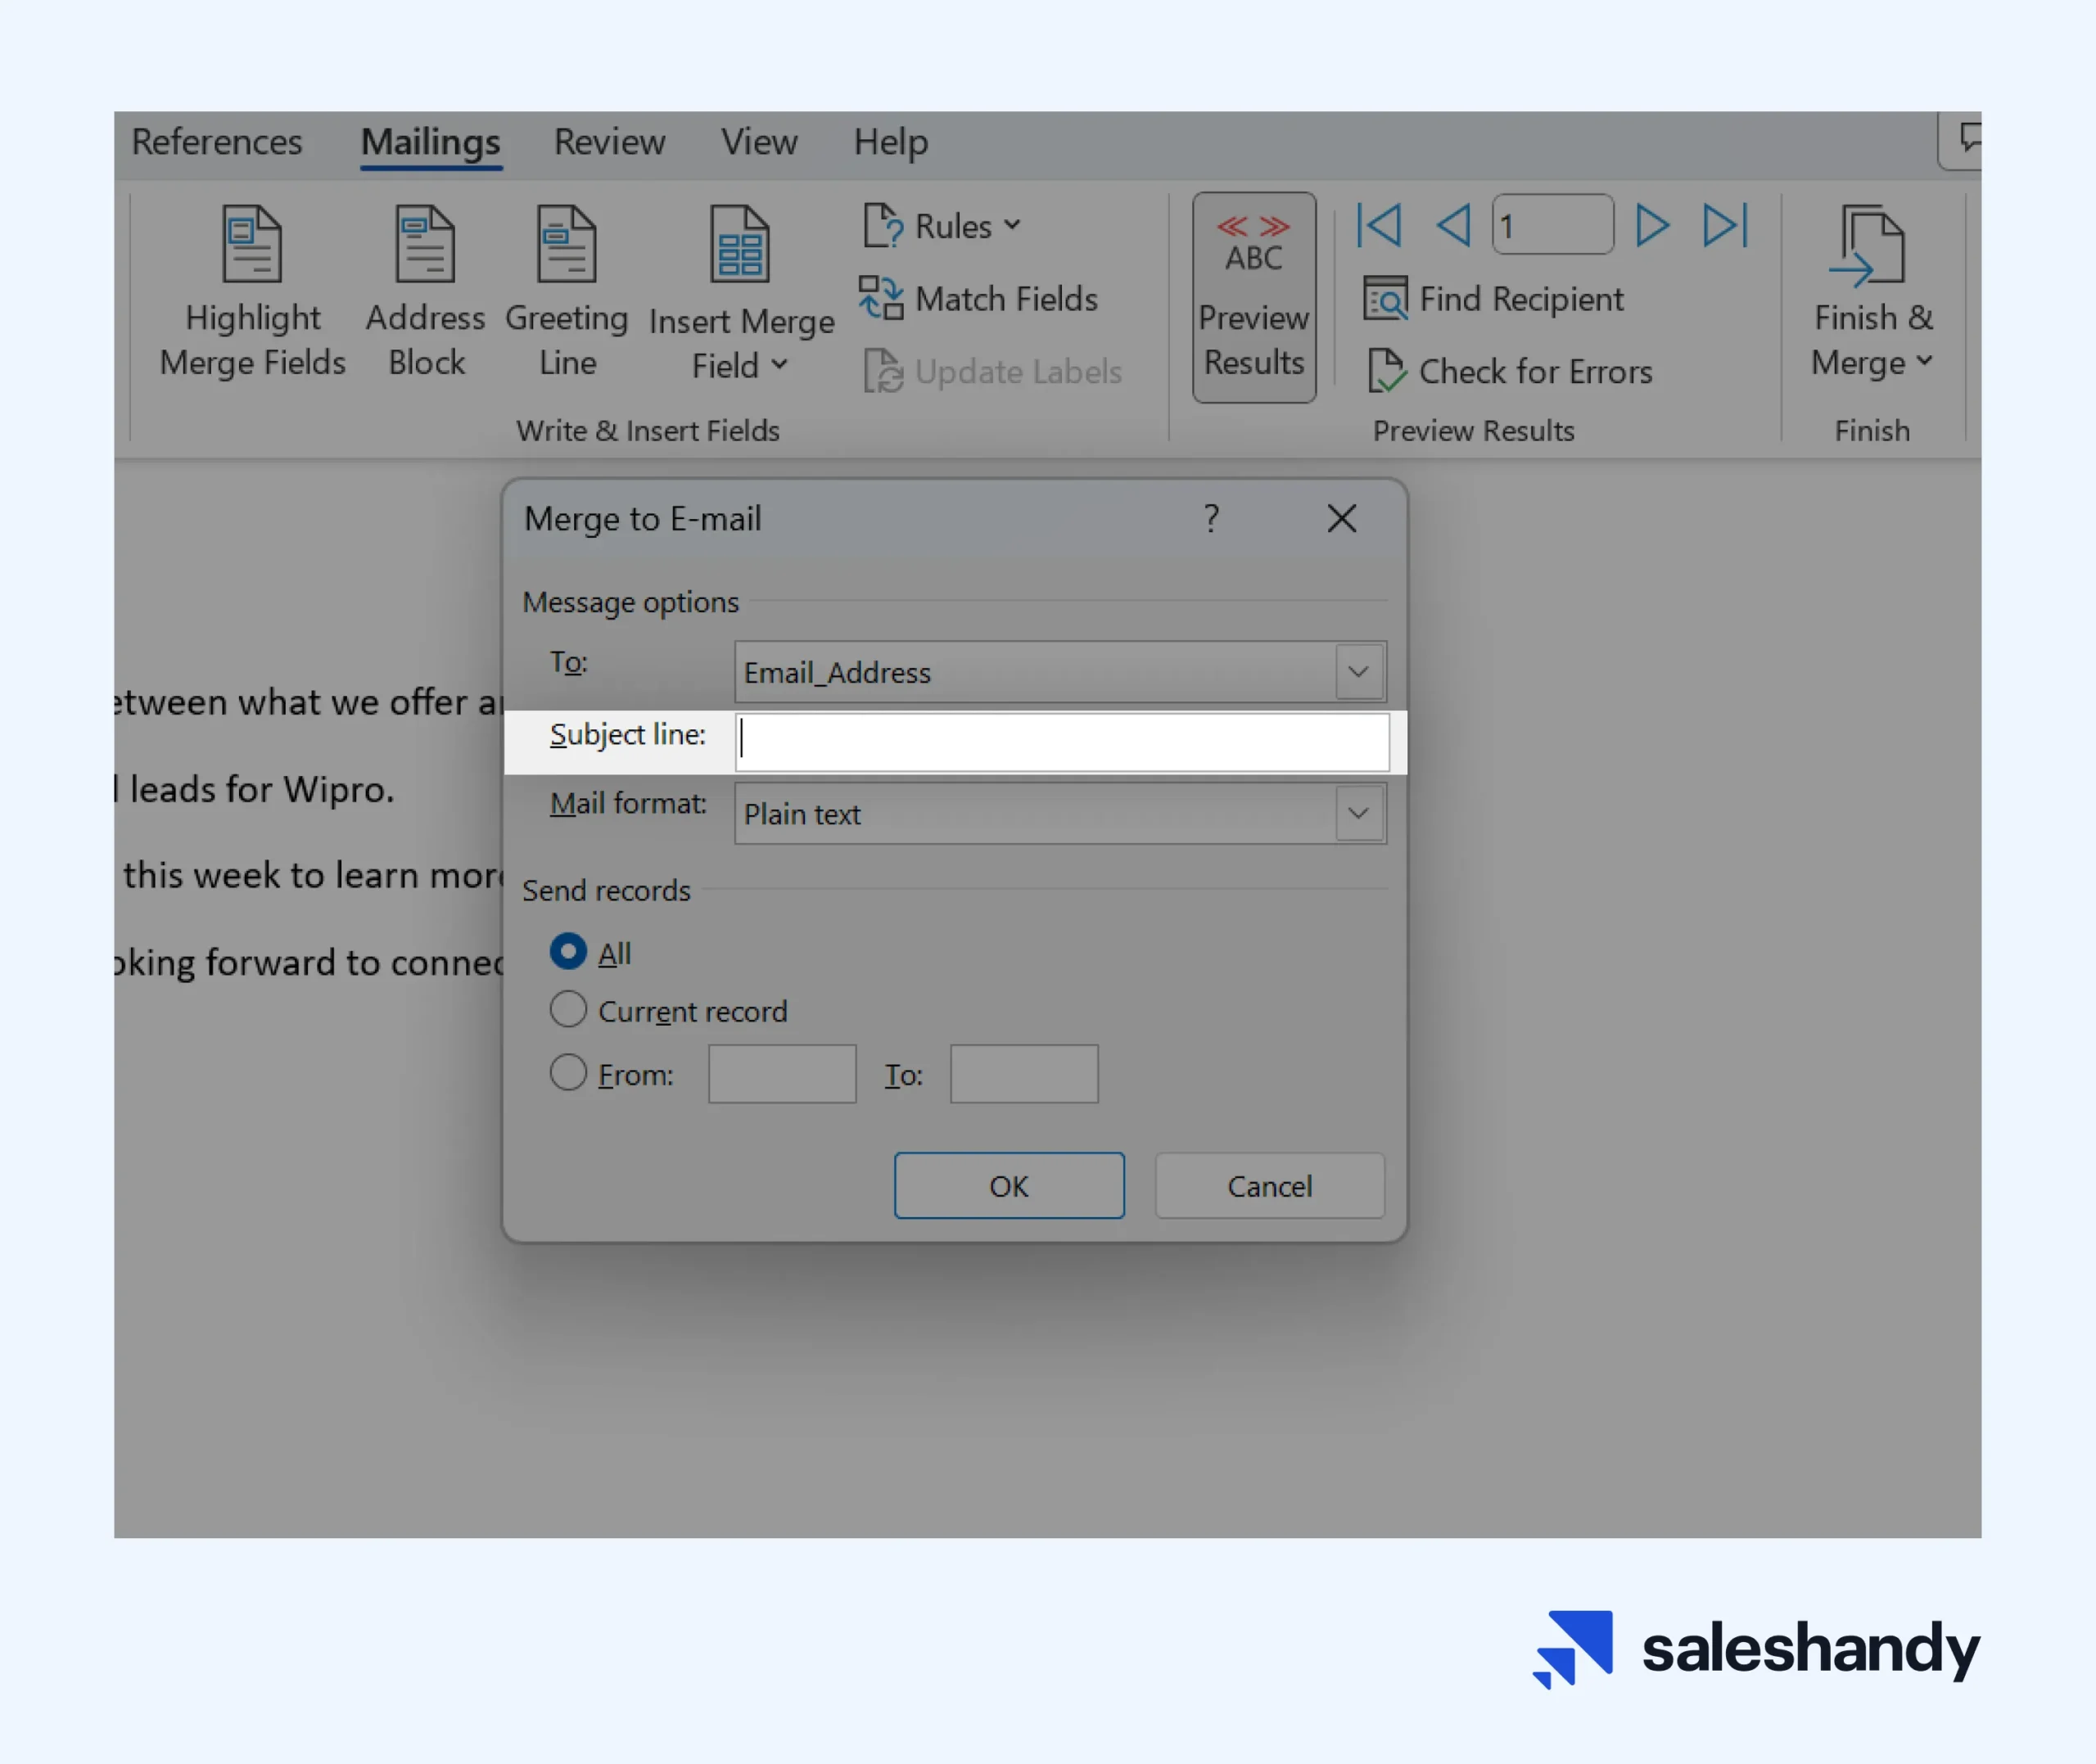
Once you’ve typed your Subject line, click on the ‘OK’ button to finish the process.
Step 6 – Send your mail merge message
It’s finally time to hit the ‘Send’ button to send out those mail merge emails to your recipients.
For this, you need to open ‘Outlook’, go to the ’Outbox’ folder, and click on the ‘Send/Recieve All Folders’ button.

Upon clicking that button, your merged emails will be sent to each person on your recipient list.
Why mail merge in Outlook is not best for email personalization?
There are 5 primary reasons why mail merge in Outlook is not best for sending personalized emails to a large list of recipients.
- Cannot add dynamic content – Mail merge only allows you to insert merge fields from a data source like an Excel spreadsheet into an email template. You can’t add dynamic content in the email body to personalize your email content for every recipient. For the uninitiated, dynamic content is something that is tailored to recipients’ needs.
- Difficult to scale – Doing a mail merge in Outlook is a manual process. It works fine if you’re sending emails to a small list. But this method isn’t practical for large audiences because you have to refresh the data source and regenerate the emails each time you add new recipients to your list.
- No auto follow-up – Mail merge only allows you to send a single email, there’s no way to automatically trigger follow-up emails. If you’re sending outbound sales emails, automated follow-up is a critical feature, which can significantly contribute to lead nurturing.
Unfortunately, mail merge in Outlook doesn’t support any automation of follow-up emails based on users’ actions or delays.
- Lacks email tracking – Email tracking allows you to see individual recipient activity and optimize your campaigns. But again, mail merge doesn’t provide any visibility into who opened your emails or clicked specific links beyond basic delivery notifications.
This lack of email tracking is a major gap with mail merge for monitoring engagement and refining your email content, segmentation, timing, and more for improved results.
- Poor deliverability – When you send mail merge campaigns from Outlook, it sends out your email to all recipients at once. This often results in your emails landing in the spam/junk folder. Specialized tools, on the other hand, keep appropriate time intervals between each outgoing email, which makes it less likely to be caught by spam filters.
Additionally, email outreach tools also let you track critical deliverability metrics like open rate, reply rate, click rate, bounce rate, etc. to further optimize your sender reputation over time.
How to send personalized emails from Outlook at scale?
Sending personalized emails to a large number of recipients can be tedious and time-consuming in Outlook.
Fortunately, there are plenty of email automation tools out there that can help to send personalized emails from your Outlook account without much hassle.
Saleshandy, for example, is a top-rated tool with robust email personalization features.
Unlike Outlook, It lets you easily personalize your emails beyond just first name, company, title, etc.
For example, the Spintax feature in Saleshandy enables advanced personalization by allowing you to dynamically generate multiple variations of text within your emails.
That means instead of a static block of copy, you can define different versions of sentences, paragraphs, and phrases that will be randomly combined when the email is generated.
Let’s look at some of Saleshandy’s key features to understand its email personalization capabilities in more detail.
- Merge Tags – Merge tags in Saleshandy are dynamic placeholders that help to incorporate recipients’ information such as First Name, Last Name, Company Name, etc. from a CSV file. These tags can make your emails more individualized, which increases engagement and delivers higher open rates.
- Spintax – Spintax allows you to create multiple versions of your email by strategically inserting variations in words, sentences, or paragraphs.
- Email Ramp-Up – Sending emails to a large list of recipients all at once may trigger spam filters. To avoid this, Saleshandy’s email ramp-up gradually increases the number of outgoing emails, preventing overload and spam folder placement.
- A-Z Variants Testing – The A-Z Variants lets you create 26 different versions of your email to test which email content performs best. You can send these different versions to small groups of people in the beginning, monitor the ones that perform the best, and use the best version for everyone.
- Auto Follow-Ups – Saleshandy comes with an auto follow-up feature that lets you send multiple automated follow-up emails based on pre-defined conditions. This automation can significantly improve your response rates.
- Sender Rotation – Sender Rotation automatically rotates multiple email accounts in your email sequence so that your emails have a higher chance of reaching the Primary inbox of your recipients.
- Sequence Score – The Sequence Score feature helps you evaluate how well your email sequences are likely to perform based on the email account setup, sequence setup, and email copy, and even suggests ways to increase your score.
- Unified Inbox – With Unified Inbox, you can see all replies from prospects in one spot. This way, you won’t miss any responses from potential customers.
Here are the steps you need to follow to send personalized emails to a large list of recipients from your Outlook account.
Step 1 – Sign up on Saleshandy
First things first, you need to sign up on Saleshandy to create your account.
Go to the Saleshandy website, click on the Sign Up for Free button, and fill in your details.

Once you create your account, you’ll get a verification confirmation email. Make sure you verify your account by clicking on the link provided in the verification email.
Step 2 – Connect your Outlook email account(s)
Once you’ve created your Saleshandy account, you need to connect your Outlook email account to Saleshandy.
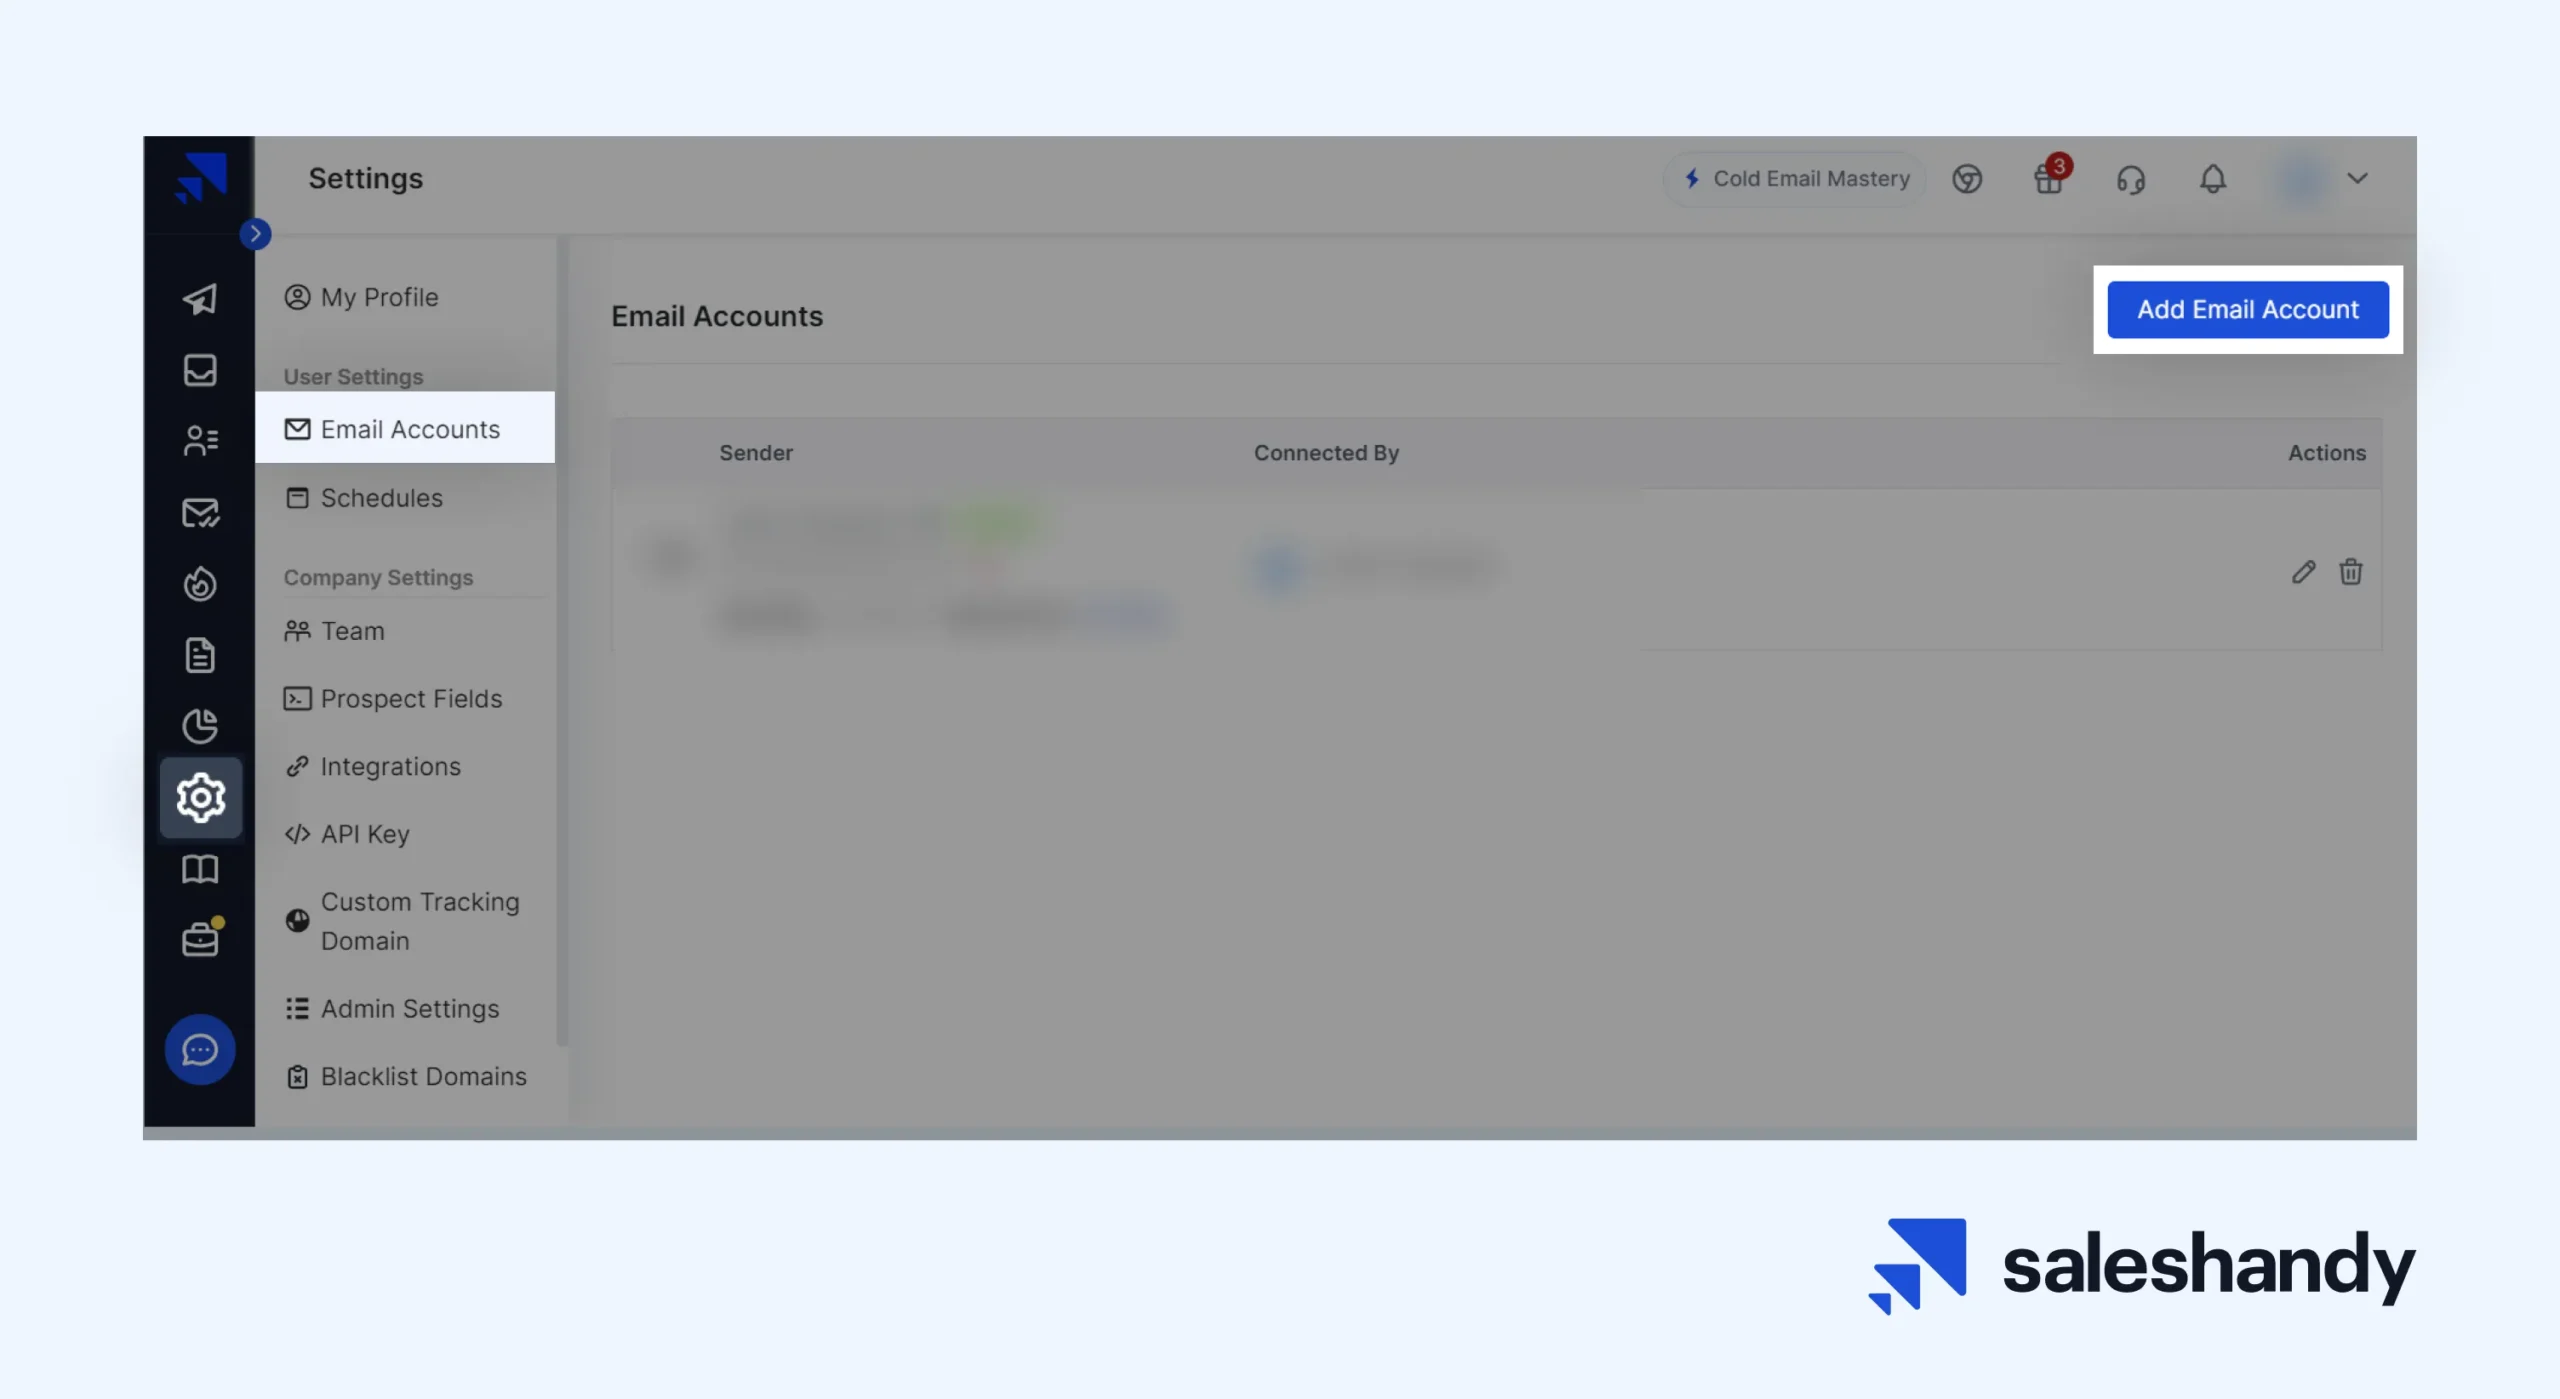
To do this, log in to your Saleshandy, go to the ‘Settings’ section, open the ‘Email Accounts’ tab, and click on the ‘Add Email Account’ button from the top-right corner.
On the next screen, enter your Outlook email account credentials and hit the ‘Add Email Account’ button.
Once done, your Outlook email account will be successfully connected to Saleshandy.
By the way, you can connect unlimited email accounts (Outlook, Gmail, others) to Saleshandy to use in your email sequence using sender rotation.
Step 3 – Authenticate your email domain
After connecting your Outlook email account, you need to authenticate your email domain.
Doing so is important because it will help you to establish a good sender reputation and achieve high email deliverability, which will keep your emails from landing in your prospects’ spam folders.
The good news is that you can easily authenticate your email domain. All you have to do is set up SPF (Sender Policy Framework), DKIM (DomainKeys Identified Mail), and DMARC (Domain-based Message Authentication, Reporting & Conformance) records.
Step 4 – Upload your prospects list
Once you’ve authenticated your email domain, it’s time for you to start uploading your prospects.
In Saleshandy, you can add your prospects one by one and also upload them in bulk.
To upload your prospects in bulk, you need to open the ‘Prospects’ section and click on the ‘Import Via CSV’ button as shown below.
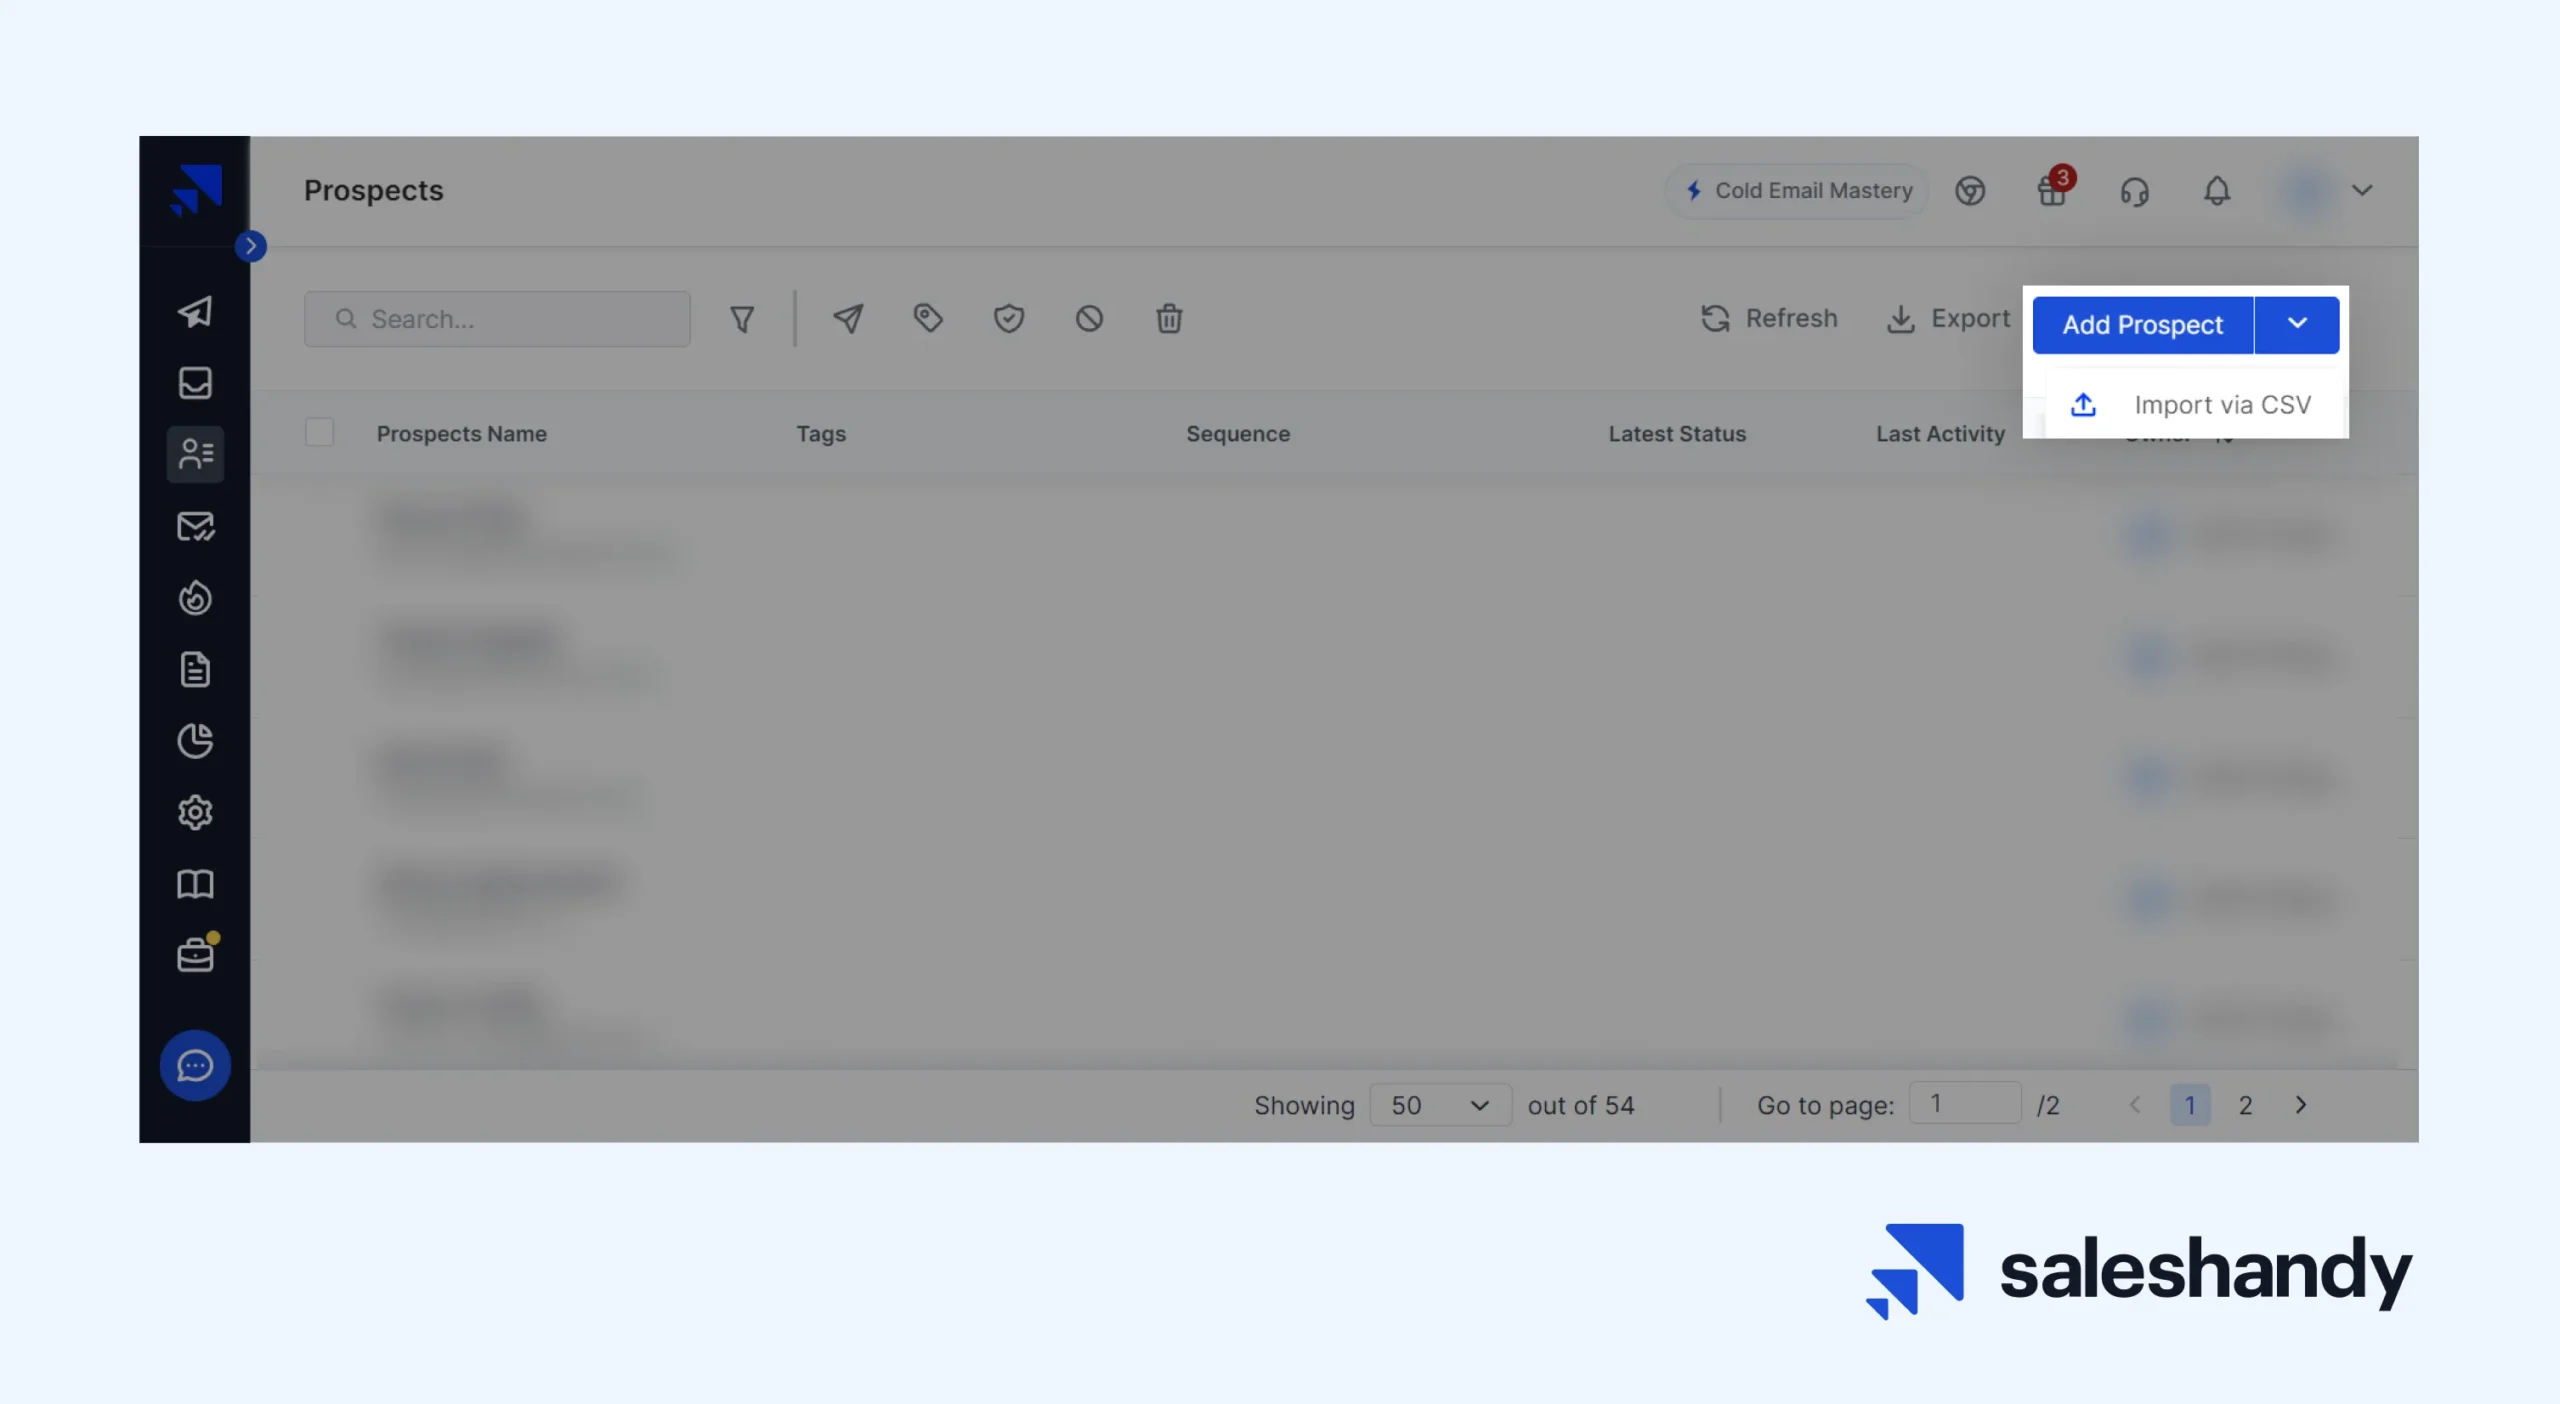
On the next screen, you need to click on the ‘Choose File’ button, locate your CSV file, and hit the ‘Next’ button.

Now, follow the instructions displayed on your screen and finish uploading your prospects list.
Step 5 – Write your email copy
After adding your prospects, you can finally craft your email copy.
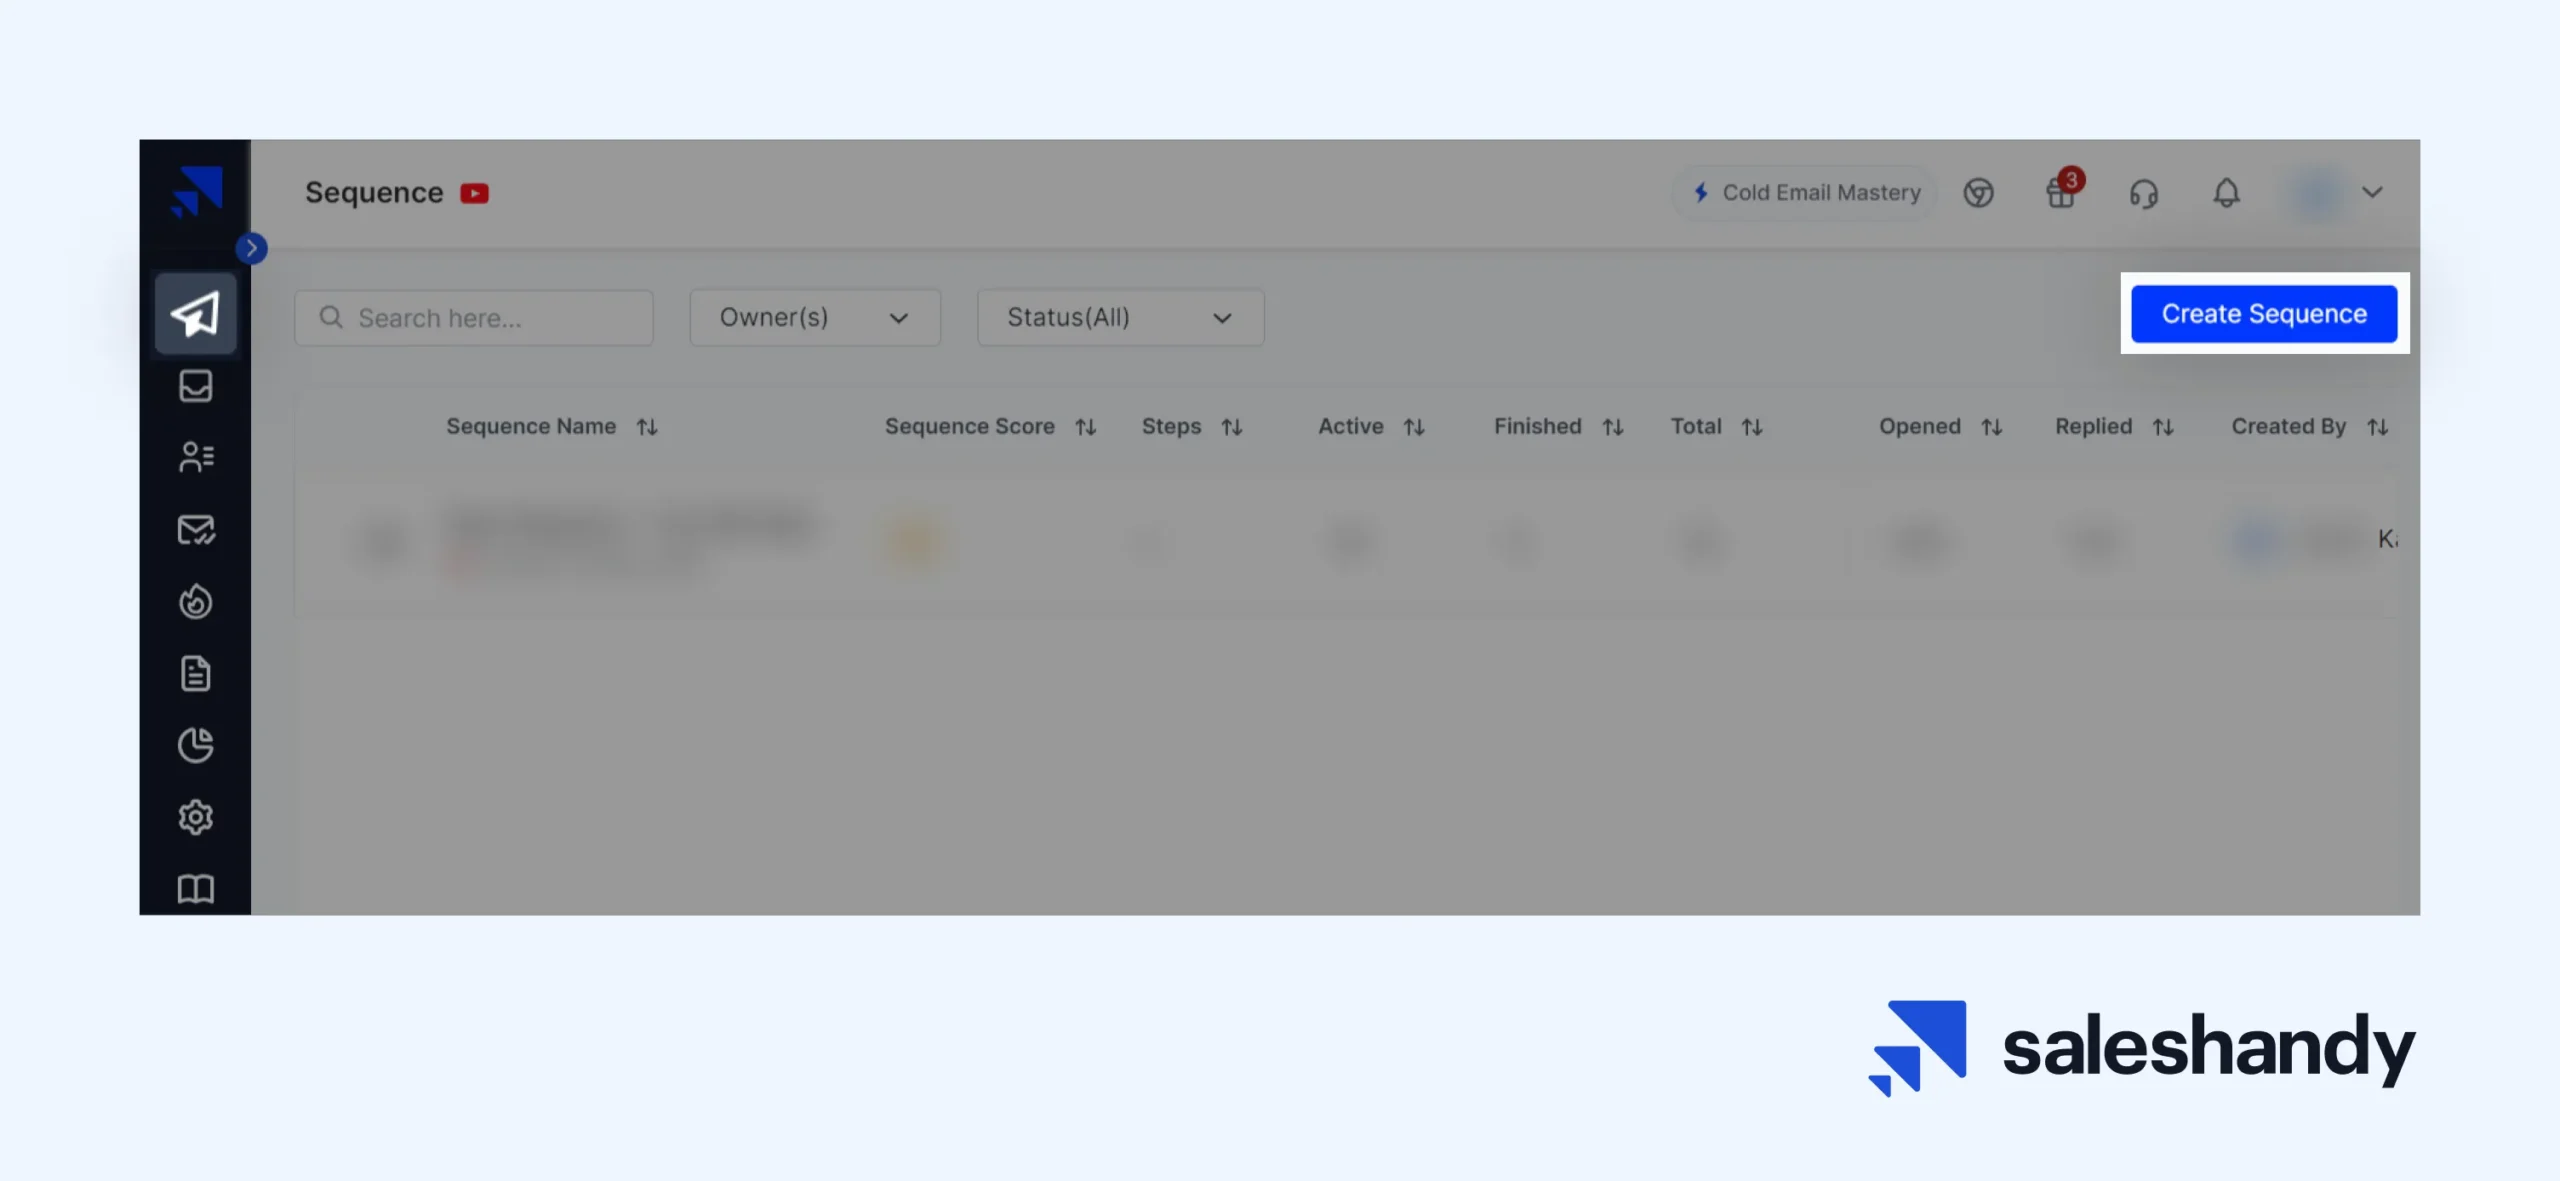
Go to the ‘Sequences’ section in your Saleshandy dashboard and tap on the ‘Create Sequence’ button from the top-right corner.
Next, click on the ‘Add Step’ and it will display a pop-up window.
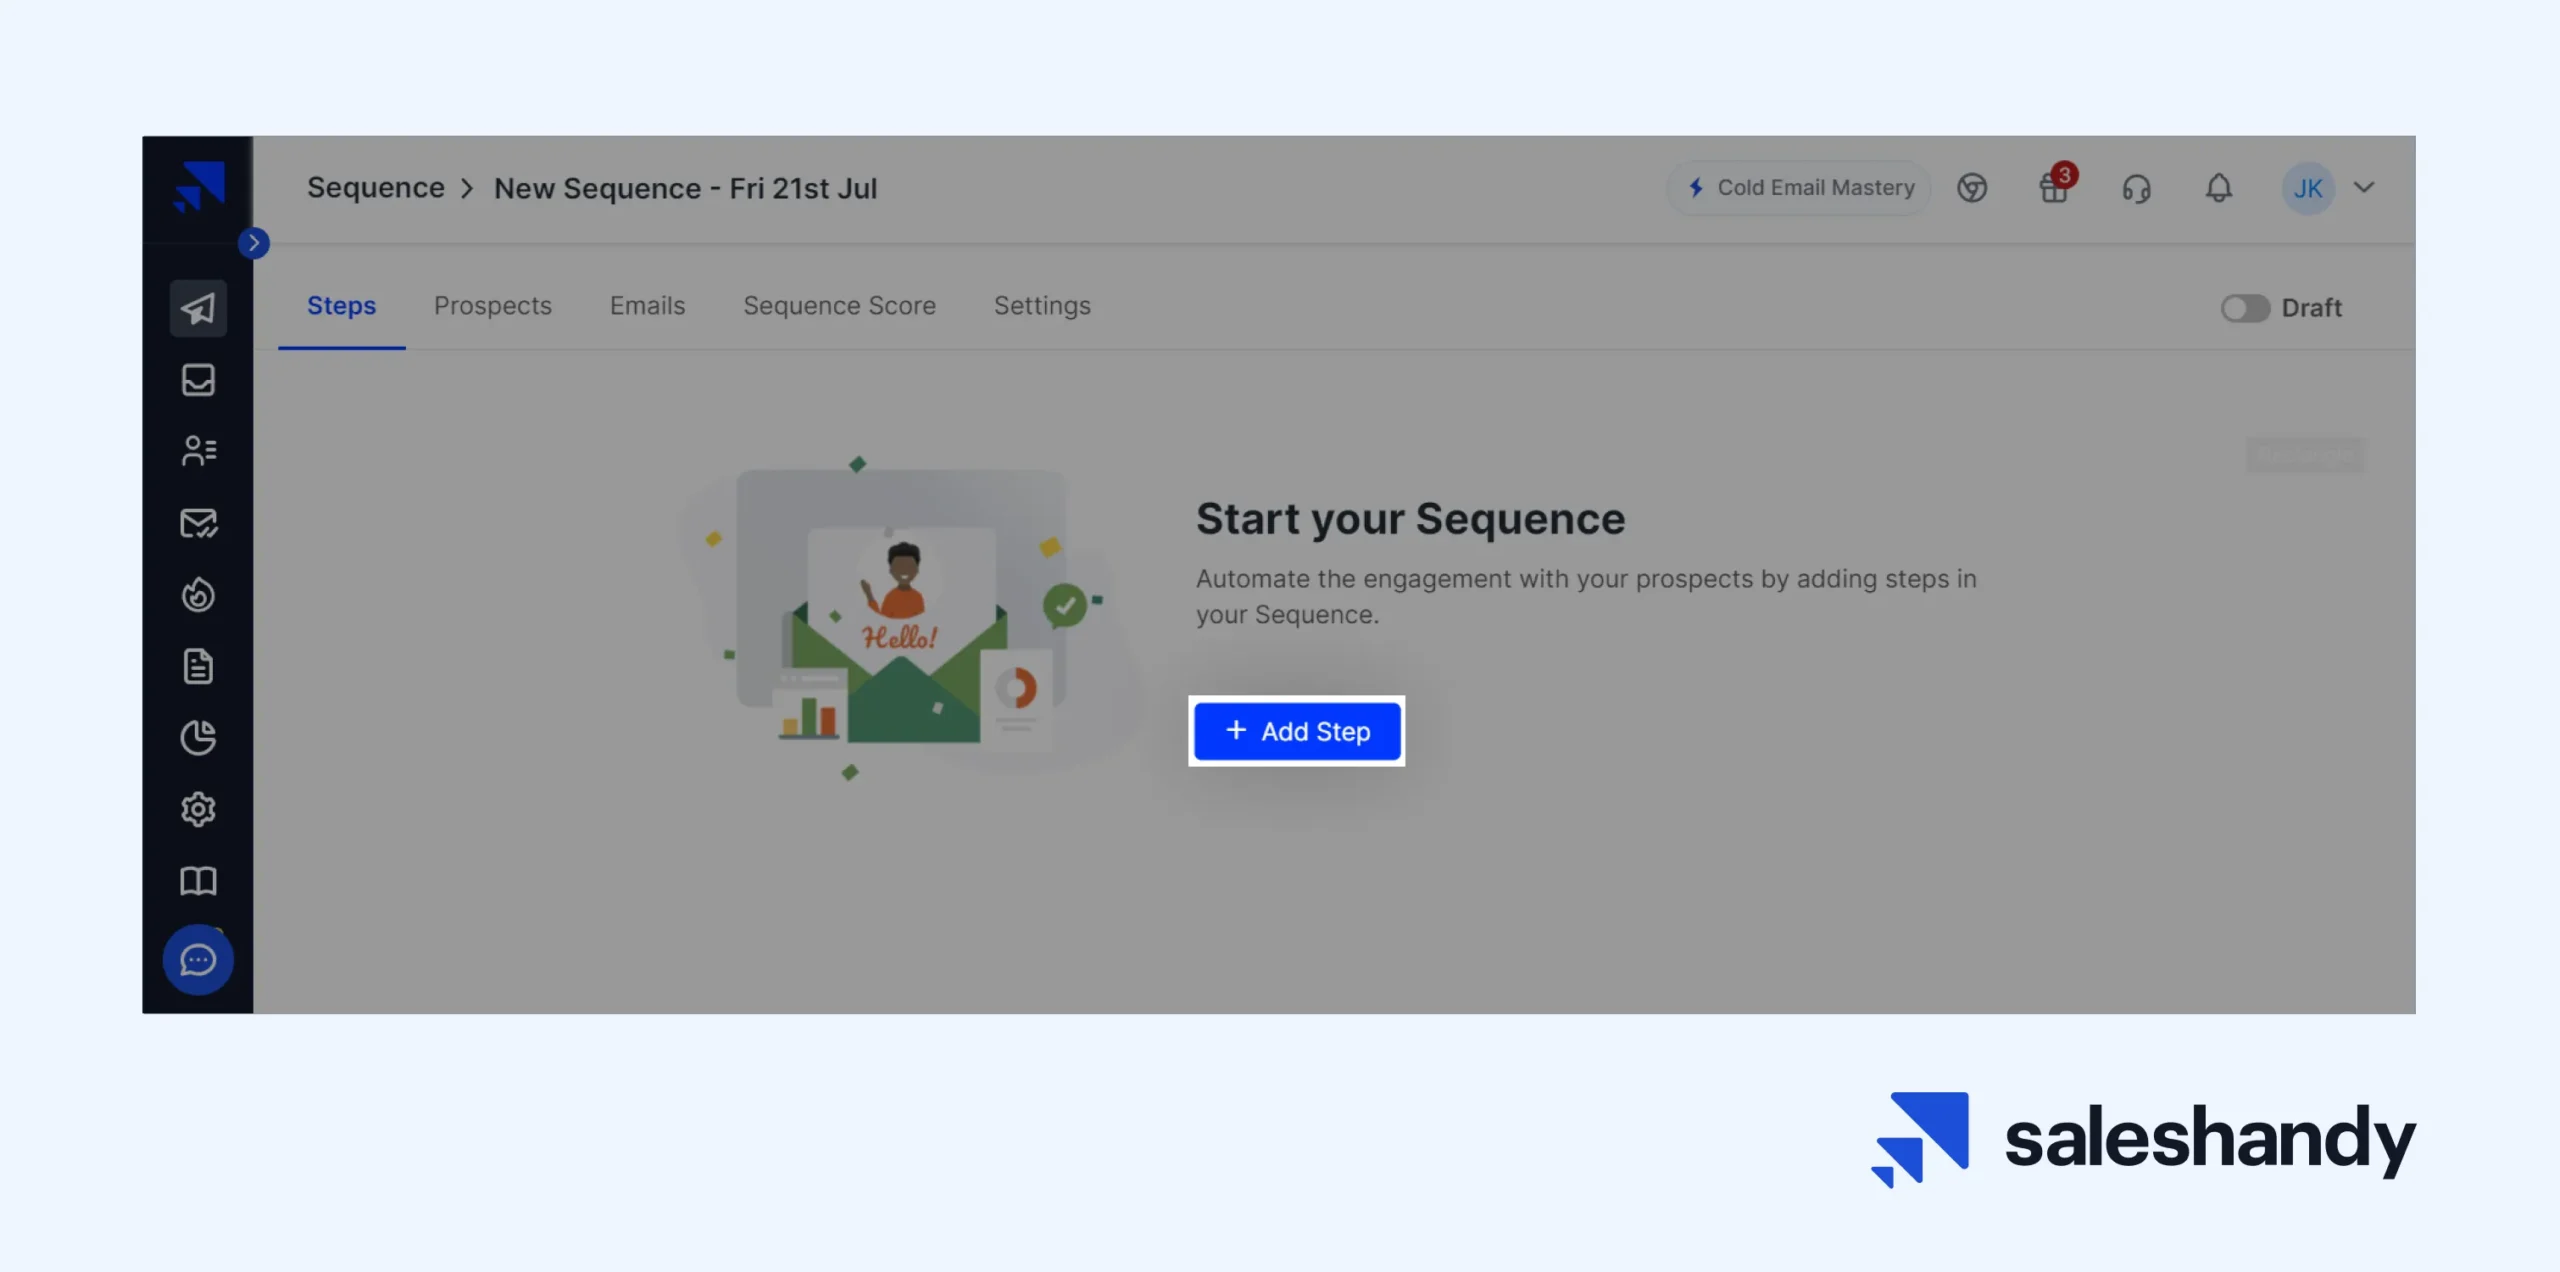
Here, you can start writing your email subject line and body message to be sent to your prospects later.
Once you’ve written your email message, click on the ‘Save’ button.

Step 6 – Add follow-up email steps
Unlike Outlook, Saleshandy lets you send auto follow-up emails based on pre-defined criteria.
Go back to the ‘Sequences’ section and click on the ‘Add Step’ displayed below the initial email step that you just created in the previous step.
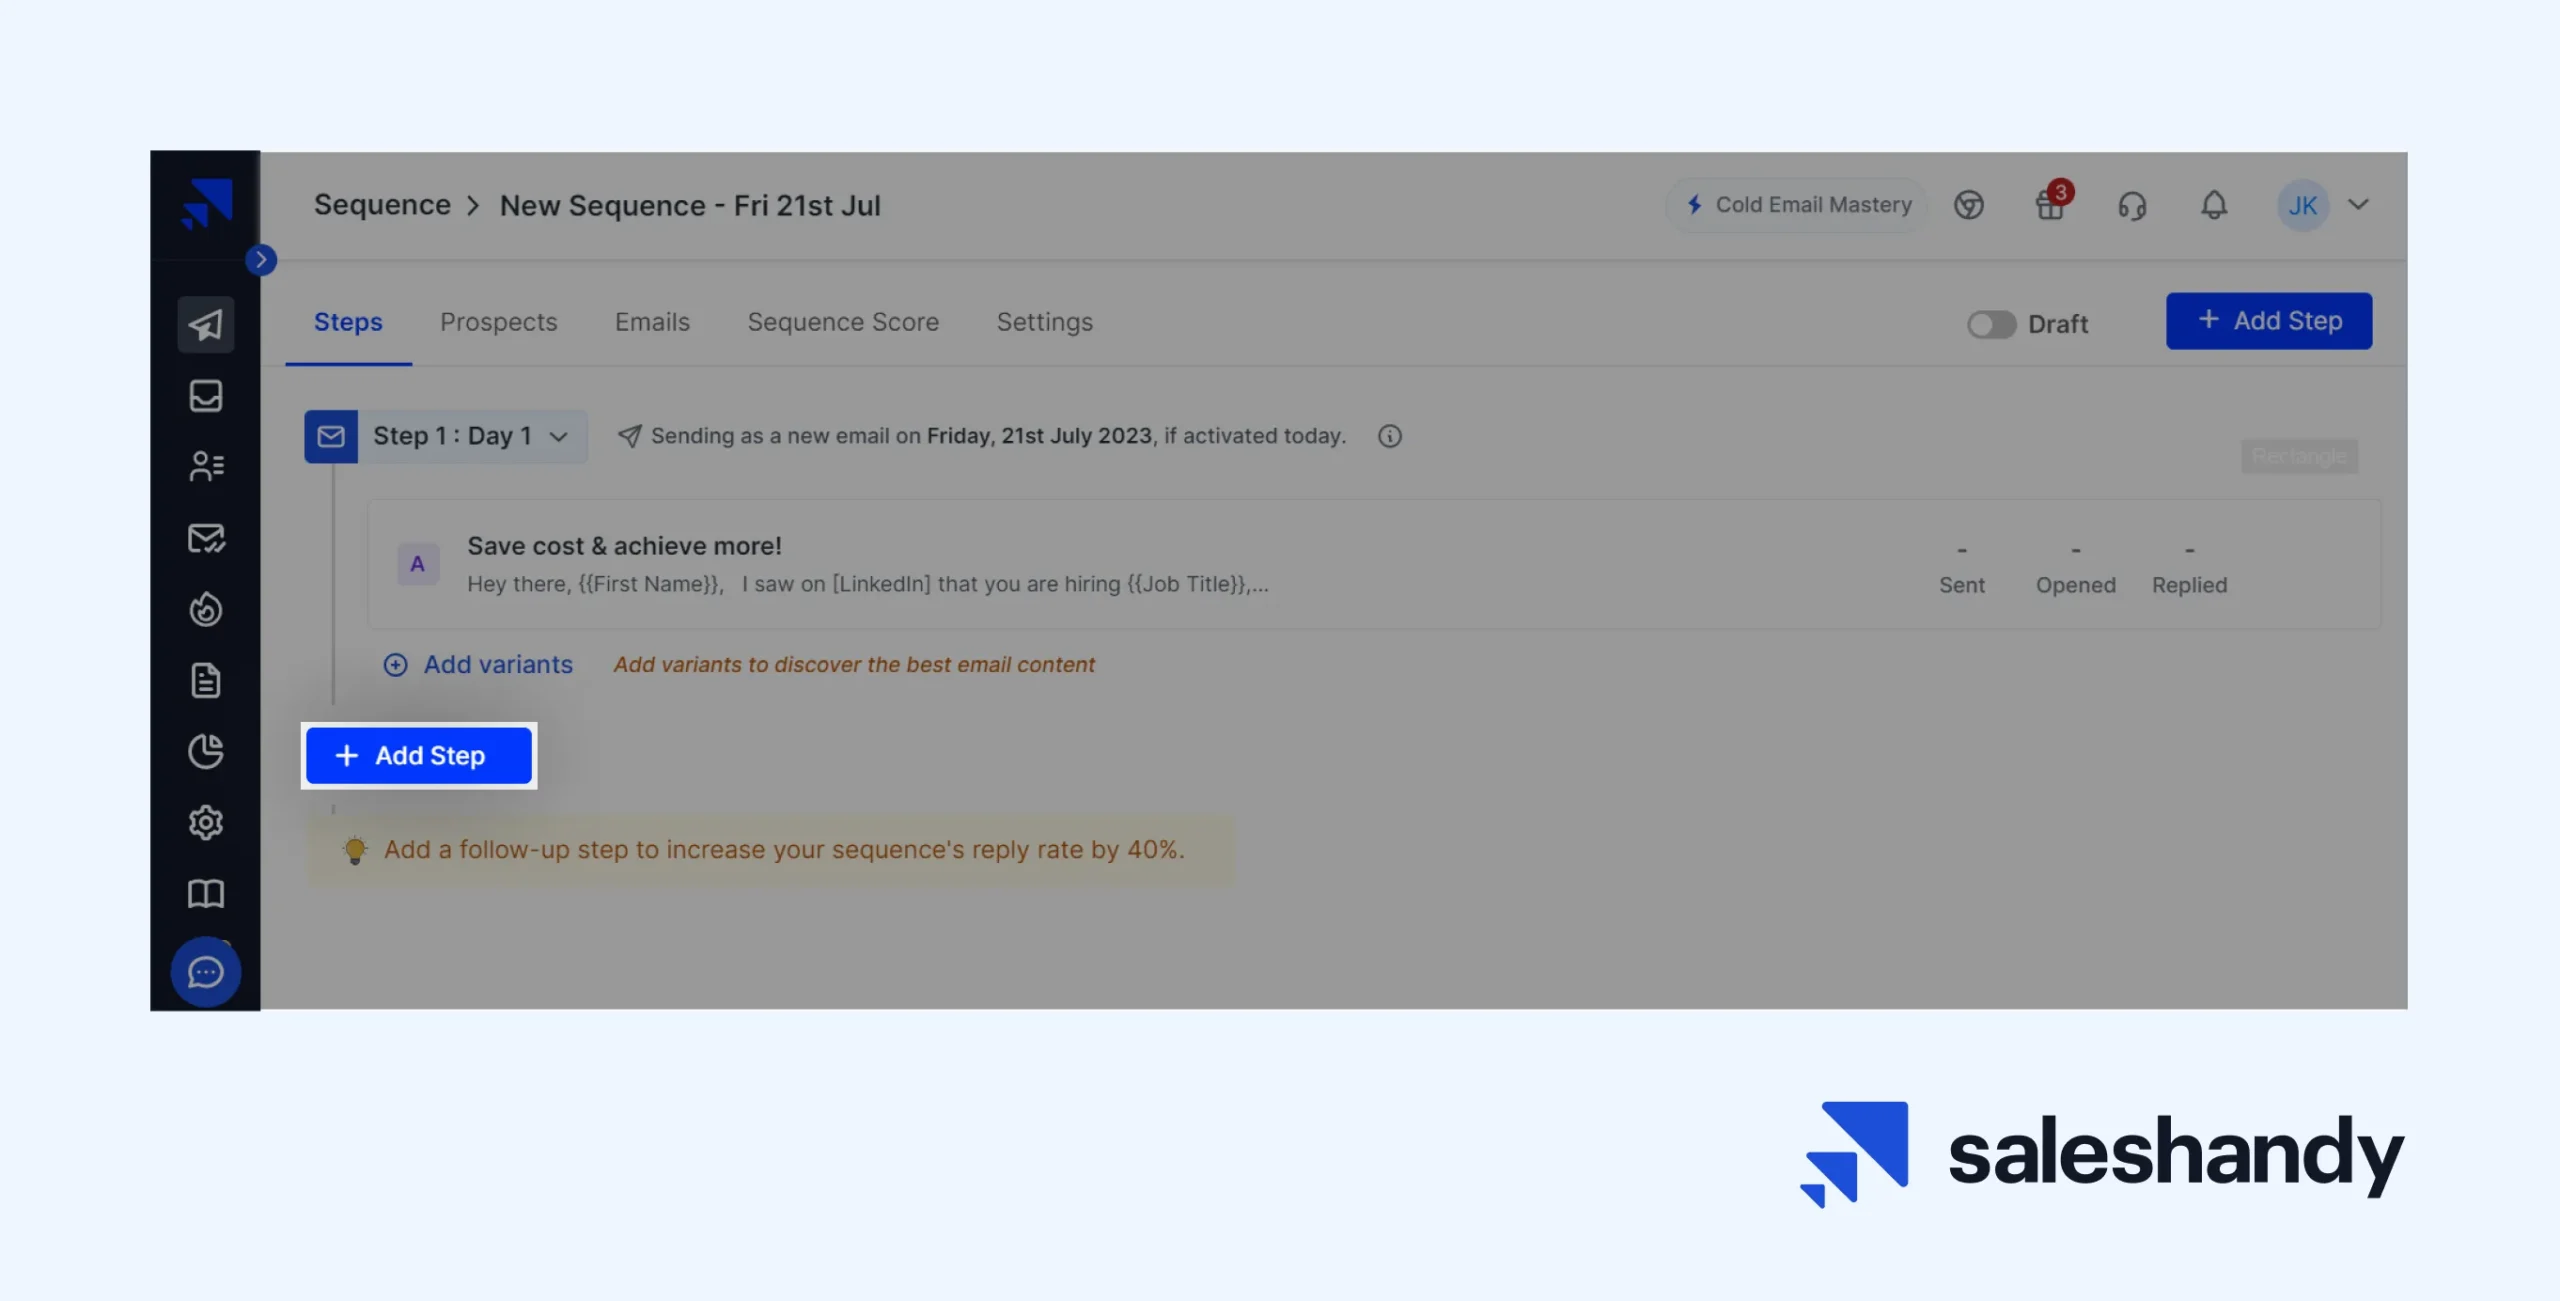
Please note that you can add multiple follow-up emails in your sequence to increase your overall campaign performance.
Step 7 – Launch your email campaign
Once everything is set, you can finally launch your email campaign using your Outlook email account.
Just head back to the ‘Sequences’ section and toggle the ‘Activate Sequence’ switch as shown in the screenshot below.

Upon activating the sequence, Saleshandy will start sending emails to each contact individually and with an appropriate time interval between each outgoing email to maintain good deliverability.
If you’re looking for a more detailed walkthrough, check out our complete guide on mass email in Outlook with mail merge.
Conclusion
And there you have it – a step-by-step guide on how to do a mail merge in Outlook to send personalized emails.
As you’ve just learned, mail merge makes it quite efficient to send personalized emails to a large list of recipients. But as we pointed out, the mail merge feature in Outlook has its fair share of drawbacks.
So, if your goal is to send personalized cold emails with auto follow-up, it’s better to use a specialized email outreach tool like Saleshandy. It just makes cold email outreach so much more efficient and effective.
Just give it a try if you haven’t already and take your cold email game to the next level!
FAQs
1) How to send emails to multiple recipients in mail merge Outlook?
To send emails to multiple recipients using Mail Merge in Outlook, you’ll need to create a contact list in an Excel spreadsheet, access the Mail Merge feature in Outlook, write your email message, insert merge fields, and send your email messages.
2) How many emails can mail merge Outlook send at once?
Free Outlook email account has a daily sending limit of 300 emails per day, while the Microsoft 365 accounts have 10,000 emails per day.
3) How to mail merge from Excel to Outlook?
To mail merge from Excel to Outlook, you need to follow these steps:
- In Excel, create a sheet with columns for all the data you want to merge like first name, last name, email, etc. This will be your data source.
- In Outlook, go to Mailings > Start Mail Merge > Step-by-Step Mail Merge Wizard.
- Select Letters as the document type and click Next.
- Select “Use an existing list” and browse to select the Excel sheet you created. Click Next.
- If prompted, select the worksheet with your data. Click Next.
- Insert merge fields from Excel into your email body by clicking More Items > Insert Merge Field > [Field Name].
- Click Next to go through the wizard, preview the merge results, and complete the merge.
- When ready, click Finish & Merge > Send Email Messages.