
You spend hours writing the perfect cold email with a sharp subject line, a strong opening, and a clear call to action.
You send it to 500 people and get 3 bounces, 1 unsubscribe, and zero replies.
Nine times out of ten, the email is fine. It is the cold email list that kills the campaign.
Most cold email lists are built on bad data that includes outdated contacts, generic job titles, unverified emails, and prospects who have no reason to care about your offer.
Every time you send to a cold email list like that, you are not just wasting effort but also burning your sender reputation and making future campaigns even harder to land.
I have built cold email lists that get under 1% reply rates and cold email lists that consistently cross 5%. The difference is never the copy. It is always how the list is built.
In this guide, I will show you the exact 6-step process I follow to build a cold email list that is targeted, verified, and ready to generate real conversations.
Before getting into the process, let me quickly clarify what a cold email list actually means.
Cold Email List – TOC
- What Is a Cold Email List?
- Why Most Cold Email Lists Fail (And How to Avoid It)
- How to Build a Cold Email List in 6 Steps
- Best Tools for Building a Cold Email List (Comparison)
- Cold Email List Compliance: CAN-SPAM, GDPR, and Best Practices
- From List to Outreach: What to Do Next
- Cold Email List: FAQs
Before getting into the process, let me quickly clarify what a cold email list actually means.
What Is a Cold Email List?
A cold email list is a collection of verified contact details, including names, email addresses, job titles, and company information, of prospects you have never interacted with before but who match the profile of your ideal customer.
It is not a random spreadsheet of emails pulled from the internet. It is not a purchased database full of generic contacts.
A proper cold email list is targeted, verified, and built with intent.
The people on it should have a real reason to care about what you are offering. That is what separates a cold email list from spam.
Think of it this way. A cold email list is the foundation of your entire cold email campaign. If the foundation is weak, nothing you build on top of it will stand.
Why Most Cold Email Lists Fail (And How to Avoid It)
Most cold email campaigns do not fail because of bad subject lines or weak copy. They fail because the cold email list was broken from the start.
Here is what usually goes wrong:
- Buying pre-made lists. These are almost always outdated. They contain invalid emails, spam traps, and contacts who have no connection to your offer. Sending to a purchased cold email list tanks your sender reputation fast.
- Targeting too broadly. When you email everyone, you connect with no one. A cold email list of 5,000 random contacts will almost always perform worse than a focused list of 500 that matches your ICP.
- Skipping email verification. B2B email data decays at roughly 25 to 30 percent per year. People change jobs, companies shut down, and email addresses stop working. If you do not verify your cold email list, your bounce rate goes up, and your email deliverability goes down.
- Sending before segmenting. A CEO and an SDR have very different pain points. If you send the same message to both from the same cold email list, neither one finds it relevant.
- Never cleaning the list. Even a well-built cold email list goes stale over time. If you are not removing bounces, unsubscribes, and inactive contacts, your results will keep declining.
(I have made almost all of these mistakes early on. The good news is that every single one of them is avoidable.)
Now let me show you how to build a cold email list the right way.
How to Build a Cold Email List in 6 Steps
This is the exact process I follow when building a cold email list. It works whether you are targeting 200 prospects or 10,000. The steps stay the same.
1. Define Your ICP and Buyer Persona
Everything starts here. If you do not know who you are targeting, no tool or tactic will save your cold email campaign.
Your Ideal Customer Profile (ICP) defines the type of company that is the best fit for your product or service.
It typically includes:
- Industry such as SaaS, IT services, e-commerce, agencies, and similar verticals
- Company size by number of employees or revenue range
- Geography covering the regions or countries you sell to
- Tech stack meaning the tools or platforms they already use
- Pain points referring to the specific problems your product solves for them
Your buyer persona goes one level deeper. It is about the actual person inside that company you need to reach.

This includes their job title, seniority level, decision-making power, daily challenges, and how they prefer to communicate.
(For example, a VP of Sales at a 200-person SaaS company has very different priorities than a marketing intern at a startup.)
Here is a practical way to start. Look at your best 5 existing customers and identify what they have in common. That pattern is your ICP.
If you are just starting out and do not have customers yet, study your competitors. Check their case studies, G2 reviews, and LinkedIn posts to understand who they serve.
The sharper your ICP, the better your cold email list. Everything else flows from here.
2. Find Leads From the Right Sources
Once your ICP is clear, the next question is, where do you actually find these people?
I use a multi-channel approach when building a cold email list. Some sources give you volume. Others give you precision. The best results come from combining both.
Here are the channels I rely on:
LinkedIn and Sales Navigator
LinkedIn is the most reliable source for B2B lead prospecting when building a cold email list.
With the free version, you can search by job title, company, location, and industry. That is enough to get started.
But if you want precision, LinkedIn Sales Navigator takes it further. You can filter by company headcount, seniority level, years in role, recent job changes, and more.
I usually start by saving search filters that match my ICP. Then I set alerts so I get notified when new prospects match those filters.
(This keeps my cold email list fresh without me having to run the same search every week.)
The one limitation is that LinkedIn does not give you email addresses directly. That is where the next sources come in.
B2B Lead Finder Tools
If LinkedIn is where you spot leads, a lead finder tool is where you actually get their verified contact information for your cold email list.
I use Saleshandy Lead Finder for this.
It gives me access to an 800M+ B2B contact database with 75+ advanced filters, including industry, company size, revenue, tech stack, job title, seniority, and even buying signals.
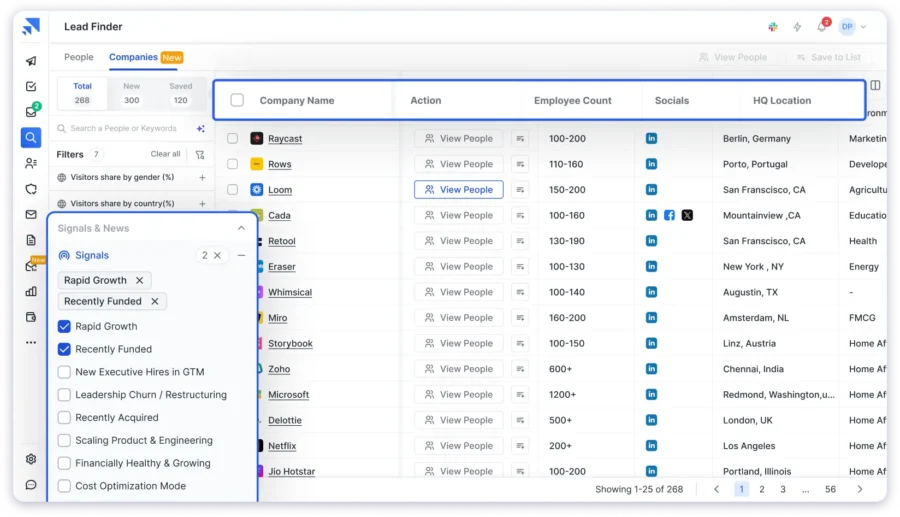
What I like most is the AI-powered search.
I can describe my ideal prospect in plain English, something like “marketing directors at SaaS companies with 50 to 200 employees in the US,” and it pulls up targeted, verified results instantly.
The data accuracy comes from waterfall enrichment, where Saleshandy cross-checks contacts across multiple data providers to return the most reliable email and phone information.
And because Saleshandy is also a cold email platform, I can find leads and launch outreach from the same tool. No exporting, no switching tabs.
I can also reveal up to 10,000 contacts in bulk, which is a major time saver when building cold email lists at scale.
Intent Signals and Buying Data
Not all prospects on your cold email list are equally ready to buy. Some are actively looking for a solution right now. Others are months away from making a decision.
Intent signals help you prioritize the ones who are closest to taking action.
These signals include:
- Funding rounds because a company that just raised capital is likely hiring and investing in new tools
- Job postings because if a company is hiring for roles related to your product, they are building that function
- Tech adoptions because switching or adding new tools signals they are open to change
- Leadership changes because a new VP or CTO often brings in their own stack
Saleshandy Lead Finder includes buying signals and news data as part of its filters. So you can build a cold email list that is not just targeted by title but also by timing.
(This is what turns a truly cold list into a warm one.)
Competitor Intelligence
Your competitors’ customers are some of the best prospects you can add to your cold email list. They already understand the problem your product solves. They are already paying for a solution.
Here is how I find them:
- G2 and Capterra reviews, where you can look at who is reviewing your competitors, since their company and role are often visible
- Case studies and testimonials because competitor websites, which often list client logos or publish detailed success stories
- LinkedIn mentions where you can search for posts that tag or mention your competitors
- BuiltWith or SimilarWeb, which show which companies use specific software, making them great for tech stack-based targeting
You will not get a full client list from any single source, but you will get enough signals to build a strong segment in your cold email list.
Chrome Extensions for Email Finding
When you are browsing LinkedIn or a company website and spot a prospect, a Chrome extension can help you grab their email right there.
I use Saleshandy Connect for this.

The Chrome extensions work directly on LinkedIn profiles. I open the extension, click “View Email,” and get the verified email address. From there, I can add the contact to my Saleshandy cold email list or export it.
It is simple, fast, and practical for one-off research or adding specific high-value prospects to your cold email list.
Inbound Lead Sources
While outbound sourcing is the main way to build a cold email list, inbound channels can support it.
Content marketing, webinars, newsletter signups, and website visitor tracking all generate leads who already have some awareness of your brand.
These contacts are often warmer and respond better to cold outreach because they have already engaged with your content.
That said, inbound is a long-term play. It takes time and consistent effort. For fast cold email list building, outbound tools and direct sourcing will get you there faster.
3. Enrich Your Data for Better Personalization
Having a name and email address is the bare minimum for a cold email list. It is not enough to write a cold email that feels personal.
To make your outreach relevant, you need context about each prospect. This is where data enrichment helps.
The key fields I try to have for every contact on my cold email list:
- Company size and revenue, which helps me tailor the pitch to their scale
- Tech stack, which tells me if they use tools that my product integrates with or replaces
- Recent news or funding that gives me a natural conversation opener
- LinkedIn activity, which shows what topics they care about right now
Saleshandy uses waterfall enrichment to pull this data automatically. Instead of relying on a single database, it checks multiple data sources and returns the most complete, up-to-date information.
(The difference between “Hi, I would love to connect” and “I noticed you just expanded your SDR team, here is how we helped a similar team book 3x more meetings” is enrichment at work.)
4. Verify Every Email Before You Hit Send
This step is non-negotiable when building a cold email list.
If you skip verification, you are sending to addresses that may not exist. That means bounces. And bounces mean your sender reputation drops, which means more of your emails land in spam, even when they are going to valid addresses.
It is a chain reaction that kills cold email campaigns.
Here is what verification catches:
- Invalid emails, which are addresses that do not exist or have been deactivated
- Catch-all domains, which are servers that accept any email, making accuracy uncertain
- Role-based addresses, which are generic inboxes like info@ or support@, rarely get replies
- Spam traps, which are addresses designed to catch people sending to unverified cold email lists
The goal is to keep your bounce rate under 2 percent.
Saleshandy has built-in email verification, so I do not need a separate tool for this. Every lead I find through Lead Finder is verified in real time before I add it to my campaign.
(If you are building your cold email list from other sources like LinkedIn, manual research, or another database, always run them through a verifier before sending.)
5. Segment Your List for Targeted Outreach
A cold email list is not one list. It is multiple micro-lists.
Segmentation is how you make sure the right message goes to the right person on your cold email list.
Here is how I segment:
- By persona, because SDRs, founders, VPs of Sales, and agency owners all care about different things, so I write separate messaging for each
- By industry, because a SaaS company and a recruiting agency have different pain points, even if the job title on the cold email list is the same
- By company size, because a 10-person startup has different needs than a 500-person mid-market company
- By intent level, because prospects showing buying signals like funding, hiring, or tech changes get a more direct pitch, while colder prospects get a softer, value-first approach
When I take a 1,000-contact cold email list and break it into 4 to 5 focused segments, my reply rates consistently improve by 3 to 4 times compared to a single blast.
(It takes more effort upfront. But the results are worth it.)
Once your segments are ready, managing them becomes important too. This is where Saleshandy CRM helps.
It gives you a Kanban-style view of all your prospects, showing who has been contacted, who replied, who needs follow-up, and who has gone cold. Everything stays organized as your cold email outreach scales.
6. Clean and Maintain Your List Regularly
Building a great cold email list is not a one-time task. It needs ongoing care.
Contacts change jobs. Companies get acquired. Email addresses stop working. If you do not clean your cold email list regularly, performance will quietly decline.
Here is my cleaning routine:
- Before every campaign, I run a quick verification pass on the segment I am about to email
- After every campaign, I remove hard bounces immediately and flag soft bounces for re-verification
- Monthly, I remove contacts who have not engaged in 3 or more campaigns
- Quarterly, I do a full audit where I update job titles, remove role-based addresses, and re-verify the entire cold email list
This sounds like a lot. But once you build the habit, it takes very little time.
And the payoff is significant. Cleaner data means better deliverability, higher reply rates, and a sender reputation that stays healthy.
Best Tools for Building a Cold Email List (Comparison)
There are plenty of tools in the market for building a cold email list. Here is a quick comparison of the ones I have tested or evaluated closely.
| Tool | Database Size | Search Filters | Built-in Verification | Cold Email Integration | Starting Price |
|---|---|---|---|---|---|
| Saleshandy Lead Finder | 800M+ | 75+ (incl. buying signals) | Yes | Yes (full platform) | $49/mo |
| Apollo.io | 275M+ | 65+ | Yes | Yes | $49 Per user per month |
| ZoomInfo | 300M+ | 50+ | Yes | No (CRM-focused) | Custom pricing |
| Hunter.io | 100M+ | Limited | Yes | No | $49/mo |
| LinkedIn Sales Navigator | N/A (profile-based) | Advanced LinkedIn filters | No | No | $99/mo |
If I had to pick one tool for the full cold email list workflow, from finding leads to verifying emails to running campaigns to managing prospects, Saleshandy covers all of it in one place.
The 800M+ database with 75+ filters and AI-powered search gives me precision. The waterfall enrichment gives me accuracy.
And because the cold email platform and the new Saleshandy CRM are built into the same tool, there is no exporting or syncing between systems.
Cold Email List Compliance: CAN-SPAM, GDPR, and Best Practices
Building a cold email list also means staying on the right side of the law. Here are the rules I follow.
CAN-SPAM (United States):
- Include a clear unsubscribe link in every email
- Use your real business name and physical address
- Do not use misleading subject lines
- Honor opt-out requests within 10 days
GDPR (European Union):
- You need a “legitimate business interest” to email someone cold
- Keep records of how and when you collected the data
- Respect opt-out requests immediately
General best practices:
- Never scrape emails without verifying them
- Maintain a Do Not Contact (DNC) list and respect it
- Remove bounced and unsubscribed contacts after every campaign
Cold emailing is legal. But it comes with responsibilities. Following these rules protects your reputation and keeps your cold email campaigns running long-term.
From List to Outreach: What to Do Next
Your cold email list is ready. Now the question is what you do with it.
The cold email list is only the starting point. What you do next determines whether it generates replies or sits unused in a spreadsheet.
Here is the sequence I recommend:
- Set up your email infrastructure. Use a separate domain for cold outreach. Configure SPF, DKIM, and DMARC records. This protects your primary domain and improves email deliverability.
- Warm up your email accounts. If you are using a new domain or inbox, start with low volume and gradually ramp up. Saleshandy includes email warm-up features to automate this.
- Write personalized first-touch emails. Use the enrichment data from your cold email list to make each email feel relevant. Reference a specific pain point, a recent event, or something tied to their role. Keep it under 150 words with one clear ask.
- Set up follow-up sequences. Most replies come from follow-ups, not the first email. I recommend 3 to 5 follow-ups spaced over 2 to 3 weeks. Each one should add a new angle, not just repeat the same ask.
- Track everything in your CRM. Use Saleshandy CRM to see which prospects are engaged, who needs a nudge, and which deals are moving forward. The Kanban view makes this easy to manage even at scale.
Build your cold email list in minutes, not days.
Try Saleshandy Lead Finder free.
Cold Email List: FAQs
1. What is a cold email list?
A cold email list is a targeted collection of verified contact details of people you have not previously interacted with. These contacts match your ideal customer profile and are potential buyers for your product or service. It is different from a marketing email list, which consists of people who have opted in to receive communications from you.
2. How many contacts should a cold email list have?
There is no fixed number. What matters more than size is relevance and accuracy. A well-targeted cold email list of 200 to 500 verified contacts will almost always outperform a generic list of 5,000. Start small, test your messaging, and scale once you see consistent reply rates.
3. Should I buy a cold email list or build my own?
Build your own. Purchased cold email lists are typically outdated, full of unverified contacts, and may contain spam traps. They hurt your deliverability and can damage your sender reputation. Use a B2B lead finder tool to build a cold email list that is targeted, verified, and fresh.
4. How often should I clean my cold email list?
At a minimum, once a quarter. If you are sending campaigns weekly, verify your cold email list before each send. Remove hard bounces, unsubscribes, and inactive contacts regularly. Clean data protects your sender reputation and keeps your reply rates healthy.
5. Is it legal to send cold emails?
Yes. Cold emailing is legal under CAN-SPAM in the United States and GDPR in the European Union as long as you follow the rules. Include an unsubscribe link, use your real identity, and honor opt-out requests. The key difference between cold email and spam is targeting, personalization, and compliance.
6. What is the best tool for building a cold email list?
I use Saleshandy Lead Finder. It gives me access to 800M+ B2B contacts with 75+ search filters, AI-powered lead discovery, waterfall enrichment for data accuracy, and built-in email verification. Plus, I can launch cold email campaigns directly from the same platform without switching between tools. You can sign up for free and get 50 leads to test it out.