Every six months, a new LinkedIn post declares cold email dead.
And every six months, outbound teams quietly keep booking more meetings from cold email than they do from paid ads, SEO, and LinkedIn DMs put together.
So what separates the teams pulling 20% reply rates from the ones stuck at 1%?
I’ve reviewed hundreds of campaigns, and the same pattern shows up every time.
The winners nail the setup before they worry about subject lines.
The losers write a great email, hit send from their main Gmail, and wonder why nobody replied.
Here’s how to send cold emails the way outbound teams actually do it at scale in 2026.
Send them now!
How to Send Cold Email – TOC
TL;DR: Sending Cold Emails by the Numbers
1. Warm-Up: Run inbox warm-up for at least 2 to 3 weeks before your first cold email.
2. Daily Send Limit: Cap every inbox at 25 to 30 cold emails per day to avoid spam filters.
3. Email Length: Keep cold emails between 50 and 75 words because shorter messages pull more replies.
4. Bounce Rate: Keep your bounce rate under 2% or Gmail starts punishing your sender reputation.
5. Best Send Window: Send Tuesday through Thursday, between 9 and 11 AM in the prospect’s local time.
6. Follow-Ups: Send 3 to 5 follow-ups per prospect, since 42% of replies come after the first email.
7. Contact Database: Use Saleshandy’s Lead Finder to pull from 800M+ verified B2B contacts with 75+ filters.
8. Sending Domain: Set up at least 1 dedicated sending domain and never send cold emails from your main business domain.
What You Need Before You Send a Single Cold Email
Sending cold emails from your main Gmail or your primary company domain is the fastest way to get blacklisted.
I’m going to say it once more because it matters: your sending setup matters more than your copy.
Here’s what that setup looks like:
- A Dedicated Sending Domain (Not Your Main One)
- SPF, DKIM, and DMARC Authentication
- Inbox Warm-Up
- A Verified Prospect List
1. A Dedicated Sending Domain (Not Your Main One)
Buy a separate domain that looks similar to your main one.
If your company runs on acme.com, register try-acme.com or getacme.com for outreach.
If the cold email domain gets flagged, your actual business email stays untouched.
Planning to send more than 100 emails a day?
Set up 2 to 3 sending domains from the start.
2. SPF, DKIM, and DMARC Authentication
These three DNS records tell Gmail and Outlook that your email is legitimate.
Since Google and Yahoo’s February 2024 update, DMARC is mandatory for bulk senders.
Skip it, and your emails get rejected at the SMTP level. They don’t even reach spam. They just vanish.
Setup takes about 30 minutes inside your domain registrar.
I have broken down the full SPF and DKIM setup here.
3. Inbox Warm-Up
A brand new inbox has zero sending reputation.
Send cold emails from it on day one, and providers flag you as spam within 48 hours.
Warm-up tools fix this by mimicking natural email behaviour.
They send, receive, open, and reply to messages between verified inboxes, so your account looks human before your first real cold email goes out.
Two weeks is the floor.
For a new domain, I’d push it to 3 to 4 weeks.
Saleshandy’s built-in warm-up runs on autopilot once you connect your inbox.
4. A Verified Prospect List
Nothing kills deliverability faster than a dirty list.
A bounce rate above 2% signals to Gmail that you’re either a spammer or an incompetent sender.
Either way, you get punished.
Run every list through an email verifier before the first send.
It catches typos, catch-all domains, and mailboxes that look real but bounce on arrival.
How To Send Cold Emails Using a Manual Approach
Manual sending is an old-school way of sending cold emails and has been practiced for ages. It is practical and personalized, but also time-consuming if you have a large number of leads as your ICPs.
Let’s take a slow, step-by-step approach to understand how you can send manual cold emails smartly.
- Step 1: Research Your Prospects
- Step 2: Craft a Perfect Email
- Step 3: Always Use a Company Domain or Email Account For Cold Email Outreach
- Step 4: Follow up With Politeness and Persistence
Step:1 Research Your Prospects
When you send cold emails manually, you’re usually reaching out to a small, targeted group.
That means research is your biggest advantage. The more relevant and personalized your outreach is, the higher your chances of getting a reply.
Before looking at prospects, define who you’re after. Your research should cover:
- Industry or niche
- Company size and location
- Decision-maker roles (title, seniority, department)
- Common pain points your solution solves
To go one step further, if you can invest 5 – 7 minutes per prospect, try finding these details,
For each prospect, jot down:
- Who they are and their role
- A recent trigger (e.g., funding, new hire, expansion)
- The problem they might be facing
- How your solution can help
- A possible angle for your CTA
This gives you a ready-to-use reference when you start writing the email.
Quick Tips:
Create an ICP (Ideal Customer Profile) list and update it frequently.
Step 2: Craft a Perfect Email
Once you have your list, it’s time to research your prospect.
The goal isn’t to send a sales pitch; it’s to start a conversation.
First, spend a couple of minutes researching your prospect.
Find one small detail a recent post, a job change, or a product launch to use as your hook.
Next, select a subject line that sparks curiosity and is short and specific.
After finalizing a subject line, write a concise email body that feels like a real conversation.
Begin with a hook that demonstrates your understanding of their problem, followed by a brief explanation of how you can assist.
End with a low-pressure CTA something like, “Would you be interested to know more?
Instead of high-demand ask.
Quick Tip:
• The entire email should be easily readable on a phone screen.
• Your email should always focus more on their needs than on yourself.
• Give them an easy out. Using phrases like “No problem if you’re not interested” shows respect for their time.
Step 3: Always Use a Company Domain or Email Account For Cold Email Outreach
For your manual cold email campaigns, always make sure you’re sending from your company domain (like you@yourcompany.com).
Professional email addresses generally have a higher sender reputation and are more likely to land in the primary inbox.
Quick Tip:
• Send a reasonable number of emails to avoid being flagged as spam.
• Always add a signature at the end, including your full name, title, and company.
Step 4: Follow up With Politeness and Persistence
Most prospects won’t reply to your first cold email.
It’s not always rejection sometimes they miss it, sometimes they’re busy. That’s why follow-up emails matter.
A well-timed, polite follow-up can bring your message back to the top of their inbox and dramatically increase your chances of getting a response.
Don’t pitch anything new in your follow-up email. Follow-up emails should just be a friendly reminder of your previous proposed pitch.
Send your first follow-up about 3-5 business days after your initial email.
After that, send one or two more a week or so apart. If you still don’t hear back, it’s okay to let it go.
Quick Tip:
Vary your email send times and subject lines for follow-ups to stand out, and don’t be afraid to send a final “no-problem” email, as it often prompts a reply.
Sending a manual cold email is powerful. It works best when you want to build a deep, personal connection with a handful of key individuals.
In this case, you can write a genuinely unique message. The result is often a warm, high-quality conversation—one that makes the extra effort worthwhile.
What do you do when your list of potential clients grows from a few to a hundred?
You need a way to take that same personal touch and turn it into a repeatable system.
This is where automated cold emailing comes in.
It’s the modern solution that lets you personalize cold email with a smart, scalable tool to do so for you.
How to Send Cold Emails Through Automation
Cold email automation is necessary when your lead list is growing fast, making it challenging to personalize each email manually and follow up.
This is the part where automation comes in.
It saves hours of human effort without losing the personal touch.
Let’s understand each step in detail to launch your automated cold email campaigns.
- Step 1: Sign Up and Set Up Your Saleshandy Account
- Step 2: Add Prospects or Build Your Lead List From Scratch
- Step 3: Create a Personalized Cold Email Sequence
- Step 4: Set Up Your Automated Follow-Ups
- Step 5: Schedule and Launch Your Campaign
- Step 6: Track Results in the Saleshandy CRM
Step 1: Sign Up and Set Up Your Saleshandy Account
Log in to your Saleshandy account and complete the onboarding process.
After that, you’ll land on the Saleshandy dashboard.
Connect your sender email or better, connect 3 to 5 warmed-up inboxes across your sending domains to enable sender rotation from day one.
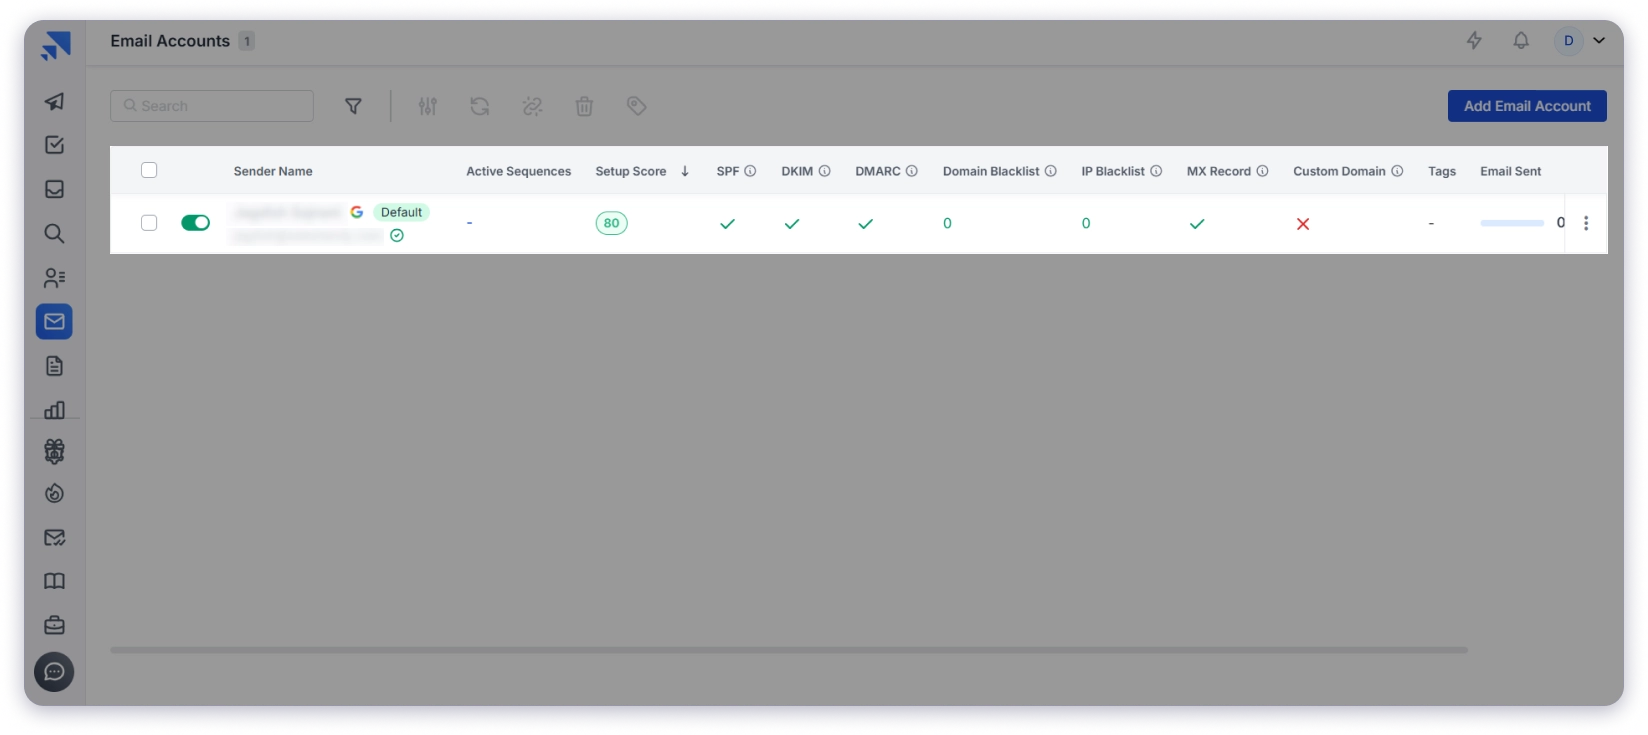
Sender rotation automatically spreads your daily volume across every connected inbox, so you can safely send 500 emails a day without blacklisting a single account and complete the onboarding process.
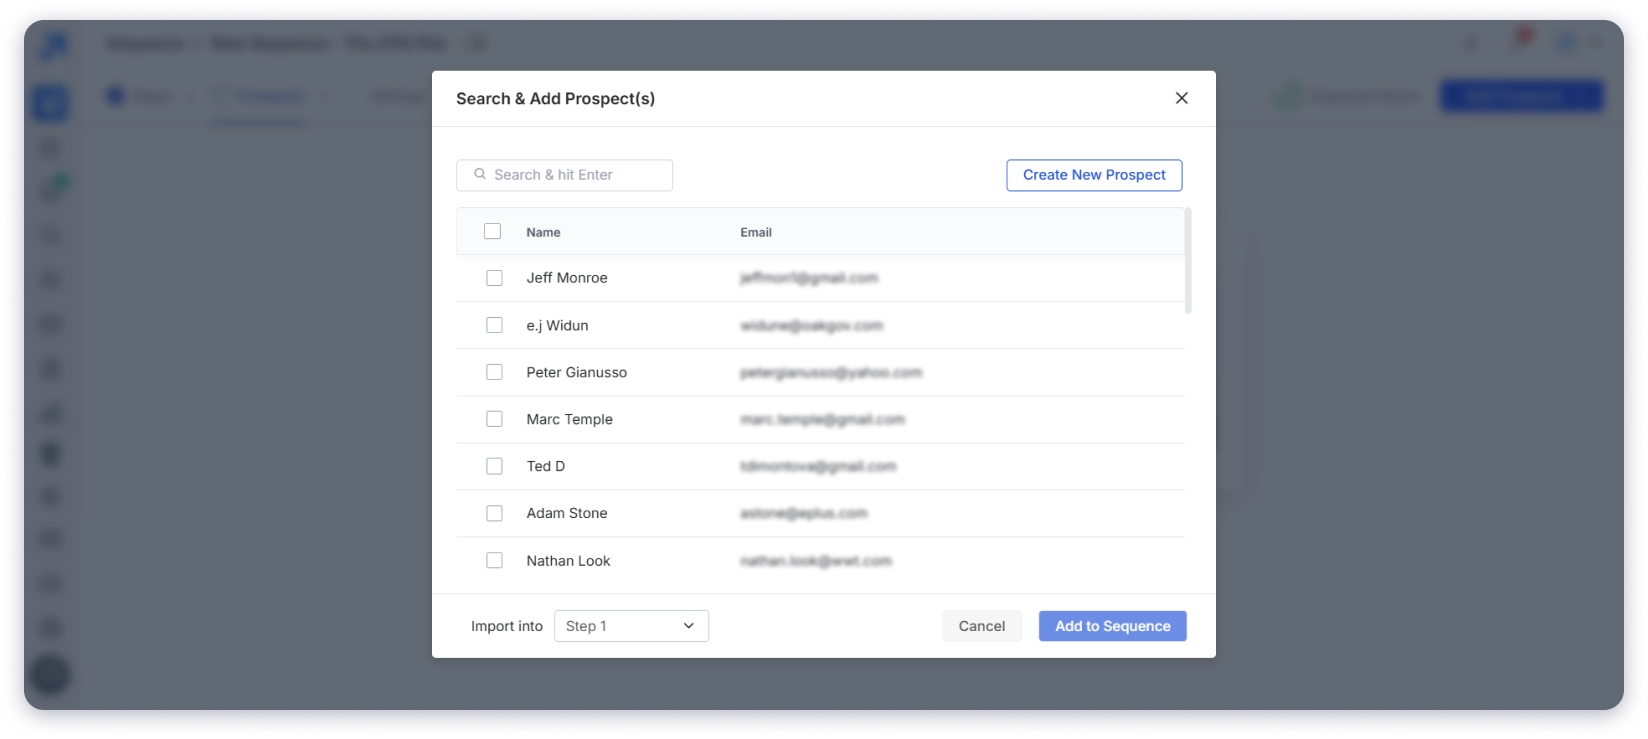
Step 2: Add Prospect or Build Your Lead List From Scratch
After your account is set up, you can upload your lead list or use Saleshandy B2B Lead Finder to get a list of your prospects.
Lead Finder now has 800M+ verified professional contacts from 60M+ companies globally, backed by waterfall enrichment for email accuracy.
As per your ICP, you can apply 75+ filters across industry, role, seniority, company revenue, location, tech stack, and real-time buying signals to find relevant prospects.
Once you have your cold email list, you can create your sequences.
Step 3: Create a Personalized Cold Email Sequence
While crafting cold emails, you can easily personalize your subject lines and messages and stand out by using merge tags, variable tags, and spintax to add a unique touch for each recipient.

Saleshandy’s AI Sequence Copilot takes this further by generating personalized opening lines automatically, pulling context from each prospect’s LinkedIn and company data.
If you want to test which angle converts best, the A-Z Testing feature lets you run up to 26 variants of the same email in parallel.
The winner shows up in your analytics within a few hundred sends.
Step 4: Set Up Your Automated Follow-ups
Once your cold email is drafted, add follow-ups within your sequence.
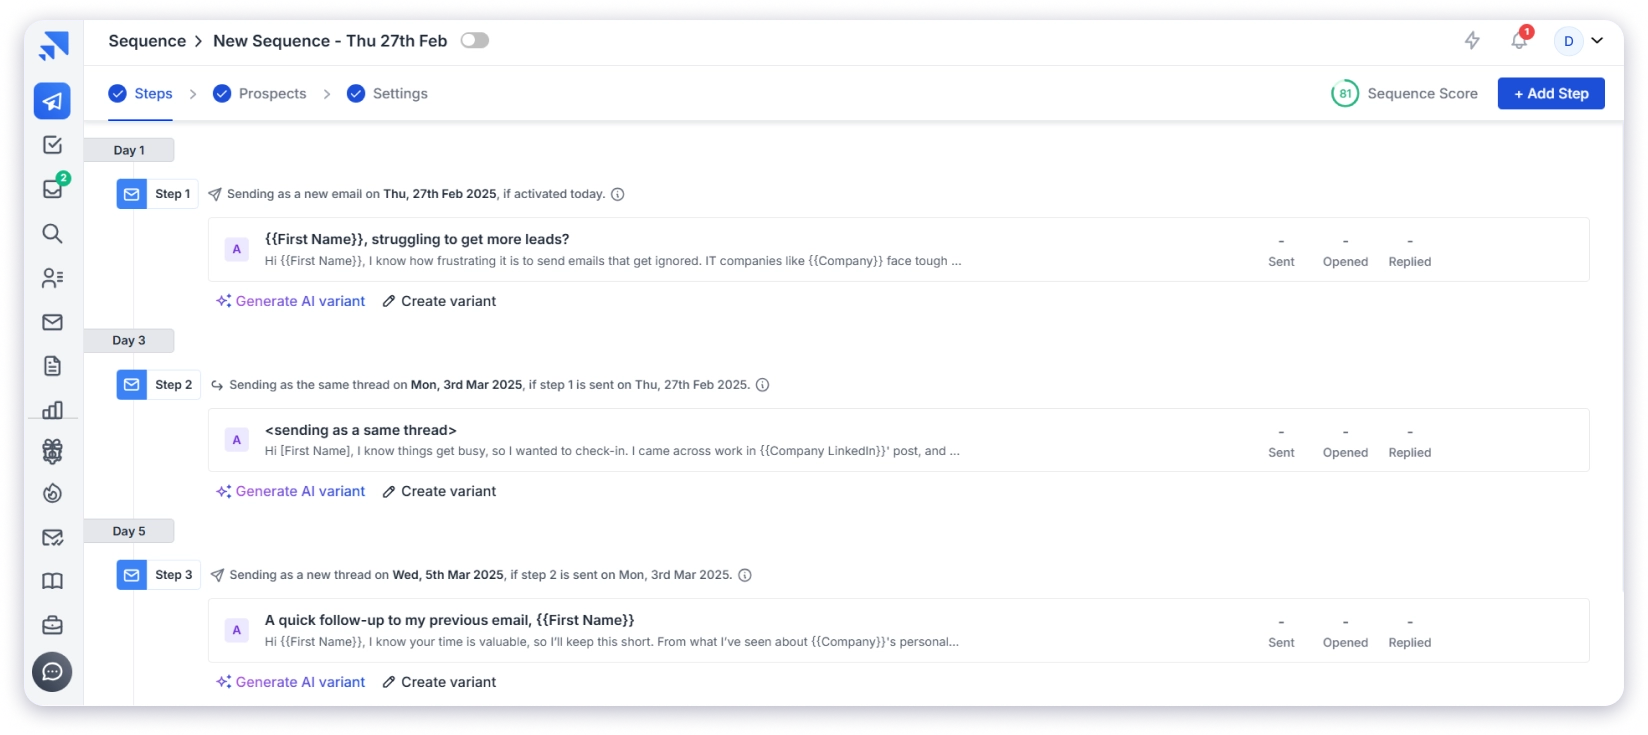
Follow-ups dramatically increase reply rates (42% of replies come after the first email), and you can schedule follow-up timing so they run automatically without needing reminders.
Step 5: Schedule And Launch Your Campaign
Once you’ve built your list and written your sequence, you set your schedule and hit “Start your Campaign.“
The automation tool takes over from there, sending out your personalized emails and follow-ups exactly as planned.
It automatically stops the sequence for anyone who replies, so you never have to worry about annoying a prospect.
Step 6: Track Results in the Saleshandy CRM
Once your campaign is live, the Saleshandy CRM gives you a full picture of every prospect in one place.
You can see important metrics like open rates, click-through rates, reply rates, inbox placement, and bounce rates across your entire campaign.

The Kanban-style pipeline shows you which prospects replied, which are stuck, and which need a follow-up, so you always know your next move.
Every email, reply, open, and note for a prospect lives in one unified timeline, which means no more digging through tabs before you respond.
You can also track campaign issues like bounced emails or messages landing in spam, with real-time insights to improve your outreach continuously.
So now you’ve learned both ways of sending cold emails, whether manual or automated.th ways of sending cold emails, be it manual or automated ones.
One Last Thing Before You Hit Send
Cold email still works in 2026.
It works for the teams who respect the setup before they worry about the copy.
Get your dedicated domain, authentication, warm-up, daily limits, and send timing right.
Then layer on short, personalized emails with 3 to 5 follow-ups.
That’s 80% of the game.
If you’d rather skip the setup gymnastics, Saleshandy handles sender rotation, warm-up, list verification, AI personalization, automated follow-ups, an outbound CRM, and 800M+ B2B contacts inside one dashboard.
FAQs About Sending Cold Emails
1. What is cold emailing, and how is it different from spam?
Cold emailing involves reaching out to someone you haven’t interacted with before for business purposes, such as sales or networking. Unlike spam, which is mass-sent, irrelevant, and often intrusive, a cold email is personalized, provides value, and follows ethical best practices to engage the recipient meaningfully.
2. Is cold emailing legal? Will I get in trouble for sending cold emails?
Cold emailing is legal if done correctly. In the U.S., the CAN-SPAM Act allows it as long as you provide an opt-out option, use a real sender address, and keep the subject line honest. In the EU, GDPR requires a legitimate business reason to contact someone and mandates an easy way to opt out. Following these regulations ensures compliance and prevents legal issues.
3. What is the best cold email platform to use?
The best cold email platform depends on your needs. Saleshandy is excellent for finding prospects, writing personalized emails on a large scale, and automating the entire sequence in a single click.
4. What should I include in a cold email to get replies?
A good cold email includes a personalized opening, a clear value proposition, and a simple call to action. Keep it short, focus on the recipient’s needs, and make it easy for them to respond. A compelling subject line and a natural, conversational tone can also improve engagement.
5. How many follow-ups should I send, and how often?
It’s best to send 3-5 follow-ups, spacing them out strategically, first after 2-3 days, then every 4-7 days. Each follow-up should add value, offer new insights, or reframe your message rather than repeating the same content. Consistency, while respecting the recipient’s time, improves response rates.