


Contents
- 1 Email Deliverability Testing – TOC
- 2 What is an Email Deliverability Test?
- 3 How to Test Email Deliverability (Step-by-Step Process)
- 4 5 Best Email Deliverability Testing Tools
- 5 When Should You Run a Deliverability Test?
- 6 A Quick Email Deliverability Testing Checklist
- 7 Start Testing Your Deliverability Today
- 8 FAQs on Email Deliverability Testing
- 8.1 1. How can I test my email deliverability for free?
- 8.2 2. What is a good email deliverability score?
- 8.3 3. How often should I test email deliverability?
- 8.4 4. What causes emails to fail deliverability tests?
- 8.5 5. What is the difference between email delivery and email deliverability?
- 8.6 6. What is inbox placement testing?
“My emails are going to spam. I have no idea why.”
I hear this from cold email teams almost every week. They wrote the perfect copy. They verified every lead. But their emails never reached the inbox.
The problem? They never ran an email deliverability test before hitting send.
An email deliverability test tells you exactly where your emails land. It checks whether your messages reach the primary inbox, slip into promotions, or get buried in spam.
In this guide, I will walk you through every step of testing email deliverability the right way.
You will learn what to test, which tools to use, and how to fix every issue that shows up.
Email Deliverability Testing – TOC
What is an Email Deliverability Test?
An email deliverability test checks if your emails are landing in the inbox. It tells you whether your messages reach the primary inbox, get filtered into promotions, end up in spam, or fail to deliver at all.
Think of it as a health checkup for your email setup before you launch a campaign.
A proper test evaluates four key areas.
- First, inbox placement across Gmail, Outlook, and Yahoo.
- Second, your domain and IP reputation.
- Third, your spam score.
- Fourth, whether SPF, DKIM, and DMARC authentication are correctly configured.
I will break each of these down into clear, actionable steps below.
How to Test Email Deliverability (Step-by-Step Process)
I have tested dozens of cold email campaigns over the years. The process below is the exact workflow I follow before launching any outreach. Each step targets a specific deliverability factor.
Step 1: Verify Your Email Authentication (SPF, DKIM, DMARC)
Before anything else, fix the technical foundation. SPF, DKIM, and DMARC are your email’s digital identity. Without them, inbox providers like Gmail and Outlook treat your messages as suspicious.
Here is what each one does.
SPF (Sender Policy Framework) tells receiving servers which IPs can send emails on behalf of your domain. If an unauthorized server sends using your domain, SPF flags it.
DKIM (DomainKeys Identified Mail) adds a digital signature to your email. This verifies the message was not tampered with during transit.
DMARC (Domain-based Message Authentication, Reporting, and Conformance) ties SPF and DKIM together. It tells servers what to do if authentication fails.
If any of these are missing or misconfigured, your emails will struggle. It does not matter how good your content is.
How to check: Use MxToolbox or Google Admin Toolbox to verify your records. Saleshandy’s Inbox Radar also checks authentication status as part of its placement report.
What a passing result looks like: All three records show “Pass” status with no alignment errors.
What a failing result means: Your emails are likely getting flagged or blocked. I have written a detailed guide on how to set up SPF, DKIM, and DMARC records step by step.
Step 2: Run an Inbox Placement Test
Once authentication is in place, run an inbox placement test. This step sends your email to seed inboxes across major providers.
It reports back whether your message hit the primary inbox, promotions tab, spam folder, or went undelivered.
How to run it: Send your test email to a seed list provided by a deliverability testing tool. The tool checks placement across Gmail, Outlook, Yahoo, Zoho, and other providers.
Tool I recommend: Saleshandy’s Inbox Radar runs automated inbox placement tests using real seed inboxes. It shows placement percentages per provider and flags authentication issues. It also generates a shareable report you can send to your team or clients. You can set up recurring tests (daily, weekly, or monthly). This helps you catch placement drops before they damage your campaigns.
You can set up recurring tests (daily, weekly, or monthly). This helps you catch placement drops before they damage your campaigns.
For a detailed walkthrough, check out this step-by-step Inbox Radar guide.
Other tools you can use: GlockApps, Warmy’s free deliverability test, and Mail Tester also offer inbox placement testing.
What good results look like: An inbox placement rate above 90% is solid. Above 95% is excellent. If placement falls below 80%, stop your campaign and investigate before sending more emails.
For a deeper comparison of testing tools, I reviewed 9 inbox placement tools with their features and pricing.
Step 3: Check Your Spam Score
Even with clean authentication and a good reputation, your email content can trigger spam filters. A spam score test analyzes your subject line, body text, links, formatting, and HTML structure.
Common triggers include phrases like “Buy now,” “Act fast,” or “Free offer.” Too many links in one email also raises suspicion. Heavy HTML formatting, large images, or attachments push cold emails toward spam. ALL CAPS in subject lines is another frequent flag.
How to check: Saleshandy’s free Email Spam Checker lets you test your content against spam filters. It checks SPF, DKIM, and DMARC, runs a SpamAssassin analysis, and shows your inbox placement across Gmail, Outlook, and Yahoo. No live campaign needed. Mail Tester is another free option. You send a test email to their address, and it returns a spam score out of 10 in under a minute.
It checks SPF, DKIM, and DMARC, runs a SpamAssassin analysis, and shows your inbox placement across Gmail, Outlook, and Yahoo. No live campaign needed.
Mail Tester is another free option. You send a test email to their address, and it returns a spam score out of 10 in under a minute.
What to aim for: Keep your SpamAssassin score below 5. If your score is higher, review your content for trigger words. Reduce links and switch to plain-text formatting.
For cold email specifically, keep messages short (under 125 words). Use plain text and personalize beyond just the first name.
Step 4: Check Blacklists
If your sending domain or IP ends up on a blacklist, your emails may never reach inboxes. There are over 100 global blacklists. Being on even one can significantly reduce your visibility.
The tricky part is that you might not know you are blacklisted. Most senders only find out after campaign performance drops sharply.
How to check: MxToolbox’s blacklist lookup checks your domain and IP against all major blacklists in seconds. Spamhaus is another reliable source for checking blocklist status. Inbox Radar also includes blacklist checks in its deliverability report.
What to do if you are blacklisted: Each blacklist has its own removal process. Most require you to submit a delisting request. You will need to demonstrate that the issue causing the listing has been resolved.
After delisting, do not jump back to full-volume sending. Warm up your domain gradually before resuming outreach.
Step 5: Monitor Sender Reputation
Your sender reputation is a score that inbox providers assign based on your sending history. It factors in bounce rates, spam complaints, engagement rates, and authentication status.
A strong reputation means more emails in the inbox. A damaged reputation means more emails in spam. This happens even if your content is clean.
How to check: Google Postmaster Tools is the best free resource for monitoring Gmail reputation. It shows your domain reputation, spam rate, and authentication results over time. Microsoft SNDS provides similar insights for Outlook and Hotmail.
What to aim for: Google categorizes domain reputation as High, Medium, Low, or Bad. You need High. If your reputation is Low or Bad, reduce sending volume immediately. Clean your email list and focus on engagement before scaling again.
To understand reputation in depth, read the complete email deliverability guide.
Step 6: Test Email Content Before Sending
Beyond spam score, test how your actual email reads and renders before launching. Small content issues can hurt deliverability even when your technical setup is perfect.
Start with your subject line. Does it sound natural or salesy? Spam filters are getting better at detecting promotional language. Keep it conversational and specific.
Next, check your email body. Is it personalized beyond “Hi {{First Name}}”? Are there too many links? For cold emails, stick to 1 or 2 links maximum. Avoid images and attachments in the first email.
Saleshandy’s A-Z testing lets you test up to 26 variants of subject lines, email body, and CTAs. This prevents spam filters from flagging repetitive content across large campaigns.
Quick manual test: Send a test email to yourself at Gmail, Outlook, and Yahoo. Open “Show Original” or “View Message Source” to manually check SPF, DKIM, and DMARC results directly in the headers.
Step 7: A/B Test a Small Segment Before Full Sends
Even after all technical checks pass, send to a small segment of your list first. This is your final safety net before full-scale outreach.
How to do it: Send to 10-20% of your list. Track bounce rate, open rate, and spam complaints for that batch.
If your bounce rate stays under 2% and you see no spam complaints, proceed with the full list. If the segment shows issues, pause and re-test your configuration or list quality.
Saleshandy’s Email Verifier helps you clean your list before sending. Keeping bounce rates under 2% is critical for protecting sender reputation long term.
5 Best Email Deliverability Testing Tools
I have tested multiple deliverability tools over the years. These five consistently deliver accurate results for cold email teams.
1. Inbox Radar by Saleshandy
Inbox Radar sends your emails to real B2B seed inboxes across Gmail, Outlook, Yahoo, Zoho, and other providers. It shows exact placement percentages per provider, whether primary inbox, spam, promotions, or undelivered.
Every test also checks SPF, DKIM, and DMARC status, runs a SpamAssassin content analysis, and scans for blacklists. The ESP-to-ESP Placement Report is especially useful. It shows how your email performs when sent from one provider to another (e.g., Gmail to Outlook).
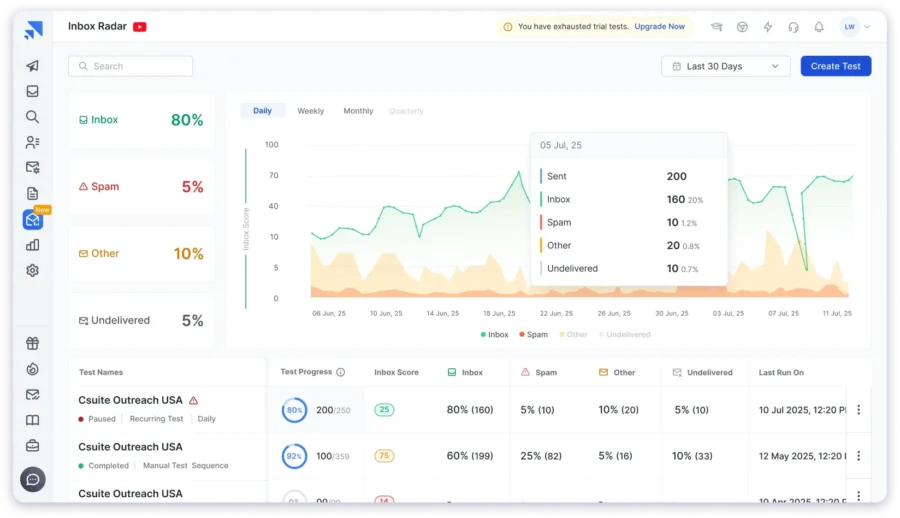
You can run manual, recurring (daily/weekly/monthly), or external tests. Recurring tests include auto-pause triggers that stop campaigns if placement drops below your threshold. Every report generates a shareable link for your team or clients.
Best for: Cold email teams, outbound reps, and agencies managing multiple client campaigns.
Pricing: Add-on starting at $34/month (annual billing) for 120 inbox placement tests/month.
2. MxToolbox
MxToolbox is a free diagnostic platform for email infrastructure health. It verifies SPF, DKIM, and DMARC records, runs SMTP diagnostics, and scans your domain and IP against 100+ blacklists. Results load in seconds without needing an account.
The free plan includes one blacklist monitor tracking 30 blacklists. The deliverability test lets you send an email to their test address and receive a report on headers, blacklist reputation, and authentication compliance.

Paid plans unlock ongoing monitoring, inbox placement analysis, DMARC reporting, and feedback loop integration. The interface feels dated, but the diagnostic depth is hard to match for free.
Best for: Technical teams needing fast, free DNS and blacklist checks. Enterprises need ongoing DMARC management.
Pricing: Free for basic lookups. Delivery Center at $129/month. Delivery Center Plus at $399/month.
3. Mail Tester
Mail Tester gives you a spam score out of 10 within a minute. You send an email to their unique test address, and it analyzes your content, authentication, blacklist status, and server configuration.
No account needed. No setup. Just send and get results. The report highlights specific content issues that might trigger spam filters, like risky words, formatting problems, or missing authentication records.
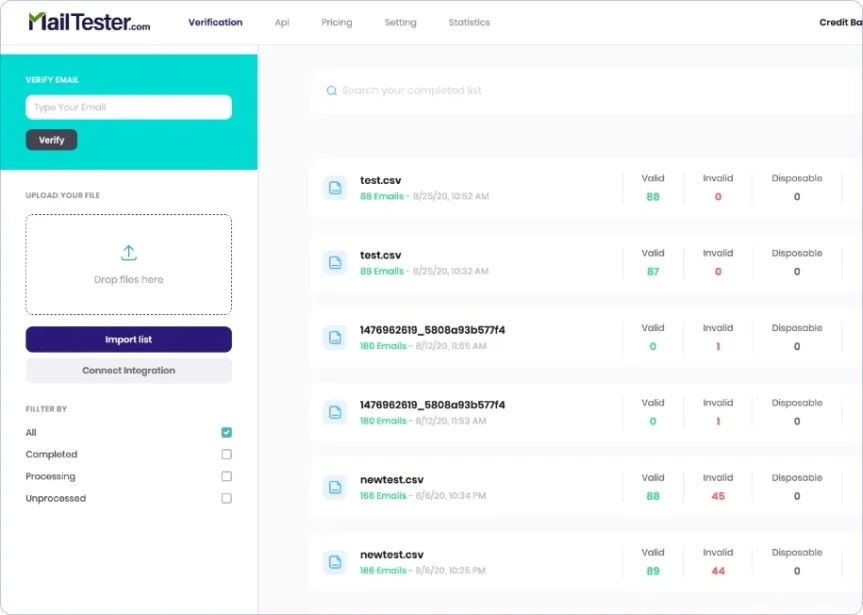
The free plan restricts daily test volume. No recurring tests or monitoring dashboard. It is purely a point-in-time snapshot of your deliverability health.
Best for: Individual senders or small teams needing a quick spam check before launching.
Pricing: Free for limited daily tests. Paid plans for higher volume.
4. GlockApps
GlockApps tests inbox placement across 70+ ISP seed addresses, including Gmail, Outlook, Yahoo, and regional providers.
It shows where emails land (inbox, spam, promotions, or missing) alongside a detailed content and authentication analysis.
The platform also includes DMARC analytics, uptime monitoring, and IP reputation tracking.

Its Inbox Insight feature flags specific issues and suggests fixes, saving time on diagnosis. Reports can be shared via email, Slack, or Telegram.
Pricing uses a credit-based model. The free plan gives 2 spam test credits. Bundle plans (annual) include spam testing, DMARC monitoring, and IP tracking.
Note: bundle plans are limited to 1 sending account until higher tiers.
Best for: Email marketers and newsletter senders needing detailed placement testing with DMARC monitoring.
Pricing: Free plan with 2 test credits. Essential at $59/month (annual). Growth at $99/month. Enterprise at $129/month.
5. Google Postmaster Tools
Google Postmaster Tools is a free dashboard from Google that tracks your domain reputation, spam rate, delivery errors, and authentication pass rates specifically for Gmail.
It categorizes your domain reputation as High, Medium, Low, or Bad.

It also shows your spam rate, which Google uses as a key filtering signal. If your spam rate exceeds 0.3%, Gmail will aggressively filter your emails to spam.
The limitation is Gmail only. No data on Outlook, Yahoo, or other providers. Requires domain ownership verification before accessing data. But for anyone targeting Gmail recipients, there is no substitute.
Best for: Any sender targeting Gmail recipients who need ongoing reputation monitoring.
Pricing: Completely free. Requires domain verification.
For a more detailed comparison, I reviewed email deliverability tools with features, pricing, and real test results.
How to Read and Fix Your Test Results
Running the test is only half the job. Here is what to do when results flag specific problems.
1. Fix Authentication Failures
If SPF, DKIM, or DMARC show “Fail,” your DNS records need attention. Log in to your domain registrar and update the records based on your email provider’s documentation.
Authentication issues are the most common reason for emails getting blocked entirely. A single misconfigured record can affect every email you send from that domain.
I wrote a complete step-by-step authentication setup guide to walk you through the fix.
2. Fix High Spam Scores
If your spam score is above 5, the issue is almost always in your email content. Review your subject line and body for salesy phrases. Reduce the number of links to 1 or 2 maximum.
Avoid large images, attachments, and heavy HTML formatting. Switch to plain text for cold outreach. Use Saleshandy’s Spam Checker to re-test after making changes.
Small adjustments often make a big difference. I have seen teams drop from a spam score of 7 to 2 just by removing one link and rewriting the subject line.
3. Fix Blacklist Listings
If your domain or IP is blacklisted, submit a delisting request to the specific blacklist operator. Each one has its own process and timeline for removal.
After delisting, do not resume full-volume sending right away. Your reputation is still fragile at that point. Warm up your domain over 2-4 weeks before scaling back to your normal sending volume.
4. Fix Low Inbox Placement Rates
If inbox placement is below 80%, the root cause is usually one of three things. Poor authentication, bad sender reputation, or spammy content. Work through Steps 1 through 6 above to find the exact issue.
If reputation is the problem, reduce your daily sending volume. Clean your list with Saleshandy’s Email Verifier. Focus on getting genuine replies from engaged prospects before scaling back up.
5. Fix Low Sender Reputation
Check Google Postmaster Tools for your domain reputation rating. If it shows “Low” or “Bad,” reduce sending volume significantly. This is not the time to push more emails.
Clean your email list and remove invalid addresses. Focus only on high-quality, personalized outreach to engaged prospects. Reputation recovery typically takes 2-4 weeks of consistent, clean sending behavior.
When Should You Run a Deliverability Test?
Here are the situations where testing is not optional.
- Before launching a cold email campaign. Confirm your setup is clean before sending to real prospects. A quick test takes 15 minutes and can prevent weeks of wasted outreach.
- After setting up a new domain or email account. New senders need to verify authentication and warm-up status before running any campaign.
- If open or reply rates suddenly drop. A sudden decline usually means your emails are landing in spam. Testing reveals exactly where the problem is.
- After changing email tools, CRMs, or domain settings. Any backend change can affect deliverability. Even small changes to DNS records or SMTP settings can cause issues.
- On a regular schedule. I recommend weekly tests if you send emails daily. For a deeper audit, follow this email deliverability audit process.
A Quick Email Deliverability Testing Checklist
Use this checklist every time you test.
- Verify SPF, DKIM, and DMARC records are passing
- Run an inbox placement test across Gmail, Outlook, and Yahoo
- Check your spam score (aim for under 5 on SpamAssassin)
- Scan your domain and IP against major blacklists
- Review sender reputation in Google Postmaster Tools
- Test your email content for spam triggers
- Send to a small segment (10-20%) before full launch
Run through this before every campaign. It takes 15 minutes and can save weeks of wasted outreach.
Start Testing Your Deliverability Today
Email deliverability is not something you set up once and forget. Inbox providers update their filters constantly. What worked last month might land in spam today.
The testing workflow above covers every factor that affects where your emails land. Authentication, inbox placement, spam score, blacklists, reputation, content, and list quality.
Start with Step 1 and work through each step before your next campaign. If you want the fastest path, use Saleshandy’s Inbox Radar to run a full placement test in minutes.
The difference between a 60% inbox rate and a 95% inbox rate is not luck. It is testing.
FAQs on Email Deliverability Testing
1. How can I test my email deliverability for free?
You can use Saleshandy’s free Email Spam Checker to test inbox placement, authentication, and spam score at no cost. Mail Tester and Google Postmaster Tools are also free options for basic deliverability checks.
2. What is a good email deliverability score?
A good deliverability score is above 85%. Anything near or above 95% is excellent. This depends on your email account setup, content quality, and how clean your contact list is.
3. How often should I test email deliverability?
Test weekly if you send emails regularly. Always test before launching a new campaign. Also, test after making changes to your email content, domain, or sending setup.
4. What causes emails to fail deliverability tests?
The most common causes are missing or misconfigured authentication (SPF, DKIM, DMARC). Blacklisted domains or IPs, spammy email content, high bounce rates from unverified lists, and poor sender reputation are also frequent culprits.
5. What is the difference between email delivery and email deliverability?
Email delivery means the recipient’s server accepted your email. It does not tell you where the email landed. Email deliverability tells you whether the email reached the primary inbox, promotions tab, or spam folder. You can have 100% delivery but only 60% deliverability if 40% of emails land in spam.
6. What is inbox placement testing?
Inbox placement testing sends your email to seed inboxes across multiple providers (Gmail, Outlook, Yahoo). It checks exactly where each email lands and gives you a percentage breakdown of inbox vs. spam vs. undelivered per provider. Tools like Saleshandy’s Inbox Radar automate this entire process.