Cold outreach isn’t just about sending the first email; it’s about sending the right follow-up, at the right time, based on how your prospects respond.
Until now, if you wanted to send behavior-based follow-ups, you had to manage them manually, export prospects from one sequence, filter them, tag them, and import them into another. It took time and effort, and let’s be honest, it was easy to mess up.
Today, that changes.
We’re excited to introduce Subsequences a powerful new way to automate intelligent, condition-based follow-ups directly within your sequences.
What is Subsequence?
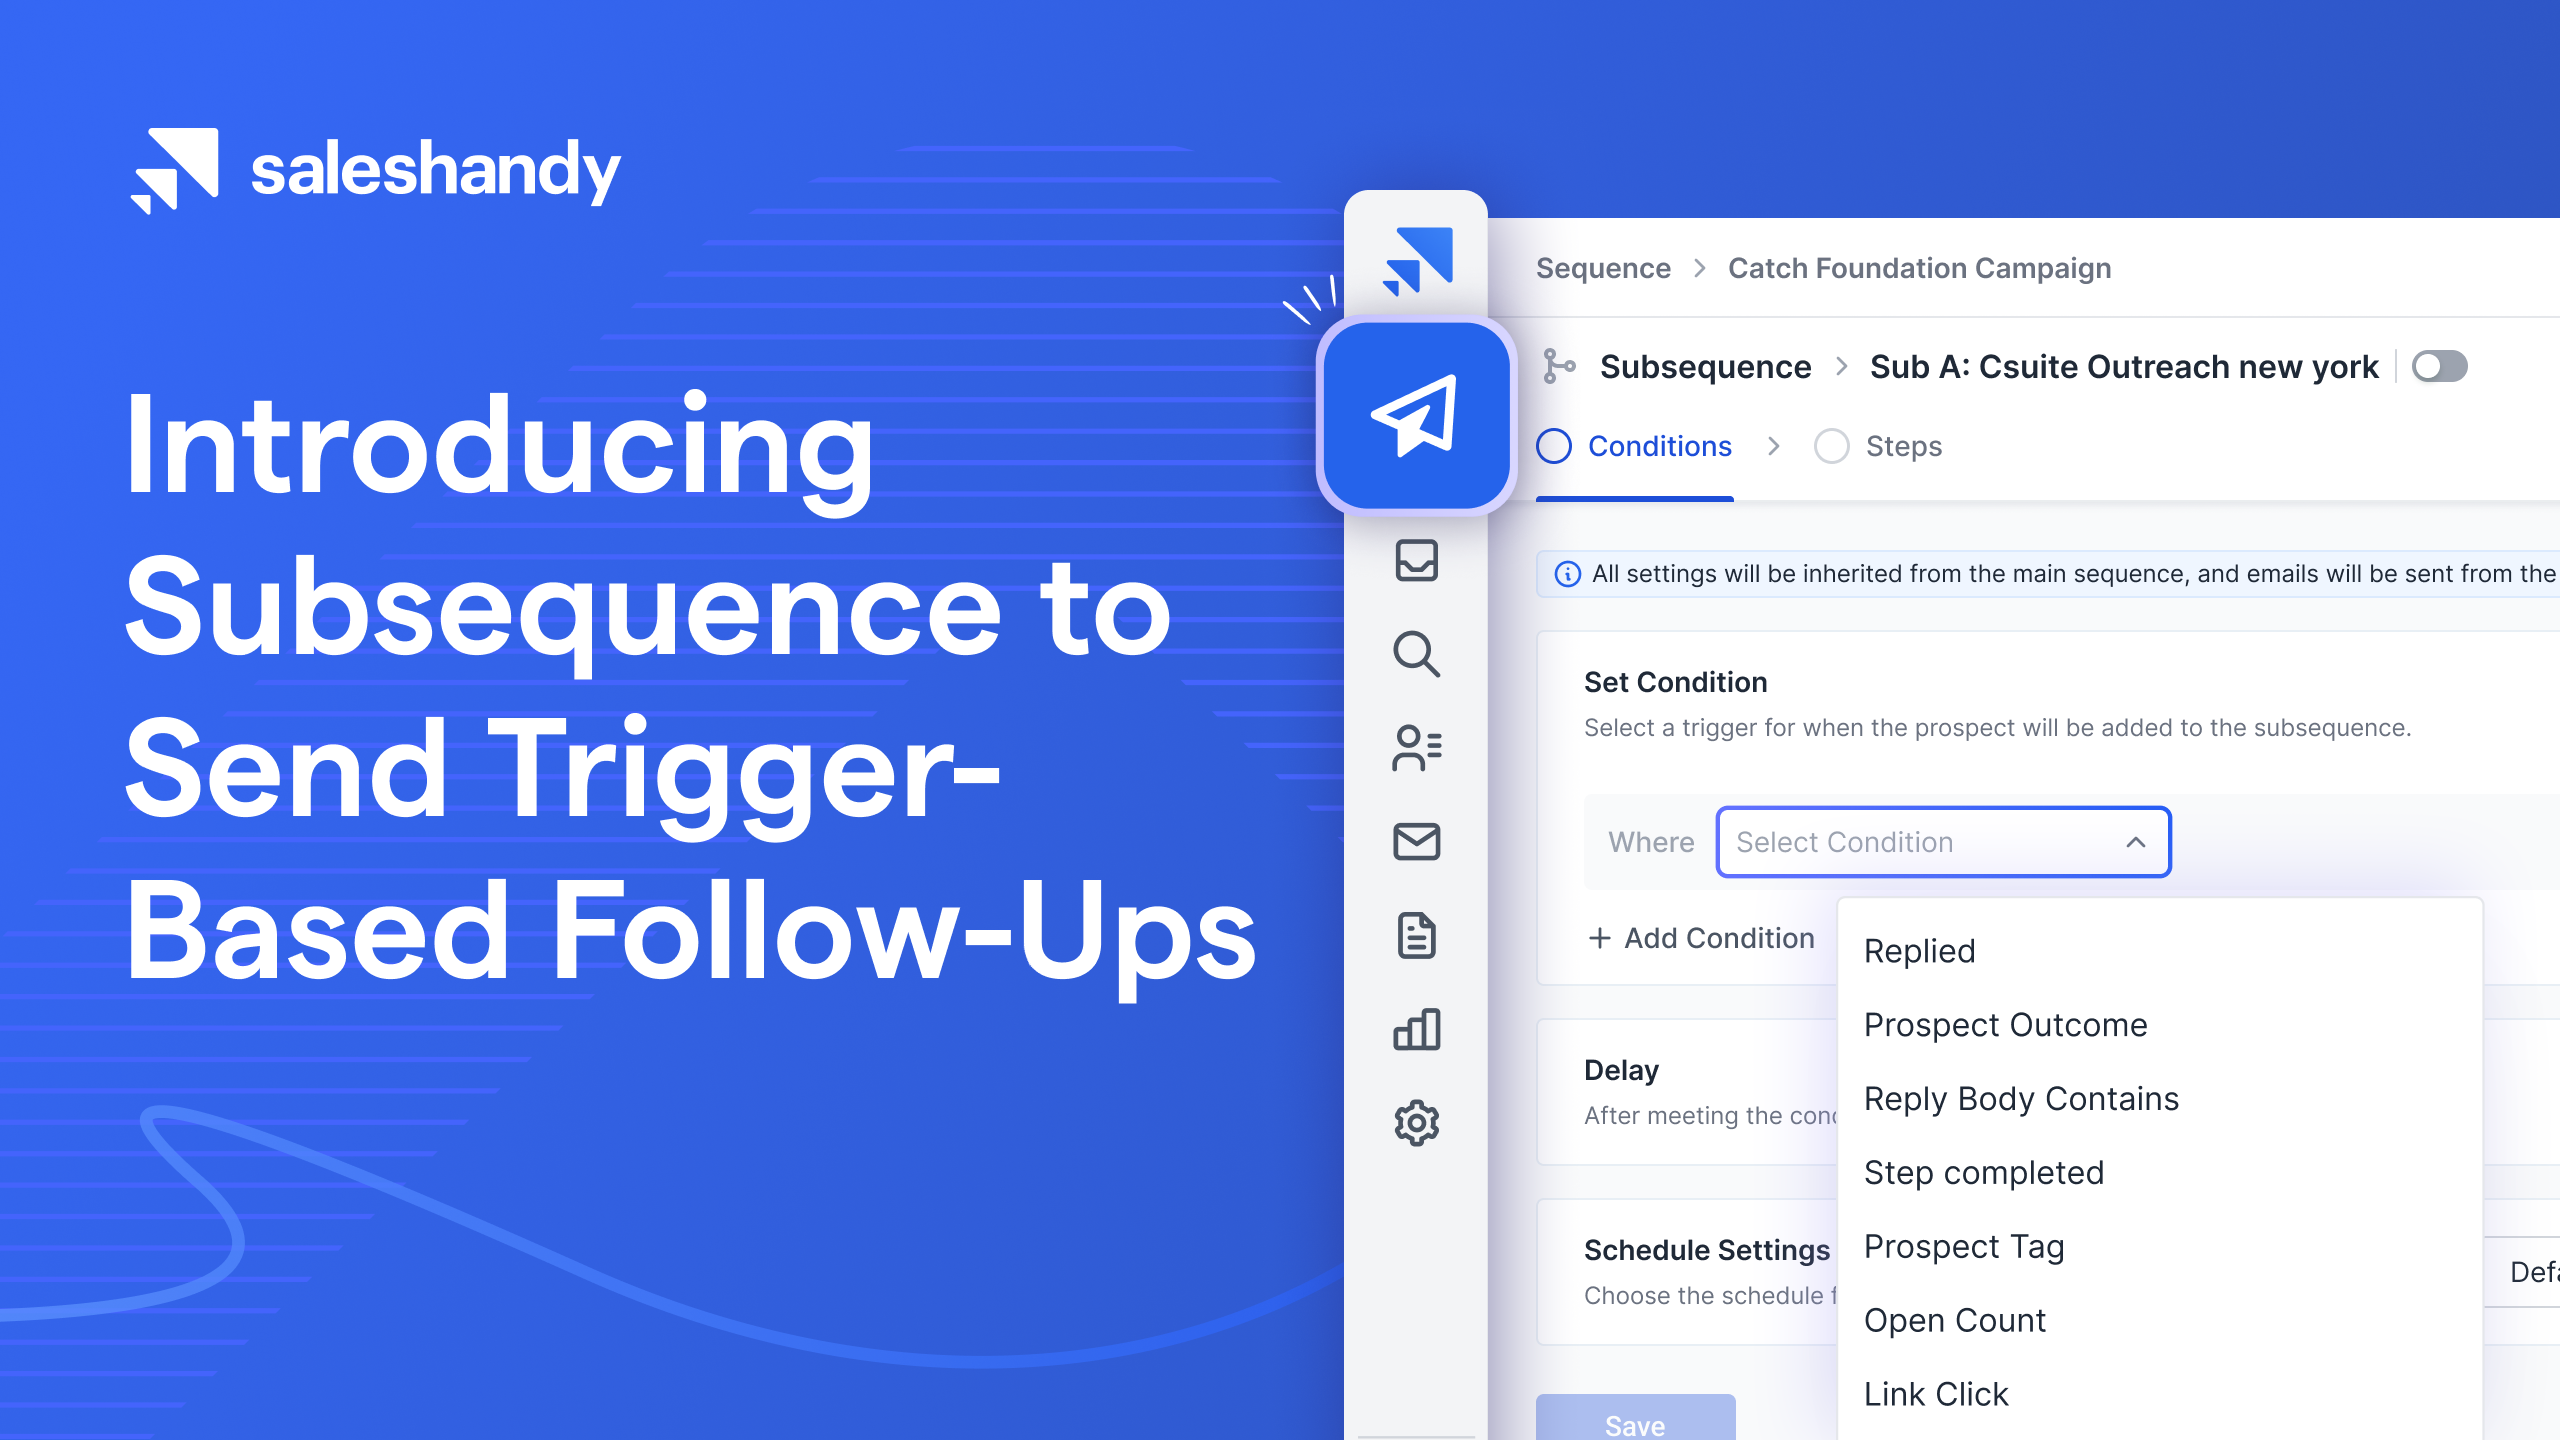
A Subsequence is an automated follow-up path inside your main sequence that gets triggered when certain conditions are met, like opens, clicks, replies, tags, or outcomes.

Think of it as a branching flow within a sequence.
Each Subsequence can have its emails, delays, schedules, and multichannel steps—all sent from the same sender account as the parent sequence and tracked under the parent sequence.
You control the logic. Subsequence handles the execution.
Here are just a few examples of how users are already planning to use Subsequence logic:
- Auto-nurture warm leads:
If replied = interested → Wait 1 day → Add to value subsequence - Re-target high-engagement prospects:
If open count > 5 AND tag = ICP → Add to follow-up subsequence - Follow-ups based on sentiment:
If reply outcome = not interested, → Start a gentle re-engagement subsequence. - Handle multi-language leads:
If tag = French → Route to French-language subsequence
Why you should use Subsequences in your Cold Email
1. Only Follow up with Warm Leads
Trigger conditions:
- Prospect replied -Their reply includes keywords like “interested”, “pricing”, “schedule”
Why use it:
When someone replies showing clear buying intent, you want to follow up fast but with the proper context.
This Subsequence can automatically send your next step (like a meeting link, case study, or product deck) only to people who are ready to move forward. There is no need to manually sort through replies.
Pro tip: Use this to personalize your high-intent flow — include tailored next steps based on keywords like “integration” or “budget”.
2. Nudge the Silent but Curious Ones
Trigger conditions:
- Opened the email 3 or more times
- Didn’t click any link
- Not reply yet
Why use it:
Some people won’t reply, but keep coming back to the email. They’re interested — just not ready. With this Subsequence, you can send a softer, low-pressure nudge, like:
“Saw you had a chance to check this a few times — happy to answer any questions or share more info!”
Perfect for re-engaging without being pushy.
Pro tip: Add a 2–3 day delay after the last open to give them space before you follow up.
3. Send Different Follow-ups based on Tags
Trigger conditions:
- Prospect is tagged as “High Value”, “Not Now”, “Demo Booked”, etc.
Why use it:
Tags let you segment leads based on internal workflows, integrations, or manual inputs. With Subsequences, you can automatically trigger relevant emails, like a nurture sequence for “Not Now” leads or a prep email for “Demo Booked” ones.
Pro tip: Combine tags with other conditions like “Clicked on Demo Link” for extra control.
4. Based on the Outcomes your Team Sets
Trigger conditions:
- A manual outcome is assigned, like “Interested – Follow Up Later” or “No Response.”
Why use it:
Sometimes your SDRs or AEs manually mark a lead based on a call or email. Instead of creating separate sequences, use a Subsequence to continue the flow from where they left off — automatically.
Example: Outcome = “Follow up in 2 weeks” → Subsequence waits 14 days and sends a check-in email.
Pro tip: Pair outcomes with delays to match the follow-up timing your reps commit to.
5. Continue only After a Certain Step is Sent
Trigger conditions:
- Step 3 (or any step) was successfully sent
Why use it:
You might want to wait for a certain email to go out before triggering a new thread or direction. Maybe Step 3 is a value-heavy email, and only after that, you want to send a separate case study or testimonial series.
Pro tip: Use this when you want to add a parallel nurturing stream that picks up only after specific moments in the journey.
6. Follow up with Highly Engaged Prospects
Trigger conditions:
- Opened the email 5+ times
- Clicked a specific link
Why use it:
If someone opens and clicks, they are very likely evaluating you seriously. Set up a Sequence to drop them into a more aggressive CTA path, like asking if they want to chat or offering a time slot directly.
You’re meeting them where their intent is highest — no extra effort needed.
Pro tip: Include dynamic content, such as “Since you’ve checked out our pricing, here are a few ways we can help reduce your cost per lead…”
Bonus: Combine Multiple Conditions for Deeper Targeting
You can stack these conditions to fine-tune who enters each Subsequence. For example:
Prospect replied AND reply contains “not now” AND has tag “ICP”
This kind of logic helps you run complex automations without the complexity — just set it and let it run.
How to Create a Subsequence in Saleshandy
Step 1: Start with a Sequence
- Create or open an existing Sequence.
- Add the first step (email or task).
- Once the first step is added, the Subsequence tab will be enabled.
Step 2: Open the Subsequence Tab

- Click the Subsequence tab within the Sequence.
- You’ll see a list of all existing Subsequences tied to this parent sequence.
- You can view, clone, or disable any of them.
Step 3: Click ‘Create New Subsequence’
- You’ll enter a new tab with two options:
- Settings
- Steps
Step 4: Configure Settings
- Add conditions (all work using AND logic):
- Open count
- Click URL
- Replied
- Finished
- Outcomes
- Reply Body Keywords
- Step Completed
- Prospect Tags

- Set a delay (in days) to wait after the rule is met before sending the first step.
- Choose a schedule (defaults to the parent sequence but can be changed).
- Tracking logic:
- If click/open tracking is OFF in the parent, relevant condition options will be disabled with a tooltip.
Step 5: Add Steps

- Once settings are saved, go to the Steps tab.
- Add your email or task steps.
- Subject lines in the first step can be empty (to stay in the same email thread).

- Use merge tags and variables as usual.
- You can add Multi-channel tasks if you have enabled multichannel from the profile tab.
Step 6: Save & Activate
- Save your Subsequence.
- You can enable/disable it anytime.
- Only one instance of a prospect can exist in a Subsequence.
- Engagement data from the Subsequence will be reflected in the Subsequence tab adjacent to a particular subsequence.
Important:
- Full Rule Match – Prospects enter the subsequence immediately after they meet all the defined conditions.
- Delay Before Action – The delay sets how long after entry, the first step will be triggered.
- Condition Re-check – Each step rechecks the conditions; if no longer met, the prospect is marked finished.
- Entry to Other Subsequence– A prospect can enter a new subsequence once their status in the current one is Completed, Finished, or Inactive.
- Subsequence Takes Over – Prospects will not receive any more steps from the parent sequence after entering a subsequence.
- Link Tracking: If link tracking is not enabled in sequence settings, you won’t be able to set the link tracking trigger condition.
- Prospect in Sequence: The prospect will move into subsequence as soon as the conditions are met, without any system delays to ensure targeted outreach.
- Email accounts: The subsequence will always be in the same thread and from the same email account as the parent sequence.
- Once a prospect has entered any subsequence, he can’t return to the parent sequence.
- A prospect can move from one subsequence to another, provided his status is finished or completed in the current subsequence.
Ready to Build Smarter, Faster, and More Personal Follow-Ups?

Subsequences are more than just a new feature — they’re a smarter way to run outreach. Whether you’re scaling outbound campaigns, personalizing nurture tracks, or syncing better with sales, this feature gives you precise control over what happens next in your prospect’s journey.
- No more missed opportunities.
- No more manual tagging.
- No more missed follow-ups.
With Subsequences, your outreach becomes adaptive, dynamic, and deeply relevant, exactly how modern B2B selling should be.